removal

How to Remove Gel Nails Safely at Home

With the right techniques and tools, you can effectively remove gel nails at home without causing damage to your natural nails. This guide will walk you through the imperative steps to ensure a safe and efficient removal process, allowing you to enjoy beautiful, healthy nails. You’ll learn how to prepare your nails, what products to use, and tips for aftercare, ensuring your nails remain in optimal condition. Follow these instructions carefully, and you can achieve salon-quality results from the comfort of your home.

Key Takeaways:

  • Soak your nails in acetone or a gel nail remover to break down the gel polish effectively.
  • Gently file the top layer of gel polish before soaking to accelerate the process and reduce time.
  • Moisturize your nails and cuticles afterward to restore hydration and prevent damage.

Understanding Gel Nails

While gel nails have become a popular choice for their durability and glossy finish, it’s necessary to understand what they are and how to remove them properly. Gel nails are a type of artificial nail enhancement that requires curing under a UV or LED lamp, allowing them to bond strongly to your natural nails. This strength and flexibility make them appealing, but it also means that improper removal can lead to damage to your natural nails.

What Are Gel Nails?

Nails are coated with a special gel that hardens when exposed to UV or LED light, creating a long-lasting and shiny finish. This type of nail enhancement comes in various colors and designs, making it a favorite among those looking for both beauty and durability in their nail care routine.

Why Gel Nails Need Proper Removal

Before attempting to remove gel nails, it’s important to understand the potential damage that can occur from improper techniques. Without the correct approach, you could end up weakening your natural nails, causing peeling or breakage. Proper removal methods help preserve the integrity of your nails and ensure they remain healthy after the gel is off.

What you might not realize is that the way gel nails bond to your natural nails can lead to some difficulties during removal. The gel formula is designed to adhere strongly, which can create challenges if not handled correctly. Choosing the right removal method, such as soaking or using specific tools, is vital to ensure your nails stay intact and healthy. Always take your time and follow through with the steps to avoid any unwanted damage.

Tools Required for Safe Removal

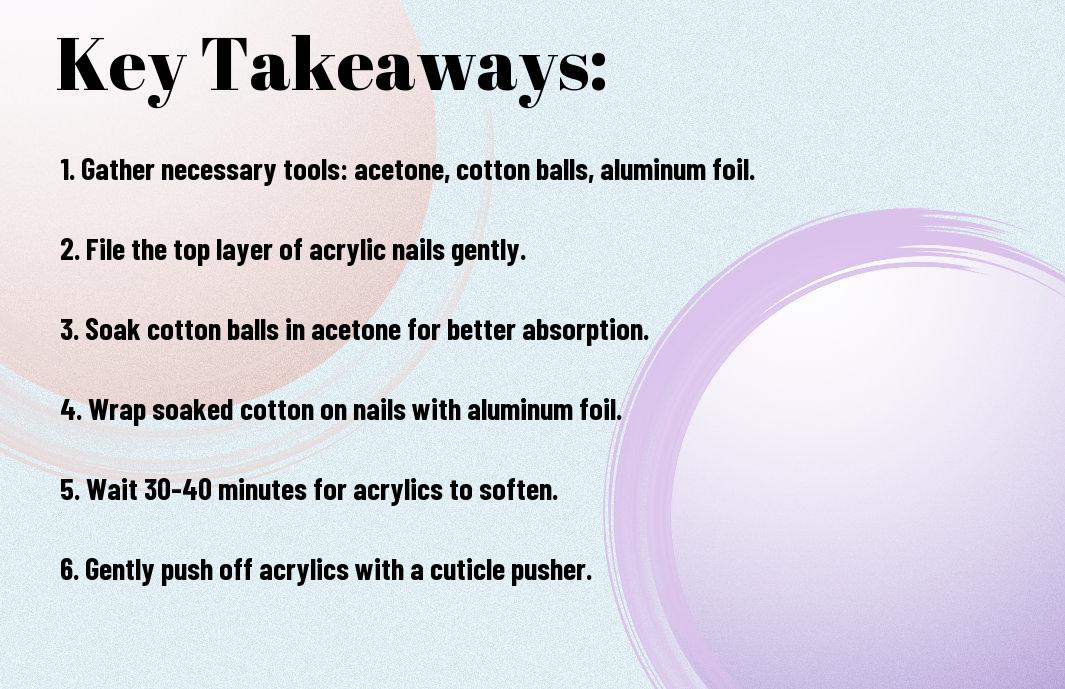
Some imperative tools will make your gel nail removal process easier and safer at home. You’ll need acetone, cotton balls, aluminum foil, a nail file, and a cuticle pusher. If you’re looking for more detailed guidance, check out How Do I remove Gel Nail-polish at home? for tips from fellow enthusiasts.

Essential Items

For a successful gel nail removal, ensure you have acetone, which acts as the solvent to break down the gel, cotton balls for application, and aluminum foil to wrap them. A nail file and cuticle pusher are also necessary to gently buff and push back any remaining gel residue from your nails.

Optional Accessories

Items like a nail buffer, hydration oils, and a manicure set can enhance your gel removal experience, but they aren’t mandatory. A nail buffer can smooth out any roughness after you’ve removed the gel, while hydration oils can restore moisture to your nails and cuticles.

Plus, having a manicure set on hand can be helpful if you want to tidy up your nails post-removal. These accessories allow you to pamper your hands, making the entire process not just practical but also enjoyable. Socializing with friends for a DIY nail care session can add a fun twist to this routine. Make sure to take the time to care for your nails after removal to keep them healthy and strong.

Step-by-Step Guide to Remove Gel Nails

Now, let’s walk through the process of safely removing your gel nails at home. Follow these important steps to ensure a smooth and hassle-free experience:

StepsDescription
1. Preparing Your WorkspaceSet up a clean area with all your tools ready.
2. Soaking ProcessSoak your nails to break down the gel polish.
3. Gentle Removal TechniquesCarefully remove the gel without damaging your nails.

Preparing Your Workspace

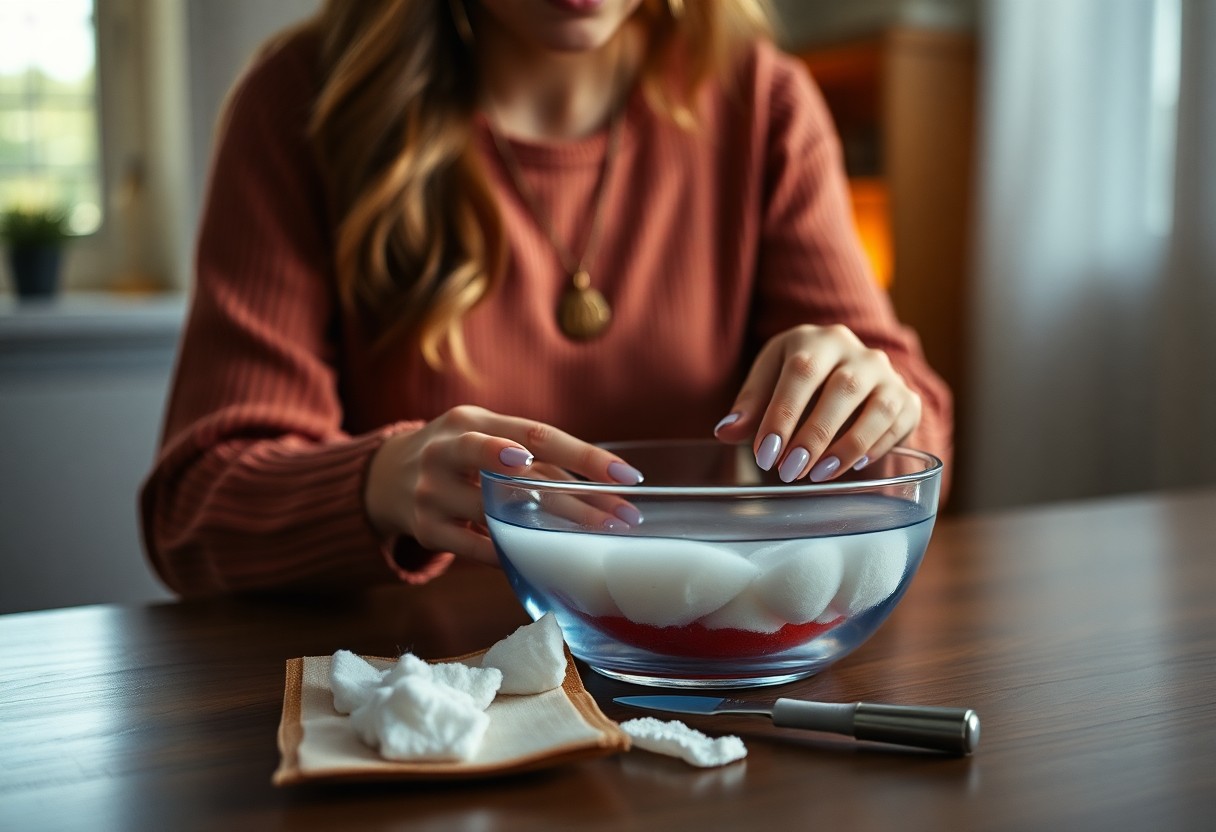
With a proper workspace setup, you can ensure a smooth removal process. Choose a well-lit area and lay down a towel or old newspaper to catch any spills. Gather all necessary tools such as cotton balls, acetone, aluminum foil, and a cuticle pusher for easy access.
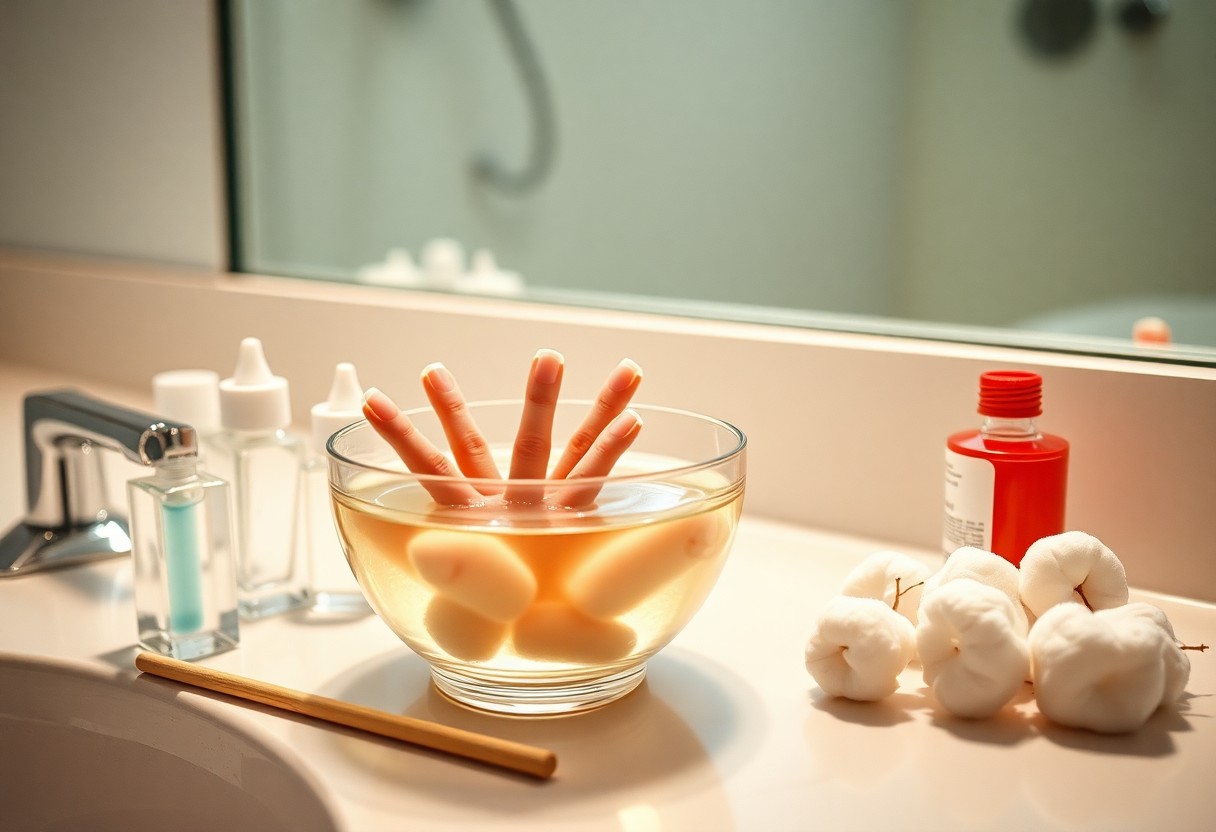
Soaking Process

Below, you will learn how to successfully soak your nails to loosen the gel polish. This step is vital for easing the removal and minimizing damage to your natural nails.

Soaking your gel nails in acetone is the most effective method to dissolve the polish. Soak cotton balls in acetone and place them on each nail, wrapping them in aluminum foil to maintain moisture and heat for 10-15 minutes. This allows the acetone to penetrate the gel, making it easier to lift off without excessive scrubbing.

Gentle Removal Techniques

Techniques for removing gel nails should prioritize the health of your natural nails. Use a cuticle pusher to gently scrape away the softened gel after soaking.

Removal of gel nails requires a light touch to ensure you don’t damage your natural nails. Once the gel has softened, gently push off the remnants with a cuticle pusher, taking care not to force anything. If there are stubborn areas, you can repeat the soaking process or use a buffer, always being cautious to preserve your nail’s integrity.

Aftercare for Your Natural Nails

Unlike the brief indulgence of gel nails, caring for your natural nails after removal is imperative to maintain their health and appearance. Gel nails can leave your natural nails weakened, so prioritize aftercare routines that support recovery. Implementing good habits now will ensure your nails grow stronger, and more resilient, ultimately allowing your natural beauty to shine through.

Nourishing Your Nails

Between treatments, it’s beneficial to nourish your nails and cuticles with oils and creams. Look for products rich in vitamin E, jojoba oil, or almond oil. Regular application will help restore moisture and elasticity, promoting healthier nail growth.

Avoiding Damage

Your nails are particularly vulnerable right after removing gel nails, so take steps to avoid unnecessary trauma. Gently trim and file any rough edges, but steer clear of aggressive filing or biting. Proper care will minimize the risk of splits or breaks, allowing your natural nails to recover fully.

Another way to avoid damage is to limit exposure to harsh chemicals and prolonged water immersion. Wearing gloves while cleaning and using gentle nail products can significantly benefit the health of your nails. Additionally, maintain a balanced diet rich in vitamins and minerals to support strong nail growth from within.

Common Mistakes to Avoid

After deciding to remove your gel nails at home, it’s important to steer clear of certain missteps that could cause damage to your natural nails or prolong the process. Avoiding these common mistakes will help ensure a safer and more effective removal experience, allowing your nails to stay healthy and looking their best.

Rushing the Process

Across many nail care routines, eagerness can lead to hasty decisions. When removing gel nails, rushing can cause harm to your nails, potentially causing splits or tears. Take your time and follow each step carefully to prevent unnecessary damage.

Using Non-Safe Products

For optimal nail health, you must use the right products when removing gel nails. Using harsh solvents or non-acetone removers can strip your nails of their natural moisture and integrity.

This is why it’s important to choose products specifically formulated for gel removal. Look for acetone-based removers that are gentle and effective or nail wraps that are designed to break down the gel safely. Always read the labels and choose reputable brands to ensure you’re protecting your nails throughout the process.

When to Seek Professional Help

Many people may find themselves in situations where removing gel nails at home becomes challenging. If you experience significant discomfort, excessive time spent trying to remove them, or are uncertain about the process, it’s best to consult a professional. They can safely remove your gel nails and provide any necessary care for your natural nails to prevent further damage.

Signs You Need Assistance

Seek immediate help if you notice signs such as persistent pain, bleeding, or infection. If the gel nails are lifted but won’t budge, trying to force them off could lead to serious nail damage or injury. Your well-being should always come first, so don’t hesitate to reach out for professional support if needed.

Finding a Qualified Technician

Seek a reputable nail technician who specializes in gel nail services. Look for technicians who have positive reviews, proper certifications, and experience in gel nail removal. You can often find recommendations through friends or beauty forums, ensuring they have a good track record with safe practices.

The right technician will not only remove your gel nails safely but can also offer helpful advice for maintaining your nails afterward. Prioritize finding someone who takes hygiene seriously and provides a comfortable environment. Little research can make a significant difference in your experience and the health of your nails.

Final Words

To wrap up, safely removing gel nails at home requires patience and the right techniques. Start by gathering acetone, cotton balls, aluminum foil, a nail file, and cuticle oil. Ensure you soak your nails adequately, gently file the surface, and follow up with moisturizing treatments for your cuticles. By taking your time and using the proper methods, you can protect your natural nails while achieving a clean gel removal. With these steps, you can confidently handle gel nail removal at home, ensuring your nails remain healthy and beautiful.

FAQ: How to Remove Gel Nails Safely at Home

Q: What supplies do I need to remove gel nails at home?

A: To remove gel nails safely at home, you will need the following supplies:
– Acetone (100% pure acetone is recommended)
– Cotton balls or pads
– Aluminum foil or gel nail wraps
– Nail file or buffer
– Cuticle oil or hand moisturizer (for aftercare)

Q: What is the step-by-step process for removing gel nails?

A: The step-by-step process for removing gel nails is as follows:
1. Start by gently filing the topcoat of your gel nails to break the seal. Be careful not to file too deeply.
2. Soak a cotton ball in acetone and place it directly on each nail.
3. Wrap each finger with aluminum foil or use gel nail wraps to hold the cotton in place.
4. Allow the nails to soak for about 10-15 minutes.
5. Once the gel has softened, gently push it off using an orangewood stick or a cuticle pusher.
6. If needed, repeat the process for any stubborn spots.
7. Finish by washing your hands and applying cuticle oil or hand moisturizer.

Q: Are there any risks associated with removing gel nails at home?

A: Yes, there are some risks involved in removing gel nails at home. It’s important to avoid damaging the natural nail bed while removing the gel. Over-filing or using excessive force can lead to thin and weak nails. Additionally, acetone can dry out the skin and nails, so it is recommended to hydrate afterward. Always follow the steps carefully to minimize risks.

Q: How can I tell when the gel nails are ready to be removed?

A: Gel nails are ready to be removed when they appear dull and have softened significantly after soaking in acetone. You should be able to gently push the gel off using a cuticle pusher. If there’s still resistance, continue soaking them for a few more minutes.

Q: What can I do to care for my nails after removing gel polish?

A: After removing gel polish, it’s crucial to take care of your nails. Apply cuticle oil generously to nourish the nail bed. Additionally, consider using a strengthening nail treatment or polish to help restore the health of your nails. Stay hydrated and avoid further nail enhancements for a week to allow your natural nails to recover.

How to Safely Remove Acrylic Nails at Home

It’s crucial to know the right techniques for safely removing acrylic nails at home to avoid damaging your natural nails. With the right tools and careful steps, you can ensure that your nails stay healthy while eliminating those artificial extensions. This guide will walk you through the process, providing you with the knowledge and confidence to perform the task effectively without needing professional help. Get ready to reclaim your natural nails with these straightforward tips!

Key Takeaways:

  • Soaking Method: Use acetone or a nail polish remover containing acetone to soak your acrylic nails. This helps to break down the adhesive, making it easier to remove the nails without damage.
  • Gentle Scraping: After soaking, gently scrape off the acrylic using a wooden cuticle stick. Avoid using metal tools to prevent harming your natural nails.
  • Aftercare: Moisten your nails and cuticles with oil or lotion post-removal to nourish and restore hydration to your nails and skin.

Understanding Acrylic Nails

The acrylic nails trend continues to be popular due to their versatility and ability to enhance the beauty of your hands. These artificial nails are created by combining a liquid monomer and a powder polymer, forming a durable coating over your natural nails. This process allows for various shapes and lengths, catering to your personal style. However, while acrylic nails can be fabulous, there are times when removal becomes necessary for the health and well-being of your natural nails.

What Are Acrylic Nails?

The acrylic nails are synthetic enhancements that offer a polished appearance and can be customized to suit your aesthetic preferences. They are crafted by mixing a liquid and powder to form a hard protective layer over your natural nails. This method not only adds length but also strength, allowing your nails to withstand daily activities without breaking easily. With various colors and designs available, acrylic nails can be tailored to match your style.

Common Reasons for Removal

Below are some common reasons why you may consider removing your acrylic nails. Changes in personal style, natural nail growth, and damage to the acrylic or your underlying nail are just a few reasons. Feeling discomfort or noticing signs of lifting can also prompt you to seek removal. Maintaining the health of your natural nails is important, as excessive wear and tear can lead to further issues.

Reasons for removing acrylic nails can vary based on personal preference and nail health. You may decide to remove them if your nails have grown out significantly, as this can create an undesirable gap between your cuticle and the acrylic. Moreover, if you experience any discomfort or if the acrylic nails are at risk of breaking, it’s best to have them removed. Additionally, you might wish to switch from acrylics to a more natural nail approach or alter your nail look for a special occasion. Keeping an eye on the condition of your natural nails is necessary to ensure they remain healthy and strong.

Preparing for the Removal Process

You should take some time to prepare before attempting to remove your acrylic nails at home. This means gathering all the necessary tools and choosing a suitable environment where you can work efficiently, ensuring that you are comfortable and free from distractions. Proper preparation will not only make the process easier but will also help protect your natural nails and surrounding skin during removal.

Tools and Materials Needed

Needed for the removal process are acetone, cotton balls or pads, aluminum foil, a nail file, a wooden cuticle stick, and a bowl. Having a good pair of scissors on hand can also be useful for trimming the acrylic nails if they are particularly long. Ensure that all your tools are clean and ready to use to promote safety and hygiene.

Choosing the Right Environment

Above all, you’ll want to select a clean and well-ventilated space for removing your acrylic nails. Ideally, this should be a table where you can lay out all your tools and materials. Having good lighting will help you see what you’re doing, while a surface that is easy to clean will make cleanup after the process simpler. Avoiding damp or cluttered places will help you maintain focus and protect your belongings from any accidental spills.

At the same time, ensure that your chosen environment is free from distractions. Consider playing soothing music or keeping your phone out of reach to help you focus on the task at hand. A calm atmosphere can make the process more pleasant and allow you to execute each step with care, ultimately leading to a more successful removal of your acrylic nails.

Step-by-Step Removal Process

Once again, it’s important to follow a cautious approach when removing acrylic nails at home. Below is a structured guide to help you through the process effectively.

Step-by-Step Guide

Step 1Gather supplies: acetone, cotton balls, aluminum foil, a nail file, and a cuticle pusher.
Step 2File the top layer of the acrylic nails to break the seal.
Step 3Soak cotton balls in acetone and place them on your nails.
Step 4Wrap your fingertips with aluminum foil to hold the cotton balls in place.
Step 5Leave on for 15-30 minutes, then gently scrape off the softened acrylic.
Step 6Clean your nails and moisturize your hands.

Soaking Method

About 75% of the time, the soaking method is the preferred approach for removing acrylic nails. This method involves immersing your fingertips in acetone to dissolve the acrylic material gently. It’s a simple and effective way to tackle the adhesive without damaging your natural nails.

Nail File Method

An alternative to soaking, the nail file method can be used for quicker removal. This technique allows you to file away the acrylic layers gradually, although it requires more caution to avoid harming your natural nail beneath.

Step by step, to utilize the nail file method, start by filing the surface of the acrylic to reduce thickness. Be sure to use a coarse nail file to penetrate the layers without applying excessive pressure. Once you notice the acrylic getting weaker, carefully work your way down to the natural nail, taking breaks as needed to avoid damaging your nail bed. This method might take longer, but it lets you maintain better control throughout the removal process.

Aftercare for Your Natural Nails

To ensure the health of your natural nails post acrylic removal, it’s crucial to incorporate specific aftercare practices. Focus on nourishing and protecting your nails to promote healing and regain their strength. Maintaining a consistent regimen will help you achieve healthier, more resilient nails over time.

Moisturizing and Hydrating

Below are several ways to keep your nails and cuticles well-hydrated. Apply a high-quality cuticle oil or moisturizing cream regularly to help replenish moisture stripped away during the acrylic application and removal process. This will keep your nails flexible and prevent breakage.

Strengthening Treatments

An effective way to enhance your nail health is through strengthening treatments. Look for products specifically designed to fortify and promote growth, such as nail strengtheners and growth serums. These can provide your nails with the nutrients they need to recover quickly.

This approach often involves using formulas rich in proteins, vitamins, and crucial oils aimed at repairing any damage caused during acrylic wear. You might also consider biotin supplements to promote healthy nail growth from within. Regular use of strengthening treatments will help your nails regain their strength and resilience, ensuring they look their best in no time.

Common Mistakes to Avoid

All too often, people make avoidable mistakes while attempting to remove acrylic nails. It’s necessary to be mindful of your approach to ensure you don’t damage your natural nails or cause undue pain. Taking the right steps will lead to a more successful and safer removal process.

Rushing the Removal

Behind the urge to free yourself from acrylic nails, rushing the removal process can lead to painful consequences, including damaged nails and skin. Take your time and allow the necessary products to work effectively before moving onto the next step.

Using Harsh Chemicals

At times, damaging chemicals might seem like a quick solution for removing acrylic nails. However, using these substances can have adverse effects on your nails and skin, leading to irritation or long-term damage.

And it’s best to opt for acetone, which is widely recommended for gentle acrylic nail removal. While it effectively breaks down the acrylic material, ensure you use a pure form and avoid any products containing unnecessary additives or harsh chemicals. By sticking to safer options, you not only protect your natural nails but also maintain the health of your skin around them.

Frequently Asked Questions

Unlike what some might believe, safely removing acrylic nails at home can be straightforward with the right techniques. Many people have questions regarding the process, tools needed, and potential risks. If you’re unsure about how to start, you can find helpful guidance on how to safely remove acrylic nails at home. It’s important to approach this task carefully to maintain the health of your natural nails while ensuring a smooth removal process.

Conclusion

With this in mind, you can safely remove your acrylic nails at home by following the appropriate steps. Ensure you gather the necessary materials, soak your nails properly, and avoid aggressive methods that could damage your natural nails. By taking your time and being gentle, you can successfully remove the acrylics while maintaining the health of your nails. If you encounter any issues, don’t hesitate to consult a professional for assistance.

FAQ

Q: How can I safely remove acrylic nails at home?

A: To safely remove acrylic nails at home, start by gathering your supplies: nail file, cotton balls, acetone, foil, and a cuticle pusher. First, file the top layer of the acrylic to break the seal. Soak a cotton ball in acetone and place it on each nail, then wrap it in foil to keep the heat in. Leave it on for about 30 minutes. Once soft, gently push the acrylic off your nail using the cuticle pusher. If there’s any resistance, re-soak and wait a little longer.

Q: Is it safe to use regular nail polish remover instead of acetone?

A: Regular nail polish remover typically contains acetone but at a lower concentration. While it may work for some, it can take much longer to dissolve acrylic nails, and may not remove them completely. For the best results and faster removal, it’s advisable to use 100% acetone, which is specifically designed for dissolving acrylics.

Q: How do I prevent damage to my natural nails during the removal process?

A: To protect your natural nails, it’s important to avoid pulling or prying off the acrylic. Always follow the soaking method, as this minimizes trauma to your nails. Additionally, consider applying cuticle oil or a strengthening treatment to your nails and cuticles after the removal to help replenish moisture and encourage recovery.

Q: What should I do if the acrylic nails are not coming off easily?

A: If the acrylics are resistant to removal, do not force them off as this can cause damage to your natural nails. Instead, re-soak them by applying more acetone and wrapping the nails in foil again. If necessary, give them an extra 10 to 15 minutes to break down further. Patience is key to a safe removal process.

Q: What aftercare should I perform once the acrylic nails are removed?

A: After removing acrylic nails, it’s vital to care for your natural nails. Start by gently buffing the surface to smooth out any ridges. Consider applying a moisturizing hand cream and cuticle oil to nourish your nails and skin. Additionally, allowing some time for your natural nails to breathe before applying new enhancements is a good practice to ensure their health.

How to Apply and Remove Nail Decals Without Damage

Over the years, nail decals have become a popular way to express your personal style, but applying and removing them can sometimes be tricky. In this guide, you’ll learn the best techniques to ensure your nail decals are applied smoothly and removed without causing any damage to your natural nails. Whether you’re a seasoned pro or a beginner, these tips will help you achieve a flawless look while keeping your nails healthy. For additional insights, check out this How do I remove nail stickers without damage? source.

Key Takeaways:

  • Preparation: Ensure your nails are clean and dry before applying nail decals to promote better adhesion and a smooth finish.
  • Application Technique: Use tweezers for precise placement of the decals, pressing firmly to eliminate air bubbles and ensure they adhere well to the nail surface.
  • Seal with Top Coat: Apply a clear top coat over the nail decal to protect it from wear and tear, enhancing its longevity and appearance.
  • Gentle Removal: Soak cotton balls in acetone and press them against the decals for a few minutes, making it easier to gently peel them off without damaging your nails.
  • Aftercare: Treat your nails with moisturizers or cuticle oil post-removal to keep them healthy and prevent dryness or brittleness.

How to Apply Nail Decals

Your journey to vibrant, decorated nails starts with an easy application process. First, ensure your nails are clean and dry before stepping into the world of nail decals. A smooth canvas is vital for an impressive result, so give your nail polish time to dry before applying the decals.

Preparing Your Nails

Apply a base coat to protect your nails and ensure a longer-lasting manicure. Once it’s dry, paint your nails with your chosen polish and allow it to dry completely. This preparation step is imperative for achieving a professional-looking finish with your decals.

Choosing the Right Decals

Assuming you want your nail art to reflect your unique style, selecting the right decals is fundamental. Consider the size, design, and color of the decals to match your personal preference and nail shape.

It’s a good idea to explore a variety of themes and designs, from floral patterns to geometric shapes. Make sure the decals you choose fit your nail size well; ones that are too large can lead to an awkward appearance. Additionally, opt for high-quality materials that will adhere well and last without fading.

Step-by-Step Application Process

An effective way to apply nail decals follows a simple process:

Step-by-Step Application Process

1. Start with clean, dry nails2. Apply base coat and let dry
3. Paint with your chosen nail polish4. Choose and cut your decals if necessary
5. Peel and position the decal onto the nail6. Press down firmly and smooth out any bubbles
7. Seal with a top coat8. Let dry completely

Step-by-step application ensures you achieve a flawless finish. Apply each step deliberately, giving attention to detail for the best results. Making sure your decals are positioned correctly before sealing them with a top coat is key to longevity and maintaining their appearance.

Tips for Long-Lasting Nail Decals

Clearly, to make your nail decals last longer, follow these valuable tips:

  • Apply decals on clean, dry nails.
  • Use a top coat for added durability.
  • Avoid exposure to water for at least an hour after application.
  • Keep your hands moisturized, but avoid oils prior to application.

Knowing how to properly apply and maintain your nail decals can make all the difference. For more guidance, check out this comprehensive guide on How to Remove Nail Stickers Without Damaging Your Nails.

Avoiding Common Mistakes

While applying nail decals, you may unintentionally make mistakes that can affect their longevity. Avoid rushing the process, as this can lead to misplacement or bubbles. Ensure you smooth out every air pocket, and resist the urge to apply decals over polish that hasn’t dried completely.

Best Practices for Maintenance

While caring for your nail decals is imperative, employ these top maintenance tricks. Keep your nails protected from harsh chemicals by using gloves while cleaning or doing dishes. Gently wash your hands without scrubbing your nails too hard, and moisturize them regularly to prevent breakage.

Another effective way to maintain your decals is to limit exposure to heat sources, such as hot water and hair dryers, which can weaken the adhesive. Be cautious when using your hands, as activities like typing or excessive tapping can prematurely wear them down. By taking these precautions, you’ll extend the life of your stunning nail art.

Factors to Consider Before Applying Nail Decals

Keep several important factors in mind before applying nail decals to ensure a beautiful finish without causing damage:

  • Your nail type
  • The quality of the decals
  • Potential allergens or sensitivities
  • Your daily activities
  • The application method

This preparation will help you achieve the best results while protecting your natural nails.

Nail Health and Condition

To make the most of your nail decals, assess the health and condition of your nails. Damaged or brittle nails may not hold the decals securely, leading to premature lifting or breakage. Keep your nails well-nourished and hydrated, and consider a strengthening treatment if necessary before applying decals. A healthy foundation ensures longer-lasting and more eye-catching results.

Type of Decals Suitable for Your Lifestyle

Health dictates the type of decals you choose, as some designs or materials may not align with your daily routine. Consider activities such as washing dishes, exercising, or using your hands frequently when selecting decals. Look for options specifically designed for durability and resistance to wear and tear.

This helps you pick decals that can withstand your lifestyle, avoiding issues of peeling or damage. For daily wear, opt for high-quality water-resistant decals or long-lasting gel options. If you prefer changing designs often, vinyl decals might suit your needs without compromising nail health. Always consider ease of application and removal as well to keep your nail care straightforward and enjoyable.

How to Remove Nail Decals Without Damage

Unlike typical nail polish or regular stickers, nail decals can be tricky to remove without causing harm to your nails. To effectively and gently peel them off, it is important to take the right approach to ensure that your nail surface remains intact and healthy.

Tools and Products You Will Need

Remove the following tools and products from your beauty arsenal to ensure a smooth removal process:

Acetone or Nail Polish RemoverCotton Balls or Pads
WaterSmall Bowl
Wooden Cuticle StickMoisturizing Hand Cream

Step-by-Step Removal Process

While your primary aim is to avoid damage, carefully following these steps will help you successfully remove the decals:

Soak a cotton ball in acetonePress it against the decal for 10-15 seconds
Gently slide the cotton ball over the decalUse a wooden cuticle stick for stubborn sections
Rinse your nails with warm waterApply hand cream to moisturize

Removal requires patience and a gentle touch. Start by soaking a cotton ball in acetone and placing it on each decal for a few seconds to loosen the adhesive. After that, use the cotton ball to wipe away the decal, rubbing lightly to lift it off completely. For any remaining residue, employ a wooden cuticle stick to gently scrape it away, ensuring you do not apply excessive pressure that could harm your nails. Conclude the process by rinsing your nails and moisturizing them, restoring their health.

Important Notes on the Removal Process

Be cautious with acetoneTest on a small area if uncertain
Use a gentle hand with the cuticle stickMaintain nail health by moisturizing regularly

Troubleshooting Common Issues

Not all nail decals apply or remove perfectly, and you may encounter some common issues along the way. If you notice bubbles forming or the edges lifting, don’t panic—there are simple solutions to ensure your nails look flawless. By addressing these minor setbacks promptly, you can maintain the integrity of your nail art and enjoy beautiful, long-lasting results.

Dealing with Sticking or Peeling Decals

If your decals are sticking too much or beginning to peel, it’s important to assess the application process. Ensure that your nails are clean and dry before applying the decals, as any moisture can affect adhesion. If a decal starts to peel, you can press it down gently with a soft tool, or apply a thin layer of top coat to secure it back in place.

Repairing Damaged Nails

To restore your damaged nails after using decals, you can take a few simple steps. Start by gently buffing the surface, which helps even out any rough spots. Follow this with a nourishing nail oil or cuticle cream to hydrate the nails, promoting recovery. Finally, consider applying a strengthening base coat before your next application, as this acts as a protective barrier between your natural nails and the decals.

Sticking to a healthy nail care routine ensures your nails remain strong and resilient. Regularly moisturizing your cuticles and avoiding harsh chemicals can prevent future damage. If your nails suffer after applying decals, don’t hesitate to give them a break and allow them to breathe before trying again. Your care today will lead you to flawless nail art tomorrow, making every application a successful one.

Summing up

To wrap up, applying and removing nail decals can be a straightforward process when done carefully. Ensure your nails are clean and dry before applying decals to enhance adhesion. When it comes time to remove them, soak your nails in warm soapy water or use a gentle nail polish remover to loosen the decals without damaging your nails. Taking these steps will help maintain the integrity of your nails while enjoying stylish designs with ease. With these tips, you can confidently switch up your nail art without worry.

Q: How do I apply nail decals properly to ensure they stick well?

A: To apply nail decals effectively, start with clean, dry nails. Begin by applying a base coat and let it dry completely. Cut the decal to fit your nail, then peel it off the backing and gently place it on your nail, starting from one side and pressing down to the other to avoid air bubbles. Use a soft tool or your fingertip to smooth it out. Seal the decal with a top coat for durability and to prevent it from lifting.

Q: What is the best way to remove nail decals without damaging my nails?

A: To remove nail decals safely, soak a cotton ball in nail polish remover or acetone-free remover. Press the soaked cotton ball onto the decal for a few seconds to allow the product to penetrate. Gently push the decal off with an orange stick or your fingertips. If it resists, soak it a little longer before attempting to remove it again. After removal, wash your hands to remove any residue.

Q: Can I reuse nail decals once I’ve removed them?

A: Typically, nail decals are designed for single use only, as the adhesive may lose its effectiveness after being applied. However, if you carefully remove them and they don’t tear or lose their stickiness, you may be able to reuse them. To increase the chances of reusing, avoid excessive exposure to water and be gentle during removal. Keep in mind that results can vary, and they may not adhere as well on subsequent applications.

Skip to content