repair

How to Repair Damaged Nails After a Manicure

Manicure sessions can leave your nails looking fabulous, but they sometimes come with unwanted damage. If you’ve experienced chips, splits, or brittleness after your last visit to the salon, it’s imperative to take action to restore your nails’ health. In this guide, you’ll learn effective strategies and techniques to repair and strengthen your nails, ensuring they return to their flawless state. From at-home remedies to professional treatments, you’ll discover how to nurture your nails back to vitality.

Key Takeaways:

  • Hydration: Keep nails moisturized with a nourishing cuticle oil or hand cream to promote healing and prevent further damage.
  • Gentle Care: Avoid harsh chemicals and be gentle while handling your nails to prevent additional breakage or irritation.
  • Strengthening Treatments: Use strengthening nail treatments or buffers to help restore the integrity and appearance of your damaged nails.

Common Causes of Nail Damage

Before you can effectively repair your damaged nails, it’s imperative to understand the common causes behind the damage. From over-treatment during manicures to exposure to harsh chemicals, these factors can compromise the integrity of your nails. For more insights on recovery methods, check out How to Strengthen Damaged Nails After Acrylic & Gel, which provides tips tailored to your situation.

Over-Treatment During Manicure

Around the world of manicures, over-treatment can occur when nails are subjected to excessive filing, buffing, or aggressive removal of products. This can lead to thinning and weakening of your nails, exposing them to potential damage.

Use of Harsh Chemicals

Nail products containing strong chemicals can wreak havoc on your nails. Excessive use of nail polish removers with acetone or regular exposure to harsh cleanings agents can strip your nails of their natural oils, leaving them brittle and prone to breakage.

Causes of nail damage often stem from these harsh chemicals making them fragile. Many manicure products include ingredients that can lead to dehydration, resulting in splitting and peeling. Being mindful of the products you use and incorporating gentle alternatives can make all the difference in maintaining healthy nails.

Initial Steps to Take After Damage

It is important to act quickly after you notice any damage to your nails following a manicure. First, assess the situation to determine the extent of the damage and what steps need to be taken. Avoid further manipulating the nails, as this could worsen the condition. Instead, focus on providing care that can help restore their health and appearance.

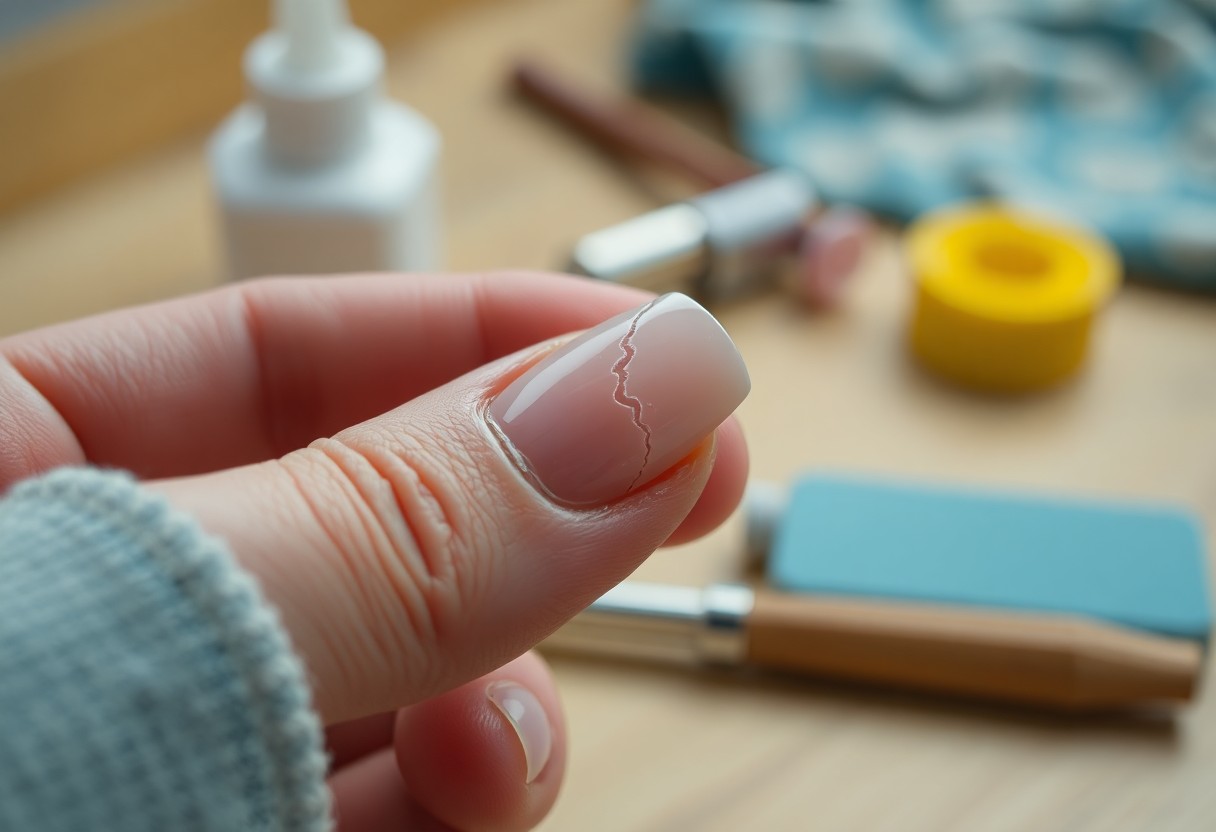
Assessing the Severity of Damage

Against a backdrop of concerns over nail health, take a moment to evaluate the damage you see. Is it a minor chip, a tear, or more extensive breakage? Understanding the severity will guide your next steps. For minor chips, you may simply need to apply a fresh coat of polish. However, deeper cracks may require more intensive care, such as filing and conditioning.

Cleaning and Protecting the Nail

About your nail care routine, cleaning and protecting your nails is crucial after any damage. Begin by gently washing your hands and nails with mild soap to remove any debris. After cleansing, ensure your nails are completely dry to prevent further issues. Applying a nourishing cuticle oil will help promote healing and add a protective layer, safeguarding against additional damage.

Nail health can be significantly improved with a consistent cleaning and protection regimen. Use an antibacterial solution to cleanse the areas around your nails, which helps prevent potential infections. Follow with a good quality moisturizer or cuticle oil, focusing on nourishing both the nail bed and surrounding skin. This will not only provide protection but also encourage growth and resilience as your nails heal.

Repair Techniques

Now that you understand common causes of nail damage, it’s time to explore effective repair techniques. These methods can help restore your nails to their former glory and protect them from further harm. Whether you prefer a more traditional approach or a DIY fix, there are several ways to get your nails back in shape.

Nail Glue and Fiber Method

Across many nail care circles, the nail glue and fiber method is a go-to solution for minor breaks. Simply apply a small amount of clear nail glue to the damaged area, then place a piece of fiber, like a nail repair patch or even a cotton ball, over it. Once dry, seal it with another layer of glue for extra strength.

Using a Tea Bag or Silk Wrap

Beside the nail glue method, using a tea bag or silk wrap can be an effective way to mend broken nails. This technique involves cutting a small piece of tea bag or silk fabric and gluing it over the damaged area to reinforce it. You can then apply a top coat for a smooth finish.

A tea bag or silk wrap acts as a barrier, reinforcing your nail structure while promoting recovery. Start by cutting a suitably sized piece that covers the break. Apply a base coat of clear nail polish or glue on the affected area, place the fabric over it, and gently press to secure it. Finish with another layer of polish to smooth the surface and protect the repair. This method not only restores aesthetics but also provides support until your nail regrows.

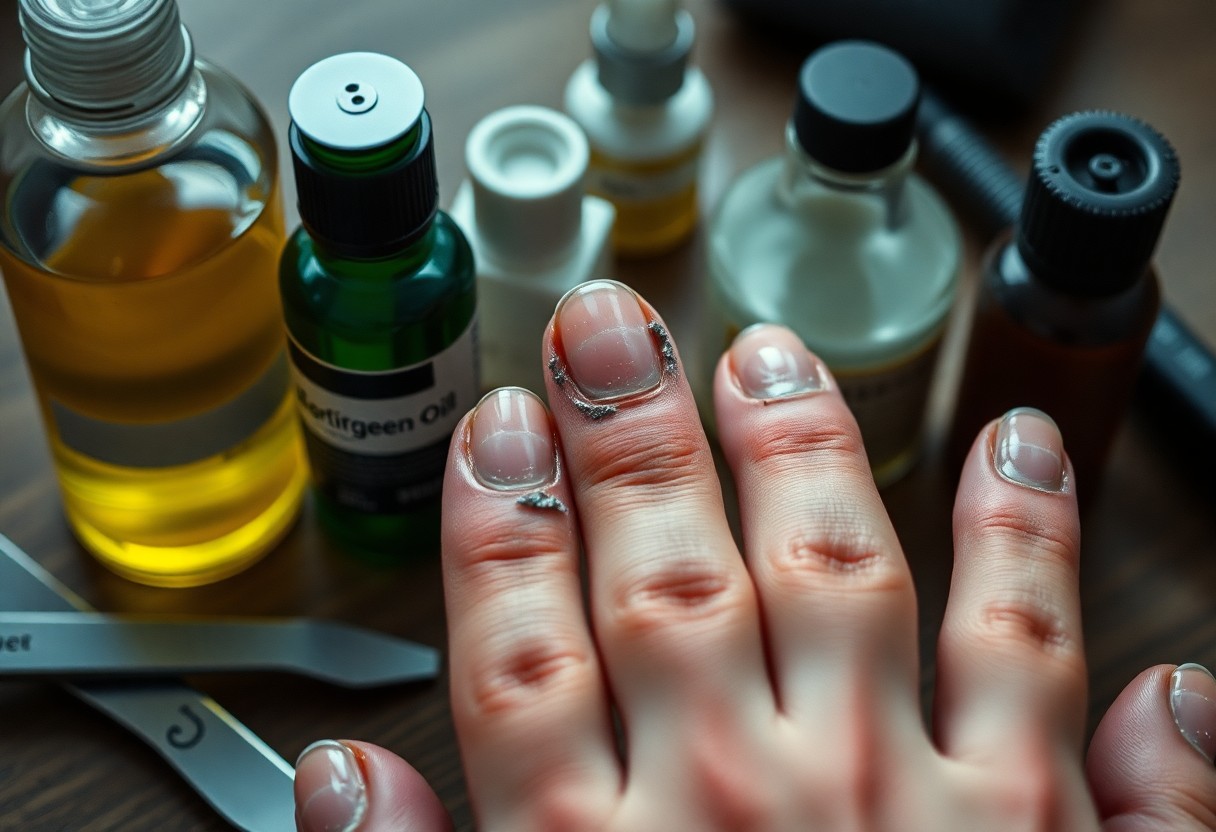
Nutritional Support for Nail Health

Many factors contribute to healthy nails, and proper nutrition plays a vital role. Incorporating a variety of vitamins and minerals into your diet can significantly improve your nail strength and appearance. For tips on how to care for your nails, check out How To Apply, Remove, and Repair Damaged Nails.

Importance of Vitamins and Minerals

At the foundation of strong nails are imperative vitamins and minerals that support keratin production and overall nail health. Key nutrients, such as Biotin, Vitamin E, and zinc, help prevent brittleness and promote growth, making them important additions to your routine.

Recommended Dietary Practices

The best way to ensure your nails receive the nourishment they need is through a balanced diet rich in vital nutrients. Focus on incorporating foods like nuts, seeds, leafy greens, eggs, and whole grains for optimal nail health.

Minerals such as calcium, magnesium, and iron also significantly contribute to the integrity of your nails. Including foods rich in these minerals, like dairy products, legumes, and lean meats, can further enhance the strength and resilience of your nails. Prioritizing a nutrient-dense diet will not only benefit your nails but also improve your overall health and well-being.

Preventative Measures for Future Care

Not taking the right precautions can lead to further damage to your nails after a manicure. To avoid future issues, prioritize the health of your nails by incorporating protective measures such as using gloves while doing household chores, choosing a qualified nail technician, and allowing your nails to breathe between manicures. Additionally, consider the environment you expose your nails to and try to minimize contact with harsh chemicals that can weaken them.

Choosing the Right Products

Among the plethora of nail products available, it’s crucial to select those that promote nail health. Opt for nail polishes that are free from harmful chemicals like toluene, dibutyl phthalate, and formaldehyde. Investing in high-quality base and top coats can protect your nails from chips and moisture loss, while nourishing oils and fortified treatments can strengthen your nail beds.

Establishing a Regular Nail Care Routine

Choosing to implement a consistent nail care routine will greatly benefit your nails in the long run. This routine should include moisturizing your nails and cuticles daily, along with regular filing and trimming to maintain their shape. Regular application of strengthening treatments can help prevent breakage and promote growth, while setting aside time for pampering with hand creams or conditioning oils will keep your nails looking their best.

Another key element of your routine is to schedule regular appointments for professional manicures. This allows for expert maintenance that can help identify any potential issues before they become problematic, while also providing an opportunity for a thorough cleaning and trimming. Furthermore, make an effort to include a healthy diet rich in vitamins and minerals, as this contributes significantly to the overall health and strength of your nails.

Professional Help: When to Consult an Expert

After a damaging manicure, it’s necessary to know when to seek professional help. If your nails are consistently splitting, peeling, or displaying extreme discoloration, consider reaching out to a nail technician or dermatologist. There are times when home remedies aren’t enough. For instance, you can get insights and support from others who have been in similar situations through this Help! Just had gel removed and my nails are paper thin … post.

Signs That Professional Repair is Needed

At times, you may notice persistent pain, severe brittleness, or signs of infection. If your nails are excessively fragile or demonstrate unusual changes that home care methods can’t rectify, it’s a signal that you should consult a professional. Observing any of these signs early can help prevent further damage.

What to Expect at a Nail Salon

Across your visit to a nail salon for professional help, you can expect a thorough assessment of your nail health. Nail technicians will likely ask about your nail care routine and recent treatments. They may also provide customized treatments to promote recovery, using products designed to strengthen and nourish your nails.

Expert technicians are trained to identify issues with your nails and provide specialized care tailored to your needs. They may use nourishing oils, strengthening treatments, or recommend specific nail products that aid in repair. Additionally, they will ensure that your nails are not only treated but also further protected from future damage, offering insights on a proactive nail care routine that you can follow at home.

Final Words

The process of repairing damaged nails after a manicure involves several steps to restore your nails’ health and appearance. Start by moisturising your hands and nails regularly, applying a strengthening base coat before polish, and avoiding harsh chemicals whenever possible. You should also give your nails a break from polish to allow them time to recover. Incorporating a healthy diet rich in vitamins and minerals can further support nail repair. By following these guidelines, you can promote stronger, healthier nails as part of your personal care routine.

FAQ

Q: What are common causes of nail damage after a manicure?

A: Nail damage can occur due to several reasons, including improper filing techniques that weaken the nails, overuse of harsh chemicals found in nail polish removers, or prolonged exposure to water which can cause nails to become brittle. Additionally, using low-quality nail products or not allowing sufficient drying time can also lead to chipping and peeling.

Q: How can I treat and repair my damaged nails at home?

A: To repair damaged nails, start by gently cleaning your nails and removing any remaining polish. Avoid harsh removers. Treat the nails with a nourishing oil, like vitamin E or jojoba oil, to help hydrate and strengthen them. Consider using a nail strengthening treatment or a clear strengthening polish that provides a protective layer. Lastly, maintain a balanced diet rich in vitamins and minerals, particularly biotin and protein, which support nail health.

Q: When should I seek professional help for nail repairs?

A: If your nails show signs of serious damage, such as splitting, lifting from the nail bed, or signs of infection (redness, swelling, or pus), it’s advisable to consult a nail care professional. They can assess the extent of the damage and provide appropriate treatment options. Additionally, if home remedies aren’t effective after a few weeks, seeking professional help can ensure your nails receive the care they need to recover properly.

How to Repair a Cracked Acrylic Nail

Just like any other beauty treatment, acrylic nails can encounter some mishaps, including cracks. If you find yourself with a cracked acrylic nail, you don’t need to panic—there are simple steps you can follow to restore it. This guide will walk you through the process, ensuring your nails look flawless again. For a quick technique, you can check out this detailed resource on how to Repair a Cracked Acrylic Nail in Two Minutes – Technique.

Key Takeaways:

  • Assess the Damage: Before starting the repair, evaluate the extent of the crack to determine if a simple fix or a complete replacement of the nail is needed.
  • Use Proper Tools: Gather crucial tools such as nail glue, a file, and a buffing block for an effective repair process.
  • Seal the Crack: Apply nail glue carefully into the crack, smooth it out, and allow it to dry completely to ensure a strong bond.

Understanding Acrylic Nails

To appreciate the maintenance involved with acrylic nails, it’s important to understand their composition and functionality. Acrylic nails are artificial nails created using a mixture of liquid monomer and powder polymer, which hardens when applied over your natural nails. They provide strength and versatility for various nail enhancements, enabling you to achieve different shapes and lengths while protecting your natural nails from damage.

What Are Acrylic Nails?

Between the myriad of nail options available, acrylic nails stand out for their durability and adaptability. They are popular for those who desire long-lasting, elegant nails with a polished look. Achieved through an application process that includes sculpting and shaping, acrylics can be customized to fit your preferred style, making them a go-to choice for many nail enthusiasts.

Common Issues with Acrylic Nails

Beside the appealing aesthetic, acrylic nails can encounter several issues that you should be aware of to maintain their integrity. Common concerns include lifting, cracking, and chipping, which can arise from various factors such as improper application, inadequate aftercare, or even lifestyle habits that put stress on your nails.

Consequently, being informed about these common issues can help you take proactive measures to preserve the quality of your acrylic nails. For instance, ensuring that your acrylic nails are properly applied and regularly maintained can prevent lifting, while being cautious during daily activities can minimize the risk of chipping. By understanding these challenges, you can better care for your acrylics and enjoy their benefits longer.

Diagnosing the Crack

Assuming you notice a crack in your acrylic nail, the first step is to accurately diagnose its nature. Understanding the type and extent of the crack will guide your repair efforts and help you determine whether professional assistance is required. Inspect your nail closely and note any other signs of damage, such as lifting or discoloration, which may indicate a more serious problem.

Types of Cracks

Assuming you’re familiar with common types of cracks, here are some categories to consider:

  • Surface Cracks: Minor, generally aesthetic.
  • Deep Cracks: Extend through multiple layers and require more extensive repair.
  • Split Nails: More severe, may involve loss of nail integrity.
  • Chips: Small areas where the acrylic has broken away.
  • Fissures: Hairline fractures that can worsen over time.

Thou should assess your nail carefully to identify any of these issues.

Type of CrackDescription
Surface CracksMinor with no structural damage.
Deep CracksPotential to separate the nail from the natural nail.
Split NailsInvolves a significant loss of integrity.
ChipsSmall portions missing from the edge of the nail.

Assessing Damage Severity

Crack identification is a key part of assessing damage severity. It’s important to evaluate how deep the crack goes and whether it affects the overall structure and appearance of your nail. Is the crack merely cosmetic, or does it lead to the natural nail being exposed? Carefully consider if the surrounding area shows redness, swelling, or infection signs, as these may require immediate attention.

Assessing the severity of the damage involves looking at various factors, including the type and location of the crack, how deep it penetrates, and any accompanying symptoms. A good rule of thumb is to visualize whether the crack compromises the nail’s functionality or aesthetics. If you notice significant impairment in any form, it is wise to consult a professional before attempting a DIY repair. Treat your nails with the care they deserve, ensuring they remain healthy and beautiful.

Tools and Materials Needed

Unlike other nail repair methods, fixing a cracked acrylic nail requires specific tools and materials to achieve a seamless finish. Gather items such as a nail file, buffer, nail glue, a repair wrap, and cuticle oil to ensure a smooth and effective repair process. Having the right supplies will help you restore your nail to its former beauty and maintain its integrity.

Essential Repair Tools

Between the various tools you’ll use, a nail file and buffer are imperative for smoothing the surface of the damaged area. A pair of scissors can also be handy for trimming any ragged edges. Additionally, nail glue will be required to bond the pieces together securely.

Recommended Products

Beside these tools, you may want to consider specific products that enhance your repair efforts, such as professional-grade nail glue or specialized acrylic repair kits.

Products like high-quality nail glue often provide stronger adhesion, preventing future cracks or breaks. Acrylic repair kits typically include everything needed for a comprehensive fix, including wraps or fiberglass patches that can reinforce the nail. Investing in these products not only makes your repair easier but also helps maintain the longevity of your acrylic nails.

Step-by-Step Repair Process

Now that you’ve identified the issue, follow these steps to effectively repair your acrylic nail. For more insights on similar experiences, check out My acrylic nail has cracked through the middle and …

Information Breakdown

StepDescription
1. Preparing the NailEnsure the area around the crack is clean and dry.
2. The Repair TechniqueUse an acrylic repair kit or bonding agent.
3. Finishing TouchesShape and polish the repaired nail.

Preparing the Nail

To prepare your nail for repair, first clean the cracked area with a gentle nail cleanser to remove oils or debris. You’ll want to gently buff around the crack with a fine buffer, which will help the adhesive bond better to your acrylic nail.

The Repair Technique

The next step involves applying a suitable acrylic repair product. Carefully follow the manufacturer’s instructions to ensure a proper application.

A well-applied acrylic repair product will fill in the crack seamlessly. Make sure to apply it evenly, using a small brush or a toothpick to push the material into the crack and smooth it out. Allow the product to cure completely before moving on to the next step.

Finishing Touches

Between applications, check the repair to ensure it has set correctly. Once dry, file the nail gently to reshape it, and buff the surface until smooth.

Further refinements can involve applying a top coat for shine and durability. This also helps blend the repaired area with the existing acrylic, making the repair less noticeable.

Preventing Future Damage

Despite the occasional mishap, you can take effective measures to keep your acrylic nails intact and prevent future damage. Adopting a few simple habits will enhance the longevity of your nails and reduce the chances of cracking or lifting. Regular maintenance and careful interactions with your environment play key roles in preserving the quality of your acrylics.

Proper Care Tips

Below are some proper care tips to consider for your acrylic nails:

  • Keep your nails moisturized with cuticle oil.
  • Avoid using your nails as tools for opening or prying.
  • Limit exposure to harsh chemicals and detergents.
  • Wear gloves during cleaning tasks or when using chemicals.
  • Schedule regular maintenance appointments with your nail technician.

Knowing how to care for your nails can significantly extend their life and appearance.

Best Practices for Acrylic Nails

Between your appointments, you can adopt best practices to maintain the health and integrity of your acrylic nails. These practices help prevent damage while ensuring your nails always look their best.

Best practices for acrylic nails include avoiding excessive moisture and ensuring your hands are always clean and dry. Be mindful of any activities that can put stress on your nails, such as typing or using your phone, and try to minimize force during these actions. Regularly trim and file your natural nails before your appointment to keep them healthy. Additionally, be sure to apply sunscreen to your hands to protect against UV rays, which can weaken the acrylic over time. These effective approaches will help you enjoy stunning nails while minimizing the risk of damage.

When to Seek Professional Help

Your DIY repair skills may be impressive, but there are situations where seeking professional help is the best option. If the crack is deep, near the nail bed, or accompanied by pain, you should consult a nail technician or dermatologist. Attempting to fix it yourself could lead to further damage or infection. Additionally, if multiple nails are cracked, it might indicate an underlying issue that requires expert assessment. Don’t hesitate to get professional advice to ensure your nails remain healthy and beautiful.

Summing up

Summing up, repairing a cracked acrylic nail can be a straightforward process if you follow the proper steps. You should clean the area, apply a nail glue or acrylic resin for reinforcement, and shape it to match your natural nail. Don’t forget to file the edges for a smooth finish. For more detailed guidance, check out How to Handle a Snapped Acrylic Nail: Repair Tips. By taking these measures, you can maintain the integrity of your nails while ensuring they look flawless.

Q: What materials do I need to repair a cracked acrylic nail?

A: To repair a cracked acrylic nail, you will need the following materials:
– Nail file or buffer to smooth the surface
– Clear nail glue or acrylic nail repair kit
– An acrylic brush (if using acrylic powder and liquid)
– Acrylic powder and liquid (if doing a more extensive repair)
– Nail tips or a piece of a plastic nail (for larger cracks)
– A small pair of scissors (optional for trimming)
– Cuticle oil (optional for hydration)
– Rubbing alcohol and lint-free wipes for sanitation

Q: How can I repair a minor crack in my acrylic nail at home?

A: For a minor crack, start by carefully filing the area around the crack to smooth it out. Clean the nail with rubbing alcohol using a lint-free wipe. Next, apply a small amount of clear nail glue over the crack and let it dry completely. Once the glue is dry, you can shape and buff the nail to make it look natural. Finish by applying a topcoat for added protection and shine.

Q: Can I repair a severe crack or break in my acrylic nail myself?

A: Yes, a severe crack or break can be repaired at home, but it may require more materials and effort. Start by assessing the damage. If the nail is entirely broken off, you will need to use a nail tip. First, file the remaining acrylic down to create a smooth surface. Then, apply the nail tip to the broken area with nail glue. Once secure, you may need to apply a thin layer of acrylic over the tip using an acrylic powder and liquid for a seamless finish. Afterward, shape, buff, and polish your nail to blend it with the rest. For larger damages, consider visiting a nail technician for a more polished result.

How to Repair a Nail That’s Split Down the Middle

Most nail issues can be fixed with a little care, and a split nail is no exception. If you find yourself dealing with a nail that’s split down the middle, you can take steps to repair it effectively. With the right tools and techniques, you can help restore your nail’s appearance and prevent further damage. For inspiration, you might want to check out this post about someone who split their thumbnail right down to about halfway. Let’s look into the process of repairing your split nail!

Key Takeaways:

  • Assess the Damage: Evaluate the severity of the split to determine if it can be repaired or if professional help is needed.
  • Gather Supplies: Collect crucial items such as nail glue or adhesive, a buffer, and a nail file.
  • Apply Adhesive: Carefully apply a small amount of glue to the split area and press the nail together, ensuring a secure bond.
  • File and Shape: Once the adhesive has dried, use a file to smooth out any rough edges and shape the nail as desired.
  • Protect the Nail: Finish with a clear nail polish or top coat to seal the repair and enhance durability.

Understanding Split Nails

Your nails can experience splitting for various reasons, often signaling underlying health or environmental issues. A split nail not only compromises your aesthetic but can also cause discomfort and lead to more severe nail problems if not addressed. Understanding the nature of split nails enables you to take appropriate action and improve your nail health in the long run.

Common Causes of Nail Splitting

While there are numerous reasons for nail splitting, some of the most prevalent causes include harsh environmental factors, such as frequent exposure to water or chemicals, and physical trauma from nail care practices. Nutritional deficiencies, particularly in vitamins and minerals, can also compromise the nails’ integrity, allowing them to split more easily. Being aware of these factors helps you prevent future occurrences.

Factors That Contribute to Nail Health

Factors that contribute to nail health go beyond external care; they also involve your lifestyle and dietary choices. Ensuring you maintain a balanced diet rich in crucial nutrients supports your nails’ strength and resilience. Incorporating practices that promote good hygiene and protecting your nails from injury can also have a positive impact. You will find that the following elements are vital for nail health:

  • Adequate hydration
  • Balanced diet rich in vitamins, particularly biotin
  • Regularly moisturizing hands and nails
  • Using gloves during household chores

Perceiving these factors can significantly enhance the strength and appearance of your nails, helping you to avoid splits in the future.

Common Nail Care Practices

Common nail care practices play an crucial role in maintaining healthy nails. Simple routines that incorporate gentle care can help you avoid unnecessary damage. Consider the following tips for maintaining your nails:

  • Trimming nails regularly
  • Avoiding excessive use of acrylics or gels
  • Choosing non-toxic nail products
  • Keeping nails dry and clean

Perceiving the importance of these practices will lead to improved nail health, making splitting less likely. Your commitment to proper nail care can enhance the beauty and resilience of your nails overall.

How to Identify the Severity of the Split

Clearly, identifying the severity of a split nail is key to determining the right course of action. Start by examining the depth and length of the split. Minor splits, which are typically superficial and do not reach the nail bed, can often be treated at home. However, splits that extend deeper and cause pain or expose the nail bed may require immediate attention to prevent infection and ensure proper healing.

Minor Splits vs. Severe Splits

Assuming your nail is split, it’s important to differentiate between minor and severe splits. Minor splits are generally shallow and may only affect the outer layers of the nail, while severe splits can penetrate deeper into the nail bed and may require more intricate care. Assessing these differences will help you choose the appropriate treatment method.

When to Seek Professional Help

You should consider seeking professional help if the split is severe or accompanied by excessive pain, bleeding, or signs of infection, such as redness and swelling around the nail. Proper evaluation by a medical professional can mitigate further complications and ensure your nail heals correctly.

Help is available if you find yourself unsure about managing a split nail. A healthcare professional can assess the condition of your nail and recommend the best treatment options, including possible procedures to repair or protect your nail. Don’t hesitate to seek assistance if you’re concerned about your nail’s health or if home remedies aren’t effective; timely intervention can prevent complications and promote better recovery.

Immediate Care for a Split Nail

Despite the discomfort a split nail can cause, addressing it promptly can minimize further damage. First, you should assess the severity of the split. If you notice excessive pain or bleeding, it’s wise to consult a healthcare professional. If the split is minor, you can begin immediate care by cleaning the area, securing it to prevent infection, and protecting the nail for healing.

Cleaning the Affected Area

An important first step is to gently cleanse the split area with soap and water. This helps prevent infection and ensures that any dirt or debris is removed. After washing, pat the nail dry with a clean towel and avoid any harsh chemicals that could irritate the skin further.

Protecting the Nail

Split nails are vulnerable, so it’s vital to protect them from further injury. You can use a bandage or adhesive strips to cover the area and keep it secure. This acts as a barrier, shielding your nail from potential irritants and adds support while it heals.

Another effective method for protecting the nail is to consider using a nail glue or a specialized nail repair kit. These products can bond the split edges together, providing additional stability and support. Make sure to follow the instructions carefully and avoid using heavy products that may exacerbate the split. Keeping the nail protected will promote faster healing and reduce the risk of complications.

Repair Techniques for Split Nails

To fix a split nail, several effective techniques can be employed based on the severity of the damage. You can opt for quick solutions or more durable methods to restore the nail’s integrity. It’s vital to act promptly to prevent further splitting and discomfort. By using either nail glue or applying a nail patch, you can extend the life of your nail while it grows out and heals.

Using Nail Glue

Some individuals find success using nail glue to bind the split edges together. Ensure that you clean the area around the split, and once dry, apply a thin layer of glue directly to the split, pressing the edges together gently. Allow the glue to cure before applying polish for a smoother appearance.

Applying a Nail Patch

Now, applying a nail patch is another effective way to secure a split nail. This method involves using a small piece of fabric, such as a tea bag or silk, to reinforce the damaged area. Cut a thin strip of the fabric, then apply a layer of nail glue over the split. Place the fabric over the glue while it’s still damp and add another layer of glue on top to complete the bond.

Nails that have been patched with fabric can regain strength and support, allowing you to go about your daily activities without worrying about further damage. After the patch has dried, you can shape and polish the nail as desired. This technique not only covers the split but also prevents it from worsening, facilitating a smoother healing process as your nail grows out. Always ensure that the patch is applied seamlessly to blend in with your natural nail for an aesthetically pleasing result.

Preventive Tips for Nail Health

Now, maintaining healthy nails is imperative to prevent splits and breaks. To strengthen your nails and keep them looking good, consider the following tips:

  • Moisturize your nails and cuticles regularly.
  • Avoid excessive exposure to water and harsh chemicals.
  • Use gloves while doing household chores.
  • Keep your nails trimmed and filed to avoid snags.

Knowing what actions to take can greatly improve the overall health of your nails. For further insights on maintaining nail integrity, check out Split Nail Repair: DIY Fixes and Professional Treatments.

Daily Care Routines

Assuming you establish a daily routine will help you keep your nails in top shape. Simple tasks such as moisturizing your hands and applying cuticle oil can significantly enhance nail resilience. Make it a habit to inspect your nails for any signs of damage and respond accordingly to avoid further issues.

Nutrition and Hydration

There’s a strong link between your diet and the health of your nails. Incorporating foods rich in biotin, protein, and omega-3 fatty acids can promote stronger, healthier nails. Additionally, staying hydrated is imperative, as it helps maintain nail flexibility and prevents brittleness.

Nail health is often a reflection of your overall well-being. Foods such as eggs, nuts, and green leafy vegetables not only provide necessary nutrients but also fortify your nails against splitting and breaking. Staying adequately hydrated by drinking enough water daily also supports nail strength. When you take care of your body from the inside out, you’ll likely see positive changes in your nails over time.

Long-Term Nail Health Strategies

Many people overlook the importance of long-term nail health, which can lead to recurring issues. To maintain healthy nails, prioritize a balanced diet rich in vitamins and minerals, stay hydrated, and consider supplements like biotin. Incorporating good nail care habits into your routine will help prevent future splits and damage.

Avoiding Harmful Practices

Now, it’s necessary to avoid practices that can jeopardize your nail health. Steer clear of biting your nails, using harsh chemicals, or subjecting your nails to excessive moisture. Opting for gentle nail products and wearing gloves when cleaning can protect your nails from damage.

Regular Nail Maintenance

Health is key to maintaining strong and beautiful nails. Regular maintenance includes trimming your nails to a manageable length, filing them to avoid snags, and moisturizing your cuticles. Incorporating these practices not only helps prevent splits but also promotes overall nail strength.

Strategies for effective nail maintenance include setting a routine for nail care, such as weekly trimming and filing. Use high-quality nail tools and ensure they are cleaned regularly to reduce the risk of bacteria. Applying a nourishing oil or cream to your cuticles and nails can enhance moisture retention, while wearing gloves during household chores protects your nails from damage. By committing to these practices, you can significantly improve the health and appearance of your nails over time.

Conclusion

Following this guide, you can effectively repair a nail that’s split down the middle, ensuring it remains healthy and aesthetically pleasing. By using common household items and a bit of patience, you can mend your nail and promote proper healing. Always keep your nails trimmed and moisturized to prevent future splits, and consider maintaining a balanced diet rich in vitamins to support nail strength. With these tips, your nails can look their best and minimize damage in the long run.

Q: What are the best methods to repair a split nail?

A: To repair a split nail, you can use several effective methods. One of the simplest ways is to apply a piece of tape or a tea bag over the split, securing it with clear nail polish. First, trim the nail to a manageable length, then cut a piece of tape or a tea bag slightly larger than the split. Place it over the affected area and seal it with a coat of clear nail polish. This method provides temporary support and protection as the nail grows out. Additionally, if the split is deep, consider using a nail glue or gel to reattach the split edges before sealing it with a protective layer.

Q: How can I prevent my nails from splitting in the future?

A: To prevent nails from splitting, focus on maintaining their health. Regularly moisturizing your hands and cuticles will help keep them hydrated and less prone to breakage. Additionally, try to avoid exposing your nails to harsh chemicals found in cleaning products by wearing gloves. Incorporating a balanced diet rich in vitamins, particularly biotin, zinc, and protein, can also support nail strength. Lastly, avoid harsh nail treatments and limit the use of artificial nails, as these can weaken your natural nails over time.

Q: When should I seek professional help for a split nail?

A: If a split nail causes significant pain, bleeding, or if there are signs of infection such as swelling, redness, or pus, it’s advisable to see a healthcare provider or a dermatologist. Additionally, if the nail splits deep enough to expose the nail bed or if there’s persistent discomfort, professional guidance can prevent complications. A nail specialist can provide advanced treatment options that you might not be equipped to handle at home, ensuring proper healing and care for your nails.

Skip to content