
Over the years, nail art has evolved into a stunning form of self-expression, and incorporating pearls and gems can elevate your designs to a whole new level. In this post, you’ll discover various techniques and tips for seamlessly adding these luxurious embellishments to your nails. From choosing the right stones to applying them securely, you’ll learn how to enhance your manicure with these elegant touches. Get ready to transform your nail art into a dazzling masterpiece that reflects your personal style!
Key Takeaways:
- Choose the Right Base Color: Select a complementary base color that enhances the look of the pearls and gems you plan to use.
- Placement Matters: Strategically place pearls and gems to create focal points and balanced designs, whether at the cuticle, tips, or as accents on specific nails.
- Mix and Match Sizes: Combine different sizes of pearls and gems for a more dynamic and visually appealing design, adding depth and interest.
- Seal and Protect: Use a quality topcoat to seal the gems and pearls for durability and to ensure the design lasts longer, keeping the elements securely in place.
- Experiment with Themes: Incorporate pearls and gems into different themes such as bridal, holidays, or seasonal designs to add a unique touch to each manicure.
Understanding Pearls and Gems in Nail Design
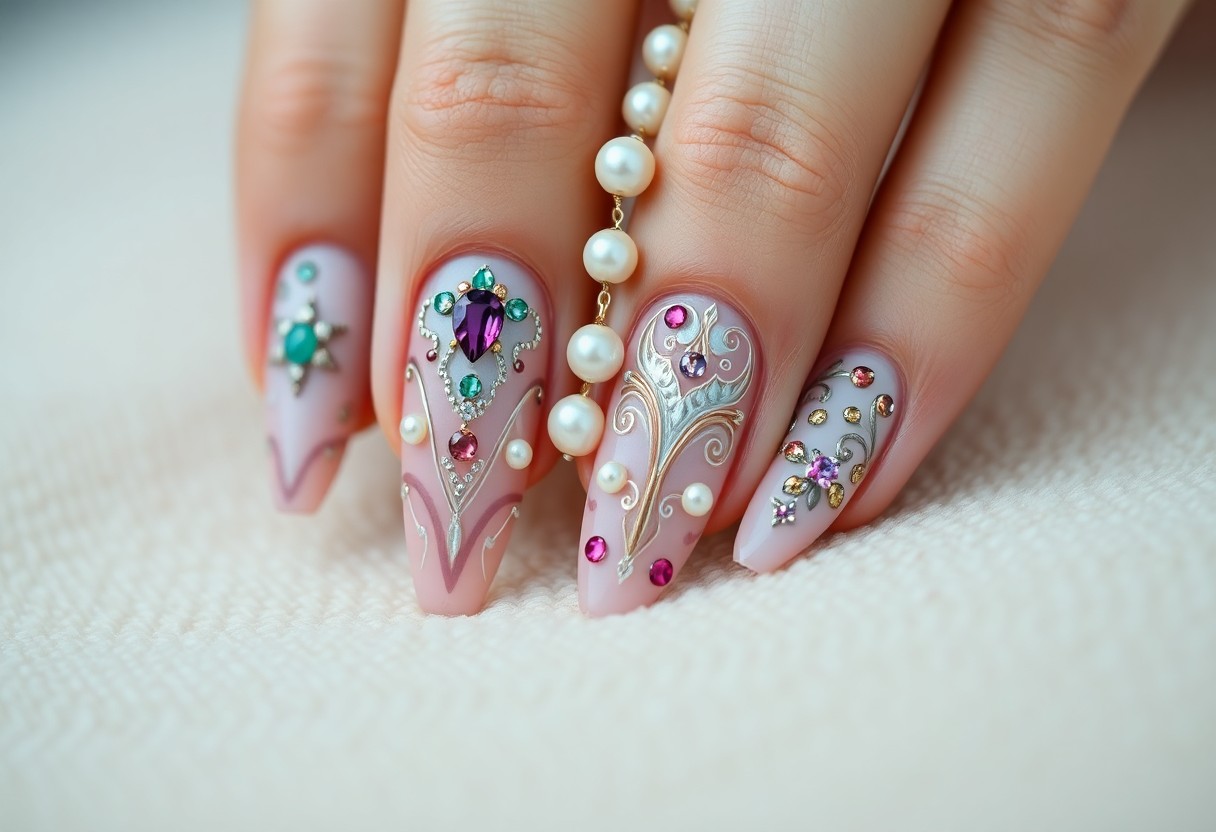
The incorporation of pearls and gems in nail design can elevate your manicure to a new level of elegance and sophistication. These elements add texture, shine, and a unique flair to your nails, allowing you to express your personal style creatively. Whether you are going for a subtle touch or a bold statement, understanding how to use these adornments effectively can enhance the overall aesthetic of your nail art.
Different Types of Pearls and Gems
With a variety of options available, you can choose the perfect pearls and gems to suit your design. Here’s a breakdown of some popular choices:
- Natural Pearls
- Glass Gems
- Acrylic Pearls
- Crystal Rhinestones
- Swarovski Crystals
Recognizing the distinct qualities of each type will help you select the right materials for your next nail design.
| Type of Pearl/Gem | Characteristics |
| Natural Pearls | Soft sheen, organic shape |
| Glass Gems | Affordable, variety of colors |
| Acrylic Pearls | Lightweight, durable |
| Crystal Rhinestones | Brilliant sparkle, various sizes |
| Swarovski Crystals | High quality, exquisite shine |
Choosing the Right Materials
Types of materials for pearls and gems can make a significant impact on your nail designs. Whether you choose natural pearls for their unique luster or opt for lightweight acrylic pearls for a more vibrant color palette, your selection should fit your intended style. Also, consider the application method; smaller embellishments may require a different adhesive than larger accents. Selecting the right materials can enhance your overall nail artwork while ensuring durability.
Understanding the importance of high-quality materials ensures that your nail designs remain intact and look stunning. By investing in premium options, you can achieve a professional finish that showcases your creativity. Balancing beauty and practicality will allow you to enjoy your nail art longer, providing an exquisite look that also lasts. Your thoughtful material choices will also dictate the final result, making it important to pick the best options available.
How to Prepare Your Nails for Embellishment
You need to start with well-prepared nails to effectively incorporate pearls and gems into your designs. This means ensuring your nails are strong, clean, and smooth. For inspiration, check out 10 Pearl-Adorned Nail Ideas To Bring Timeless Glamour To Your Looks.
Nail Care Tips
For maintaining healthy nails, follow these care tips:
- Moisturize regularly to keep your cuticles supple.
- Avoid biting or picking at your nails.
- Use gentle nail treatments for strength and shine.
- Keep your nails trimmed and shaped to prevent breakage.
After implementing these tips, you’ll set a solid foundation for your nail embellishment.
Proper Cleaning Techniques
You must ensure your nails are properly cleaned before adding any embellishments. Begin by washing your hands thoroughly to remove dirt and oils. Then, soak your nails in warm, soapy water for a few minutes to soften the cuticles, making them easier to manage. Follow this with gentle exfoliation to remove dead skin around the nail bed.
Techniques for cleaning your nails can significantly impact the outcome of your nail designs. Use a soft brush to gently scrub under your nails and around the cuticles, ensuring all debris is removed. Rinse thoroughly and dry your hands completely before you start applying polish or embellishments.
How to Apply Pearls and Gems
Once again, incorporating pearls and gems into your nail designs can elevate your look, adding a touch of elegance and sophistication. To achieve the best results, it’s important to know how to apply these embellishments effectively, ensuring they adhere well and maintain their beauty throughout the wear. With the right techniques, you can master this skill and dazzle with your embellished nails.
Step-by-Step Application Guide
Tools and Products Needed
Apply the right tools and products to achieve stunning results with your nail designs. Essentials include nail glue, a top coat, a clear polish for a base layer, and, of course, the pearls and gems you want to incorporate into your design.
This combination of tools ensures you have everything you need for both application and longevity. A precise brush can facilitate the placement of gems, while a good quality top coat will protect your nail art from chips and enhance shine. Consider investing in a quality nail glue specifically designed for embellishments to ensure your pearls and gems stay securely in place.
Tips for Customizing Your Nail Designs
All you need to make your nail designs unique is a touch of creativity and some personal flair. Here are a few tips to help you customize your nail art:
- Use various sizes of pearls and gems to create dimension.
- Combine different shapes for a more textured look.
- Incorporate themed elements to match special occasions.
- Experiment with different nail shapes to see what suits you best.
After you’ve tried these tips, your nails will become an extension of your personal style.
Color Coordination
Tips for color coordination include selecting shades that harmonize with your gemstones or pearls. Neutral tones can create an elegant backdrop, while vibrant colors can attract attention and highlight your gems. Don’t be afraid to mix and match different hues to achieve the look you desire.
Placement Strategies
For effective placement of pearls and gems, consider their size and balance on your nails. You might want to cluster them together or distribute them evenly for a more scattered effect. Think about using negative space and your nail shape to enhance the design.
Strategies for placement include placing larger gems at the base of the nail for a bold statement, while smaller gems can be arranged towards the tip. Your design can also benefit from asymmetrical layouts, which provide an edgy touch. Experiment with diagonal lines or curves to guide the eye, creating an elegant flow in your nail art.
Factors to Consider for Long-lasting Designs
Unlike traditional nail art, incorporating pearls and gems requires additional care to ensure your stunning designs last. Consider these factors:
- Choose the right base coat
- Seal gems and pearls with the right topcoat
- Avoid harsh chemicals when cleaning
- Regularly moisturize your nails and cuticles
Assume that following these steps will enhance the longevity of your nail art, allowing you to showcase your Elegant Nail Art with Pearls and Gemstones for weeks to come.
Durability of Materials
Longlasting nail art hinges on the quality of materials used. Invest in high-grade pearls and gems that can withstand wear and tear. The right adhesives and sealants further enhance durability, ensuring that your artistic creations stay intact and visually appealing over time.
Maintaining Nail Health
Longlasting designs also depend on your nail health. Regular maintenance and care play a significant role in supporting a vibrant nail canvas that can showcase your creativity.
Factors contributing to nail health include hydration, appropriate trimming, and avoiding overexposure to potentially harmful substances. Utilize nourishing oils and hand creams to keep your nails flexible and strong. Regularly inspect your nails for signs of damage and promptly address any issues to ensure a healthy foundation for your stunning designs.
Creative Ideas for Incorporating Pearls and Gems
Not limited to traditional designs, pearls and gems can add a modern twist to your nail art. Try placing small pearls along the cuticle line for an elegant touch or use a cluster of colorful gemstones to create a stunning accent nail. You can also experiment with different shapes and sizes of pearls and gems to break away from uniformity, making your design truly unique. Unleash your creativity by mixing textures, pairing your glossy gems with matte finishes or adding intricate nail art patterns for a breathtaking effect.
Trendy Nail Art Styles
Assuming you want to stay ahead of the game, consider incorporating pearls and gems into popular styles like negative space, ombre, and abstract designs. These trends allow for endless versatility, letting you be as bold or subtle as you like. For instance, in negative space art, strategically placing gems creates focal points that elevate the entire look. Ombre styles contrast beautifully with shiny pearls, while abstract designs become even more striking with the addition of gem clusters. Create something fresh by playing with these trending techniques.
Seasonal Inspirations
To bring a festive touch to your nail designs, look to the seasons for inspiration. Each season offers distinct colors and themes that can be reflected in your art. For example, incorporate soft pastels and floral motifs in spring, vibrant colors for summer, warm earth tones in autumn, and rich jewel tones during winter. Adding pearls and gems that mimic seasonal elements can enhance your designs and keep your nails in sync with the trend of the moment.
The beauty of seasonal inspirations lies in the opportunity to connect your nail art with the mood and spirit of each time of year. In spring, think of delicate pearl blossoms against soft green shades, while summer can call for bright gemstone hues reflecting beach vibes. Autumn could inspire you to use deep red and orange colors adorned with warm-toned gems, and winter becomes a canvas for icy blues and whites paired with glimmering pearls. By aligning your nail design with seasonal themes, you create a cohesive and charming look that resonates with the vibes around you.
To wrap up
On the whole, incorporating pearls and gems into your nail designs can elevate your manicure game significantly. By experimenting with different placements and combinations of these embellishments, you can create stunning looks that showcase your personal style. Whether you opt for DIYing your designs with simple tools or following expert tips from resources like DIYing The Pearl Nail Art Trend With Decals At Home, the possibilities are endless. Enjoy unleashing your creativity and making your nails a true fashion statement!
FAQ
Q: What are the best types of pearls and gems to use for nail designs?
A: When incorporating pearls and gems into nail designs, it’s important to consider both size and style. Small flat-back pearls work well for creating intricate designs without overwhelming the nail. For gems, opt for Swarovski crystals or rhinestones, as they come in various colors and sizes, allowing for great versatility. Additionally, consider using matte or iridescent pearls for a unique touch, while colorful gems can add a pop of vibrancy to your manicure.
Q: How can I ensure that pearls and gems stay securely on my nails?
A: To ensure your pearls and gems stay in place, it’s necessary to use a high-quality nail adhesive or gel. Begin by applying a base coat, then follow with your chosen nail polish color. Once the polish is dry, apply a dot of adhesive where you want to place your pearl or gem. Gently press it into place and allow it to dry completely. For added security, you can layer a top coat over the entire nail design, sealing everything in and preventing any pieces from coming loose.
Q: What nail design styles pair well with pearls and gems?
A: Pearls and gems can elevate a variety of nail design styles. For a classic look, consider using them in a French manicure by placing tiny pearls along the tips. Floral designs are also enhanced by adding small gems or pearls in the center of flowers. Geometric patterns can create a modern aesthetic when combined with metallic gems. Moreover, a minimalistic style can benefit from a single pearl or gem on an otherwise simple nail, making it a statement piece without being too overwhelming.