Cozy up your look this autumn with stunning nail art that perfectly captures the essence of the season. As the leaves change and temperatures drop, you have the perfect opportunity to express your style through warm, inviting designs that reflect the rich colors and textures of fall. In this guide, you will discover various nail art ideas and techniques that you can easily incorporate into your manicure routine, ensuring your nails are just as ready for the season as your wardrobe.
Key Takeaways:
- Seasonal Colors: Embrace warm and rich tones like burgundy, mustard, and pumpkin to reflect the fall atmosphere.
- Cozy Designs: Incorporate elements such as leaves, sweaters, and pumpkins to create inviting nail art that resonates with the season.
- Textures and Techniques: Experiment with matte finishes, nail stamps, or 3D embellishments for an elevated cozy look.
Color Palette for Fall Nail Art
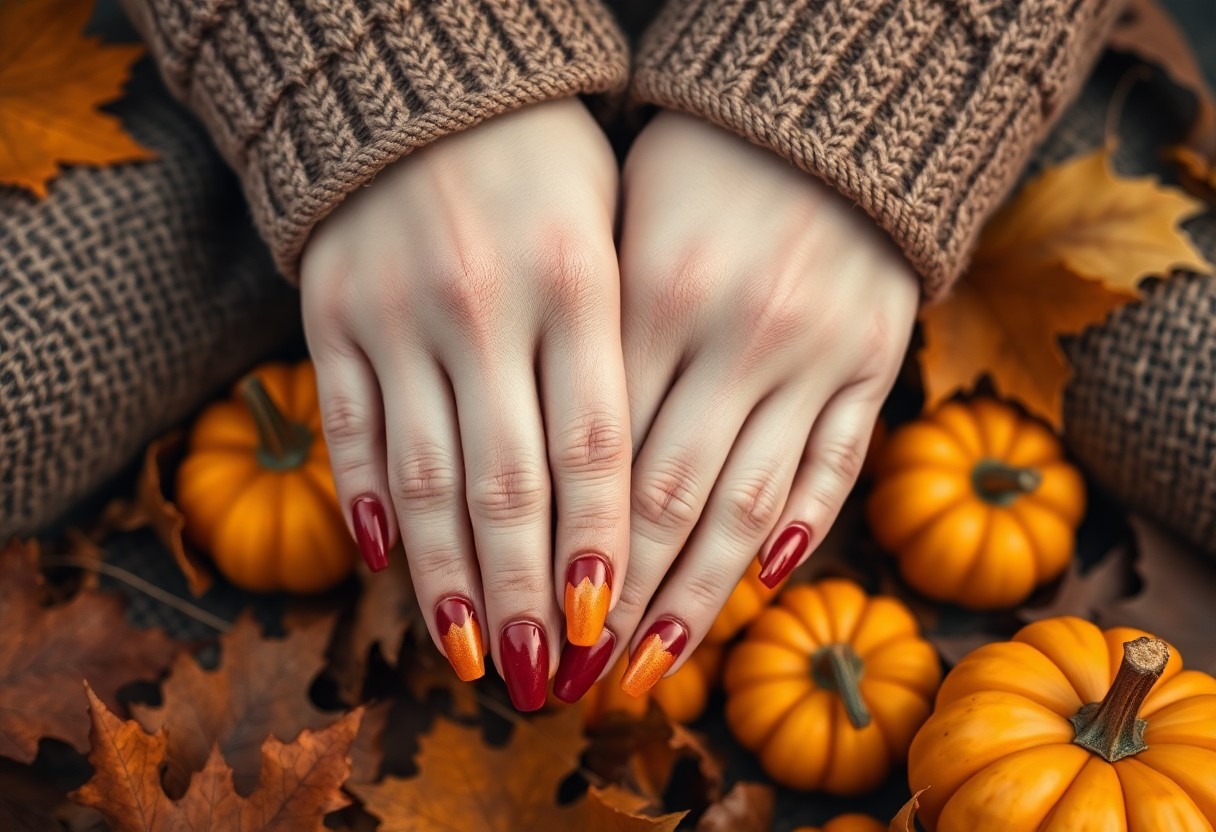
The beauty of fall nail art lies in its rich color palette, filled with hues that perfectly capture the essence of the season. As leaves change and a chill fills the air, your nails can transform into a canvas reflecting those warm, inviting tones. Experimenting with various shades will help you express your personal style and embrace the cozy vibes of fall.
Earthy Tones
Between deep browns, rusty oranges, and muted greens, earthy tones offer a grounded yet stylish aesthetic for your fall nail designs. These colors evoke the natural landscape of autumn, ensuring your nails complement the seasonal scenery beautifully. Incorporating earthy shades creates a warm and soothing atmosphere, perfectly aligning with this comforting time of year.
Warm Neutrals
Against a backdrop of vibrant autumn shades, warm neutrals serve as the perfect foundation for your nail art. This palette includes soft beiges, taupes, and warm grays, providing a versatile canvas that enhances any design you choose. Warm neutrals not only evoke a sense of calm but also allow the intricate patterns or accents you create to shine without overwhelming your overall look.
Also, warm neutrals can easily transition from day to night, making them ideal for any occasion. Pairing these colors with gold or copper accents can add a touch of elegance, while matte finishes lend a modern twist. You can mix and match warm neutrals with bolder hues to create unique combinations that reflect your personal style while keeping your fall aesthetic on point.
Popular Fall Nail Art Trends
Clearly, the arrival of fall ushers in a delightful array of nail art trends that capture the essence of the season. You can explore rich, warm hues, intricate designs, and cozy patterns that evoke the spirit of autumn. From earthy tones to playful motifs, these trends not only enhance your style but also celebrate the beauty of this transitional season.
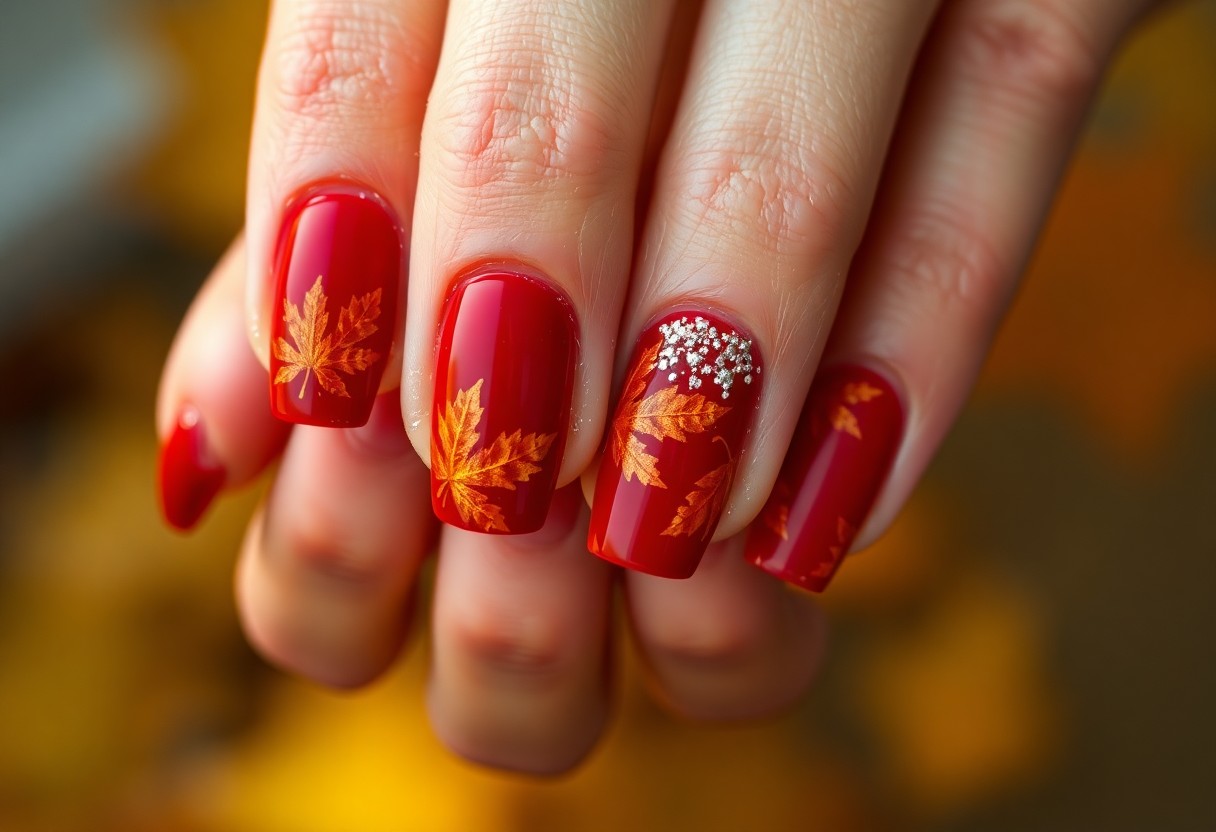
Leaves and Nature-Inspired Designs
Against the backdrop of fall’s picturesque scenery, nature-inspired nail art designs flourish. You can incorporate leaf motifs, acorns, and earthy tones that echo the vibrant colors of changing foliage. These designs allow you to express your appreciation for nature while keeping your nails chic and seasonal.
Plaid and Cozy Patterns
The cozy comfort of plaid and other textured patterns make them a go-to choice for fall nail art. You can enjoy the warmth and familiarity these designs provide, often reminding you of your favorite flannel shirts and comfy blankets. With a mix of colors and styles, plaid patterns offer you versatile options to match your fall wardrobe.
Consequently, you can play with various plaid designs that reflect your personal style. Opt for classic red and black or navy and green combinations, or experiment with unexpected color palettes to make a statement. Mixing plaid with accents such as metallics or glitter adds a touch of glamour to otherwise warm designs. No matter how you choose to style your nails, plaid patterns will undoubtedly give your autumn look a cozy and inviting vibe.
Seasonal Nail Art Techniques
Once again, as the leaves begin to change and the chill sets in, you can elevate your nail game with various seasonal techniques. Consider exploring 52 Fall Nail Designs to Inspire Your Next Mani that showcase creative methods that bring autumnal vibes straight to your fingertips. From stamping to ombre effects, these techniques will help you embrace the cozy season in style.
Stamping and Nail Decals
Stamping is a fun and efficient way to achieve intricate designs on your nails without the need for a steady hand. With various plates and tools available, you can create stunning patterns that reflect the essence of fall. Nail decals are another excellent option for adding cute accents, like pumpkins or leaves, which can easily be applied for a personalized touch.
Ombre Effects and Gradient Styles
Around this time of year, ombre effects and gradient styles become particularly popular, allowing you to play with rich color transitions that mimic the beauty of autumn. This technique can create a seamless fade between shades that evoke the stunning colors of fall foliage.
Gradient techniques, like a soft blend from deep burgundy to burnt orange, can evoke the warmth of cozy sweaters and falling leaves. You can achieve this look with a makeup sponge or even a brush for more control. Consider pairing matte and glossy finishes to add depth to your design. The effect is not only visually striking but also easy to customize, making it perfect for everyday wear or special occasions!
Tools and Supplies for Creating Fall Nail Art
After gathering inspiration for your fall nail designs, it’s time to collect the necessary tools and supplies to bring your vision to life. Having the right items at your disposal will make the process easier and more enjoyable as you create stunning nail art that reflects the cozy spirit of the season.
Essential Nail Tools
Across your nail art journey, you’ll need to ensure that you have vital nail tools handy. A good-quality nail file, cuticle pusher, and a set of fine nail brushes will help you achieve precision and create intricate designs with ease. Additionally, a dotting tool can be invaluable for adding fun details and patterns to your nails.
Recommended Nail Polish Brands
Among the numerous nail polish options available, certain brands stand out for their rich autumnal colors and long-lasting formulas. Seek out brands that are known for their quality pigment and smooth application to achieve salon-like results at home.
Tools and supplies play a significant role in your nail art experience. Brands such as OPI, Essie, and Zoya offer a diverse range of fall-inspired shades that can complement any design you choose. Look for polishes with a blend of cremes, metallics, and shimmers to create depth and interest in your nail art. Investing in quality nail polish not only enhances your art but also ensures a longer-lasting finish, ultimately making your seasonal manicure more enjoyable.
Maintenance Tips for Fall Nail Art
Unlike other seasons, fall requires specific maintenance for your nail art to keep it looking fresh. To ensure its longevity, adhere to the following tips:
- Moisturize your nails daily to prevent dryness.
- Use a top coat every few days to maintain shine and protect your design.
- Avoid harsh chemicals that can weaken both your nails and art.
- Wear gloves when doing household chores.
This will help your designs last longer, giving you the chance to try out 59 Cute Fall Nail Designs and Ideas Trending in Autumn … as they seasonally change.
Protecting Your Nail Art
Among the best practices for protecting your nail art is to stay away from water too long, as it can cause lifting and chipping. Always apply a nourishing cuticle oil to keep surrounding skin hydrated and shield your artwork from potential damage.
Touch-Up Techniques
After a few days, you might start noticing some wear on your nail art. Don’t worry; this is common! A simple touch-up can revive your manicure and ensure it continues to look its best throughout the season.
Protecting your art means learning some easy touch-up techniques. Keeping a small bottle of your nail polish handy allows you to fix minor chips quickly. For intricate designs, a fine brush can help you repaint details precisely. By doing this, you can maintain a polished look, allowing you to enjoy your fall nail art to the fullest.
Inspiring Fall Nail Art Ideas
Many nail designs this fall embrace the season’s warm colors and cozy vibes. From rich burgundies and deep oranges to leafy patterns and textured finishes, you can find plenty of inspiration to showcase your autumn spirit. Whether you’re gearing up for a pumpkin patch visit or just want to cozy up at home, these designs will elevate your look and bring joy to your fingertips throughout the season.
Simple DIY Designs
One of the easiest ways to express your fall enthusiasm is by creating simple DIY nail art at home. You can experiment with colors like burnt orange or olive green, and add charming accents like tiny leaves or dots using a dotting tool or a toothpick. This approach not only saves you time and money but also allows you to customize your designs according to your personal style and preferences.
Salon-Approved Looks
Nail art options at the salon can elevate your autumn aesthetic significantly. A skilled technician can execute intricate designs that feature seasonal motifs, like pumpkins, acorns, or shimmering gold leaf accents, all while ensuring your nails are impeccably polished and long-lasting.
Another great benefit of opting for salon-approved looks is the professional finish and variety of techniques available. Your nail technician might suggest methods such as ombre styles or gel finishes that not only enhance the design but also improve durability. Plus, using high-quality products will keep your nails looking fresh and vibrant throughout the fall season, making it easier for you to flaunt your fabulous nail art effortlessly.
Conclusion
As a reminder, fall nail art offers a delightful way to embrace the season’s warmth and aesthetic. By incorporating cozy designs like rich earth tones, playful patterns, and seasonal motifs, you can elevate your nail game and reflect the beauty of autumn. Whether you opt for intricate details or simple elegance, your nails can serve as a canvas for your seasonal spirit. Explore various techniques and let your creativity shine as you enjoy the comforting vibes of fall through your nail art.
FAQ
Q: What are some popular fall nail art themes for this season?
A: This season, popular fall nail art themes include warm autumn colors like burgundy, mustard, and forest green. Designs often feature leaves, pumpkins, acorns, and cozy sweaters. Other trends incorporate plaid patterns and metallic accents to capture the essence of fall.
Q: How can I create a cozy nail art design at home?
A: To create a cozy nail art design at home, start by painting your nails with a base coat to protect them. Choose deep, warm colors for your base and let them dry. Use nail art brushes or dotting tools to add designs like leaves or knitted textures. Finish with a top coat for shine and longevity.
Q: What nail shapes work best for fall nail designs?
A: Fall nail designs look great on various shapes, but some of the best options include oval and almond nails, as they provide a soft, cozy feel that complements seasonal designs. Squoval shapes also work well, offering a combination of elegance and practicality.
Q: How long do fall nail designs typically last?
A: The longevity of fall nail designs depends on several factors, including the type of polish used, application method, and daily wear and tear. Generally, a well-applied gel manicure can last up to two to three weeks, while traditional polish may last about a week with proper care.
Q: Are there any recommended products for achieving the best fall nail art results?
A: For achieving the best fall nail art results, consider using high-quality nail polishes in fall colors, along with a good base and top coat for optimal wear. Nail art kits with brushes, dotting tools, and nail stickers can help create intricate designs. Look for brands that offer long-lasting, chip-resistant formulas.