Designs

The Best Nail Designs for Prom Night

Many aspects go into making your prom night unforgettable, and your nails are no exception. As you prepare for this magical event, having the perfect nail design can enhance your overall look and boost your confidence. In this post, we will explore a variety of stunning nail designs that are sure to complement your prom attire and express your unique style. From elegant classics to bold statements, you’ll find inspiration that resonates with you and elevates your special night.

Key Takeaways:

  • Trendy Colors: Embrace popular prom colors like metallics, pastels, and glitter to complement your attire.
  • Creative Nail Art: Consider unique designs such as floral patterns, geometric shapes, or ombre effects to showcase your personality.
  • Durability Matters: Opt for long-lasting nail products to ensure your manicure stays flawless throughout the night.

Trending Nail Shapes for Prom Night

While it’s crucial to choose the right outfit and hairdo for prom night, your nails play a significant role in completing your overall look. Trending nail shapes can enhance your style, express your personality, and make a lasting impression. Here’s a look at some of the most popular nail shapes that will steal the spotlight on prom night.

Classic Almond

Against the backdrop of various nail shapes, the classic almond style remains timeless. This shape mimics the gentle curves of an almond, offering an elegant and sophisticated look that’s perfect for any formal occasion. You can opt for soft pastel shades or striking hues, enhancing your overall prom aesthetic.

Bold Coffin

Between chic and edgy, the bold coffin shape stands out for its distinctively wide and tapered design. This shape complements dramatic nail art, allowing you to experiment with designs that draw attention, making it a popular choice for individuals seeking a bolder statement on prom night.

Nail artists have embraced the bold coffin shape due to its versatility and strength. This shape works beautifully with various nail designs, from intricate florals to geometric patterns. Whether you choose a high-gloss finish or matte look, bold coffin nails will accentuate your confidence and style, ensuring your hands are as stunning as your gown.

Elegant Stiletto

Across the spectrum of nail shapes, the elegant stiletto is renowned for its fierce and sharp appearance. This shape creates elongated nails that can add an element of glam to your prom look. You can opt for simple colors or adorned designs to elevate your overall outfit.

With stiletto nails, the sky’s the limit regarding design possibilities. You can use rhinestones, glitters, or ombre effects to create a dramatic flair that suits your personality. As an eye-catching choice, elegant stiletto nails will definitely give you a bold and fashionable edge at your prom, making them an excellent choice for your special night.

Popular Nail Colors for Prom

There’s no denying that the color of your nails can enhance your overall prom look. Choosing the right nail color is necessary in complementing your outfit and making a statement. This year’s popular nail colors range from elegant neutrals to striking metallics, offering a variety of options for every style and personality.

Timeless Neutrals

After all, timeless neutrals are a go-to choice for any prom look. Shades like nude, soft beige, and delicate blush not only exude sophistication but also complement a wide range of dress colors. These versatile hues allow your nails to blend in, ensuring your overall appearance remains polished and chic.

Vibrant Pastels

Pastels are perfect for adding a touch of playful elegance to your prom attire. Light lavender, mint green, and baby blue are radiant options that evoke a sense of freshness and whimsy. Pastels beautifully contrast with bold outfits, providing a light-hearted touch that captures the joyous spirit of the event.

Hence, vibrant pastels are becoming increasingly popular, as they suit various skin tones and add a romantic flair to your nails. They’re an excellent way to express your personality while remaining on-trend. Whether you choose a solid pastel shade or opt for artistic designs, these colors will surely make your nails the talk of the night.

Bold Metallics

Colors like gold, silver, and rose gold bring a fierce element to your prom nails. The shimmer and shine of metallics make a strong statement, perfectly in line with the glamour of prom night. You can opt for a full metallic manicure or incorporate these shades as accents to elevate your nail game.

Consequently, bold metallics are favored for their eye-catching appeal and ability to seamlessly align with your prom dress. Whether you prefer a high-shine chrome look or an iridescent finish, these colors can instantly transform your nails into a stunning accessory that complements the dazzling atmosphere of the evening.

Nail Art Techniques for a Glamorous Look

All eyes will be on your nails as you dance the night away at prom, and incorporating the right techniques can elevate your look. From delicate ombre styles to sparkling glitter accents, there are various nail art techniques you can choose from to complement your prom outfit and express your personal style. Whether you prefer a subtle touch or something more eye-catching, these designs will ensure your nails are as glamorous as the rest of your ensemble.

Ombre Designs

For a dreamy effect, opt for ombre designs that blend complementary colors for a stunning gradient look. You can choose shades that match your dress or go for bold contrasts to stand out. This technique adds depth and dimension to your nails, giving them a sophisticated finish that is perfect for prom night.

Glitter Accents

After you’ve decided on your base color, consider adding glitter accents to create a dazzling focal point. Sparkling details can elevate even the simplest nail designs, ensuring your look radiates elegance and glam. From a sprinkle of fine glitter to bold glitter stripes, the options are endless.

In fact, glitter accents are the perfect way to catch the light as you move, making your nails pop throughout the night. You can apply glitter to just one or two nails for an understated elegance, or go all out and cover your entire manicure for maximum impact. Experiment with different types of glitter—chunky or fine—to find the perfect finish to match your personality.

Floral Patterns

With floral patterns, you can add a touch of whimsy and romance to your prom nails. Whether you choose soft pastels or vibrant colors, floral designs bring a charming detail to your overall look. You can go for intricate designs or opt for simple blossoms, depending on your style and the time you have to create your nail art.

Also, floral patterns can be versatile! You can mix and match colors to create a bridal-style nail or stay bold with bright hues for a more playful vibe. Adding a glossy top coat will enhance the beauty of your designs, ensuring they look fresh throughout the night and highlight the elegance of your prom attire.

Embellishments to Elevate Your Nail Design

Unlike basic nail art, embellishments can transform your manicure into a show-stopping accessory for prom night. Adding sparkling details not only enhances your overall look but also showcases your personal style. Whether you opt for rhinestones, metallic foils, or nail foils, these elements can take your nail design to the next level and help you stand out amongst the crowd.

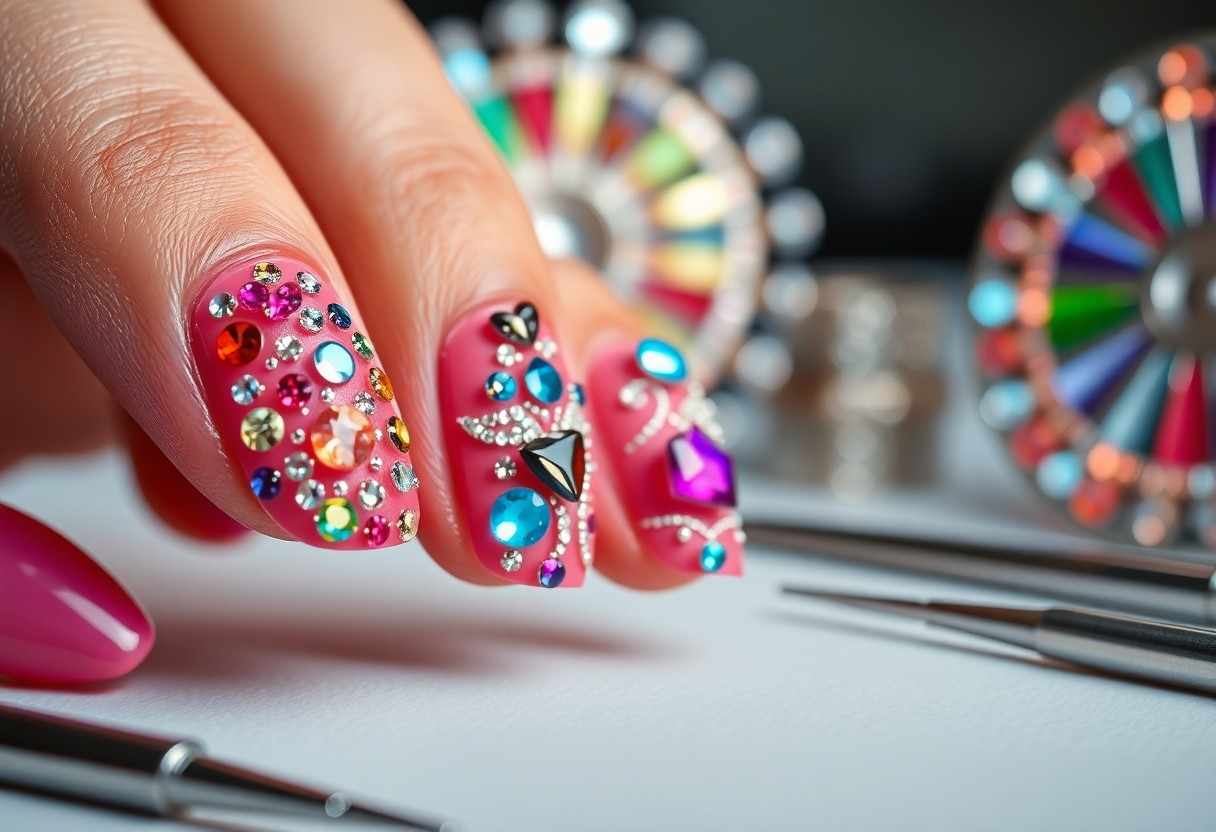
Rhinestones and Gems

Your nails will dazzle when you incorporate rhinestones and gems into your design. These sparkling additions can be strategically placed on accent nails or used to create intricate patterns, lending a luxurious feel to your look. For prom, consider choosing jewels that match your gown for a cohesive and glamorous ensemble.

Foil and Metallic Strips

For a modern twist on nail art, consider using foil and metallic strips to elevate your design. These materials can add a bold, eye-catching contrast to traditional polish, creating a stunning effect that captures the light beautifully. Whether applied in a geometric pattern or used for delicate accents, metallics can give your nails a sophisticated edge.

Plus, foil and metallic strips are versatile and easy to apply, making them perfect for a last-minute touch-up. You can choose from a variety of finishes, such as gold, silver, or holographic, which can suit any dress color or style. The reflective quality of these materials ensures that your nails will stand out on the dance floor and complement your ensemble brilliantly.

Nail Foils

An exciting option to consider for your prom nails is nail foils, which add a unique texture and dimension. These foils can come in various designs, from bold prints to intricate patterns, allowing you to customize your look easily. They provide an eye-catching alternative to traditional nail polish, making your nails a focal point of your overall appearance.

Foils can be applied over a base color or used alone for a minimalist design. The application process is simple; just apply adhesive and press the foil down for a chic finish. This technique gives your nails an artistic flair and can be combined with other embellishments like rhinestones for a truly statement-making look. With nail foils, your prom night nails will undeniably be unforgettable.

DIY vs. Salon: Choosing the Best Option for Prom

Your nail choices can set the tone for your entire prom look, and deciding between a DIY approach or professional salon services is key. While DIY offers a fun creative outlet, salon experiences often bring expert craftsmanship and unique designs. Weighing both options can help you achieve nails that not only look stunning but also feel personally tailored to your style for this special night.

Benefits of DIY

About DIY nails allows you to unleash your creativity and personalize your designs to match your prom attire perfectly. You can experiment with various colors, patterns, and techniques, all in the comfort of your home. Additionally, it can be more budget-friendly, saving you both time and money while still delivering a unique touch to your overall look.

Advantages of Professional Services

About opting for professional salon services ensures a polished finish and often offers access to advanced techniques and intricate nail art that might be challenging to accomplish on your own. Skilled technicians can provide personalized advice, ensuring that your nails complement your dress and style perfectly. This not only enhances your overall appearance but also helps alleviate any stress you may have about your prom preparations.

Another benefit of professional services is the time-saving aspect; salons have the tools and expertise to complete your manicure efficiently, leaving you free to focus on other vital prom details. The high-quality products used by professionals can also lead to longer-lasting wear, ensuring your nails remain stunning throughout the night. Plus, the pampering experience can be a wonderful way to get into the prom spirit!

Nail Care Tips Before Prom Night

Keep your nails looking their best with these vital nail care tips:

  • Moisturize your hands and cuticles regularly.
  • File your nails to your desired shape.
  • Buff the surface for a smooth finish.
  • Apply a strengthening base coat before polish.
  • Consider a professional manicure for added flair.

After applying these tips, explore The 35 Best Prom Nail Ideas to Complete Your Look for inspiration.

Preparing Your Nails

Care for your nails by soaking them in warm water and using a gentle scrub to remove any dirt. Follow this with a nourishing cuticle oil to soften the cuticles for easy pushback. Ensure your nails are clean and dry before applying polish to achieve a long-lasting finish.

Maintenance for Longevity

Between now and prom night, maintain your polished look by applying a top coat every few days. This not only adds shine but also protects your manicure from chips and wear. Consider wearing gloves while doing chores to prevent damage.

For instance, protecting your nails from harsh chemicals and excessive moisture will help keep your manicure intact. Regularly check for any signs of wear and touch up as needed to ensure your nails look flawless throughout the evening. A little extra care goes a long way in making your nails shine bright on your special night.

Final Words

With this in mind, choosing the best nail designs for prom night is all about expressing your personal style while complementing your dress and overall look. Whether you go for classic elegance, bold colors, or intricate details, the right nails can elevate your entire ensemble. Take the time to explore different options, and consider what makes you feel confident. Your nails can be the perfect finishing touch that enhances your special night, ensuring you shine as brightly as the memories you will make.

FAQ

Q: What are some popular nail design trends for prom night?

A: Some of the most popular nail design trends for prom night include elegant ombre styles, glitter and metallic finishes, intricate nail art featuring flowers or geometric shapes, and classic French tips with a twist. Additionally, pastel colors and bold jewel tones are also trending, allowing for both subtle and eye-catching options.

Q: How can I choose the right nail color to match my prom dress?

A: To choose the right nail color, consider the primary color of your prom dress. For example, if your dress is a bright color, such as red or royal blue, opt for complementary or contrasting shades like gold or silver. If your dress features pastel tones, soft pinks or nude shades may work best. Always test colors against fabric swatches to ensure harmony.

Q: Should I opt for nail art, or keep it simple for prom?

A: It ultimately depends on your personal style and the overall look you want to achieve for prom. Nail art can add a fun and creative touch, especially if your dress is simpler in design. Conversely, if your dress is heavily embellished or patterned, simple, clean manicures can provide a classic and elegant complement without overwhelming your look.

Q: How can I ensure my nails stay looking great all night long?

A: To keep your nails looking fabulous throughout prom night, start with a good quality base coat for durability. Avoid excessive hand washing or using your hands for heavy tasks, as this can chip your polish. Carry a small touch-up kit with imperative items like a mini nail file and a bottle of your polish color for quick fixes during the evening.

Q: What nail care tips should I follow in the lead-up to prom night?

A: In the days leading up to prom, focus on keeping your nails and cuticles healthy. Moisturize your hands and nails regularly with cuticle oil or hand cream. Avoid harsh chemicals that can weaken your nails, and consider a gentle manicure to shape and smooth them. If you wish to grow your nails out, maintain a balanced diet rich in vitamins that promote nail health.

The Best Nail Brushes for Intricate Designs

Brushes play a vital role in achieving stunning nail art, especially when it comes to intricate designs. With the right tools in your arsenal, you can elevate your nail game and create detailed patterns that stand out. This guide will introduce you to some of the best nail brushes available, tailored specifically to meet your creative needs. From fine detailing to flawless strokes, discover how these brushes can enhance your artistry and help you achieve the nail designs you’ve always dreamed of.

Key Takeaways:

  • Brush Types: Choose the right type of brush, such as detail, liner, or fan brushes, for creating intricate nail designs.
  • Quality Materials: Opt for brushes made from high-quality materials, like synthetic or natural hair, to ensure smooth application and durability.
  • Size Matters: Select varying brush sizes to achieve different levels of detail and precision in your nail art.

Understanding Nail Brushes

While selecting the right nail brush is important for achieving intricate designs, understanding the various types and materials can significantly enhance your nail art experience. Each brush serves a distinct purpose, whether for fine lines or broader strokes, and knowing their differences helps you choose the right tool for your design vision.

Types of Nail Brushes

While there are numerous types of nail brushes available, familiarizing yourself with the most common can streamline your artistry.

  • Lining brushes for detailed designs
  • Detail brushes for fine work
  • Flat brushes for filling and shading
  • Fan brushes for texture effects
  • Dotting tools for perfect dots

The right brush can elevate your nail art to new heights.

TypePurpose
Lining BrushCreating precise lines
Detail BrushAdding intricate details
Flat BrushFilling larger areas
Fan BrushProducing texture and effects

About the overall design process, understanding the nuances of each brush type can significantly impact the results of your nail artistry.

Materials Used in Nail Brushes

Brushes come in various materials, each influencing the performance and feel during application. The materials play a key role in how the brush interacts with both the polish and your nails.

For instance, natural bristles offer a soft touch that smoothly glides over your nails, making them ideal for blending and applying polish. Synthetic brushes, on the other hand, are often more durable, providing precision for intricate details without losing their shape. Choosing between these materials depends on your style and technique, so it’s good to experiment with both types to find what works best for your specific needs.

Features to Look for in Nail Brushes

Some crucial features to consider when selecting nail brushes include bristle quality, handle design, and ease of cleaning. A good nail brush should provide precision and control, allowing you to create intricate designs effortlessly. Investing in high-quality brushes not only enhances your artistry but also ensures that your tools last longer. Pay attention to the unique attributes of each brush to find the perfect match for your nail art needs.

Bristle Quality

Before choosing a nail brush, evaluate the bristle quality as it significantly affects the application and results. Opt for brushes made of synthetic or natural hair that provide flexibility and durability. High-quality bristles enable you to create fine lines, detailed patterns, and smooth strokes, enhancing the overall appearance of your nail designs.

Handle Design

One important aspect to consider is the handle design of the brush. A comfortable and ergonomic handle allows for better grip and control, making intricate designs more manageable. This is especially important for lengthy sessions, as a well-designed handle can help reduce hand fatigue.

Look for nail brushes with handles that fit well in your hand; this will enhance your precision during application. Some brushes feature a tapered or oval shape, providing additional comfort and preventing slippage. A lightweight handle can also contribute to extended use without discomfort, allowing you to focus on perfecting your unique creations without distractions.

Top Nail Brushes for Intricate Designs

Not all nail brushes are created equal, especially when it comes to intricate designs. You want brushes that offer precision and control, making them ideal for creating stunning nail art. Explore the best options at Nail Art Brushes | Professional Quality at Wholesale Price to elevate your skills and achieve the perfect look.

Fine Detail Brushes

Among the most crucial tools in your nail art arsenal are fine detail brushes. These brushes excel at creating intricate designs, allowing you to draw fine lines, delicate patterns, and tiny embellishments with ease. The precision of these brushes enables you to achieve professional-looking results, making them a must-have for any nail artist.

Flat and Angular Brushes

On the other hand, flat and angular brushes play a pivotal role in achieving various nail art techniques. These brushes are perfect for applying larger areas of color, creating gradients, and achieving sharp lines. Their unique shapes provide versatility, empowering you to experiment with different styles and designs.

Also, flat and angular brushes can be used for techniques like nail stripping and filling in designs. Their ability to cover larger areas effortlessly allows you to create stunning effects while maintaining clean lines. Whether you are doing a classic French tip or a more modern design, investing in high-quality flat and angular brushes will significantly enhance your nail artistry.

How to Care for Your Nail Brushes

Once again, taking care of your nail brushes ensures they remain effective for intricate designs and can prolong their lifespan. Proper maintenance not only keeps your brushes in prime condition but also enhances the quality of your nail art. For additional tips, you can find suggestions from fellow enthusiasts in this Help! Looking for good nail art brushes! discussion.

Cleaning Techniques

About cleaning your nail brushes, it’s vital to do so immediately after use. Rinse them with warm water and mild soap to remove paint and product residue, gently shaping the bristles back into their original form. For stubborn remnants, a specialized brush cleaner can be effective.

Storage Tips

By properly storing your nail brushes, you protect their bristles from damage and maintain their shape. Here are some helpful storage suggestions:

  • Keep brushes upright in a holder to avoid bending the bristles.
  • Store them in a cool, dry place away from direct sunlight.
  • Consider using a brush pouch to keep them organized and clean.

This will ensure easy access and longevity of your tools.

With thoughtful storage practices, you can further prolong the life of your brushes. Consider these additional tips:

  • Avoid mixing brushes with other tools to prevent accidental damage.
  • Invest in a dedicated drawer or case to keep your nail art supplies organized.
  • Regularly check and clean the storage area to prevent dust buildup.

This will help maintain the quality of your tools for future projects.

Common Mistakes to Avoid

After selecting the perfect nail brush for your intricate designs, it’s important to navigate some common pitfalls to ensure the best results. Many beginners overlook details like cleaning and brush selection, leading to frustrating experiences and less-than-perfect nail art. By being aware of these mistakes, you can enhance your nail art technique and achieve the stunning results you desire.

Improper Cleaning

Common cleaning errors can significantly impact the performance and longevity of your nail brushes. Neglecting to clean your brushes after each use can lead to build-up of acrylics and polish, compromising the fine tip and precision needed for intricate designs.

Using the Wrong Brush for the Job

Above all, using the wrong brush type for your specific design can hinder your creative process and outcome. Each brush serves a unique purpose, whether it’s for detailed line work, filling in color, or creating intricate patterns.

Cleaning your brushes after each use is key to maintaining their effectiveness. If you regularly switch techniques or designs, having the right brush for each specific task will improve your outcomes. For instance, a detailer brush is ideal for fine lines, while a flat brush suits larger areas. Knowing the distinctions between brushes will elevate your nail art game and help you avoid frustration during your creative process.

Recommendations from Professionals

Now that you know the importance of having the right tools, professionals recommend opting for a variety of brush shapes and sizes to achieve precision in your intricate nail designs. From detail brushes for fine lines to flat brushes for filling in larger areas, having a well-rounded selection can elevate your nail art game. Don’t hesitate to invest a bit more in high-quality brushes to ensure longevity and performance in your work.

Tips from Nail Artists

From various nail artists, you can gain invaluable insights to enhance your nail art skills. Here are some tips they swear by:

  • Choose brushes based on specific design needs.
  • Clean your brushes after each use for longevity.
  • Practice on a nail wheel before applying on yourself or clients.

This can lead to a mastery of techniques that truly stand out.

Popular Brands

Nail artists often gravitate towards reputable brands that consistently deliver quality. With options like Kolinsky, Creative, and OPI, you can find brushes that meet your standards for intricate designs. Each brand offers unique brush shapes and bristle types, catering to different techniques and preferences. Investing in brushes from these brands ensures you’re equipped with tools that professionals trust, ultimately enhancing the quality of your artwork.

Final Words

The best nail brushes for intricate designs can elevate your nail art game significantly. By selecting the right brushes that suit your style and skill level, you can achieve stunning details and precision in your artwork. Investing in quality brushes tailored for fine lines, dot work, and other intricate techniques will enhance both your results and enjoyment of the process. With the right tools at your disposal, you have the potential to create mesmerizing nail art that truly reflects your creativity.

FAQ

Q: What types of nail brushes are best for intricate designs?

A: The best nail brushes for intricate designs typically include detail brushes, striping brushes, and oval or flat brushes. Detail brushes have fine tips suitable for creating tiny lines and intricate patterns. Striping brushes are designed with long, thin bristles that help in painting straight lines or stripes. Oval and flat brushes can be used for filling in larger areas while still allowing precision work. Choosing the right type of brush largely depends on the specific design technique you are looking to achieve.

Q: How do I choose the right size brush for detailed nail art?

A: When identifying a brush size for detailed nail art, consider the complexity of your design. For very fine and detailed work, a small detail brush with a thin tip is ideal. For slightly larger designs, a medium-sized brush can be more versatile. It’s advisable to have a variety of sizes on hand, as different designs may require different brush dimensions for optimal results.

Q: Are synthetic or natural hair brushes better for nail art?

A: Both synthetic and natural hair brushes have their advantages for nail art. Synthetic brushes are often more durable, easy to clean, and less prone to damage from acrylics and gel paints. They also maintain their shape better over time. Natural hair brushes, such as those made from Kolinsky sable, can provide a softer touch and excellent paint retention, which is beneficial for blending colors. Ultimately, the choice depends on personal preference and the specific techniques you plan to use.

Q: Can I use regular paintbrushes for nail art?

A: While you can technically use regular paintbrushes for nail art, it is generally not recommended. Nail art brushes are specifically designed for the unique curvature and small size of nails, which allows for better control and precision. Regular paintbrushes may have different bristle stiffness and shapes that could make it difficult to achieve the intricate details typical in nail art. It’s best to invest in brushes specifically made for this purpose to ensure the best results.

Q: How do I clean and maintain my nail brushes for intricate designs?

A: Proper cleaning and maintenance of your nail brushes are important for their longevity and performance. After each use, clean your brushes with a suitable brush cleaner or acetone immediately to remove any paint or gel. For stubborn residue, gently swirl the brush in the cleaner until it loosens. Reshape the bristles and lay the brushes flat to dry to maintain their shape. Avoid leaving brushes soaking in cleaner for extended periods, as this can damage the bristles. Regular care will ensure that your brushes remain effective for detailed nail artistry.

Trying 30 Days of Different Nail Art Designs

Nail art is not only a creative outlet but also a fashion statement that allows you to express your personality. By begining on a 30-day challenge of different nail art designs, you can explore various techniques, styles, and themes that will elevate your manicure game. Each week, you’ll experiment with unique trends, from minimalist looks to bold patterns, enhancing your skills along the way. This journey will inspire you to embrace your creativity while keeping your nails looking fabulous and fresh throughout the month.

Key Takeaways:

  • Variety: Exploring different nail art designs enhances creativity and keeps your manicure fresh and exciting.
  • Skill Development: Trying new techniques each day can improve your nail art skills and boost confidence in your abilities.
  • Self-Expression: Nail art serves as a fun way to express personal style and individuality through unique designs.

The Basics of Nail Art

To get started with nail art, it’s important to understand fundamental techniques and designs that can elevate your manicure game. For inspiration, check out NailArtBreak, which offers a variety of tutorials ranging from simple to advanced styles. Familiarizing yourself with these basics can build a strong foundation for your nail art journey, allowing you to express your creativity while also ensuring a polished finish.

Essential Tools and Supplies

On your nail art journey, you’ll need a few important tools and supplies to get started. Stocking up on high-quality nail polish, brushes, dotting tools, and a good top coat will make all the difference in achieving professional-looking designs. Additionally, having nail tape, sponges, and a clean-up brush on hand can help create various techniques, from gradients to intricate patterns.

Choosing the Right Nail Polish

Nail polish selection can affect the outcome of your nail art significantly. Opt for polishes that offer good opacity, quick drying time, and long-lasting wear to enhance your designs and extend their lifespan.

Choosing the right nail polish involves considering the finish you desire, whether it’s matte, glossy, or glittery, and matching it to your planned design. Investing in a few high-quality brands known for their pigmentation can elevate your art. Don’t forget to explore various colors and textures, as this variety will allow you to experiment and develop unique styles that suit your personality.

Week 1: Classic Nail Art Designs

Some of the most timeless nail art designs are those that have stood the test of time. This week, you’ll explore classic techniques that enhance your nail game, presenting sophistication and elegance. From the iconic French manicure to playful polka dots, these designs allow you to express your style while remaining effortlessly chic.

French Manicure

Around the world, the French manicure is celebrated for its simple yet sophisticated look. This design typically features a nude or sheer base with white tips, making your hands appear polished and elegant. Perfect for any occasion, it provides a clean and fresh aesthetic that complements various outfits.

Polka Dots

To add a fun and vibrant touch to your nails, consider the playful polka dot design. This classic motif can be through varied sizes and colors, allowing you to showcase your personality. No matter your color scheme, polka dots can easily transform your nails into eye-catching accessories.

It’s easy to create a polka dot design using a dotting tool or a toothpick. Start with a base coat of your choice, then select contrasting colors for your dots. You can play with different dot sizes and arrangements to achieve the desired look. Experiment with patterns, such as evenly spaced dots for a more uniform effect or sporadic placements for a whimsical feel. This versatile technique not only enhances your nails but also allows you to showcase your creativity. Perfect for a casual day out or a festive gathering, polka dots are a delightful addition to your nail art repertoire.

Week 2: Trendy Nail Art Techniques

For Week 2, you’ll examine the world of trendy nail art techniques that will take your designs to the next level. You can check out Day 1 of My 30 Day Nail Art Challenge to inspire your creativity. With each technique, you can enhance your skills and elevate your nail game this week.

Ombre Effect

One of the most popular techniques making waves in the nail art community is the ombre effect. This technique allows you to blend two or more colors seamlessly, creating a stunning gradient that adds depth to your nails. By choosing colors that complement each other, you can easily achieve a stylish look that’s perfect for any occasion.

Marble Nails

Week two wouldn’t be complete without marble nails, a sophisticated trend that mimics the elegant swirls of natural marble. To achieve this look, you start with a solid base color and then use a nail art brush or a toothpick to swirl together contrasting colors, creating a marble effect that is truly unique. Applying a top coat will enhance the marble’s shine and longevity, making your nails stand out even more.

Week 3: Creative and Fun Designs

All week long, you’ll explore nail art that adds a splash of creativity and fun to your personal style. This week is all about stepping outside the box with unique designs that reflect your personality. From bold color combinations to intricate patterns, you’ll find an array of ideas to elevate your nail game. Embrace your artistic side, and don’t be afraid to showcase your creativity through fun and eye-catching designs!

Geometric Patterns

Behind the trend of geometric patterns in nail art is a mix of precision and creativity. These designs are characterized by clean lines, sharp angles, and a variety of shapes that create stunning visuals. You can play with color contrasts or keep it monochrome, allowing for endless possibilities. Geometric patterns are not only stylish but also a fantastic way to express your artistic flair on your nails.

Floral Designs

With floral designs, your nails can blossom into beautiful works of art. These designs can range from delicate daisies to vibrant roses, allowing you to convey any mood or season. Whether you choose intricate hand-painted flowers or simple stickers, floral nail art adds a touch of elegance and charm to your look.

Hence, focusing on floral designs offers a refreshing approach to nail art that can be tailored to suit your tastes. You can experiment with different color palettes, from soft pastels to bold hues, while combining various flower types for a themed nail look. Seasonality can also play a role; bright florals for summer or muted tones for fall can keep your nails in tune with nature. Whether you’re a beginner or a pro, floral designs allow you to unleash your creativity while remaining timeless and chic.

Week 4: Seasonal and Thematic Art

Now it’s time to get creative with seasonal inspirations and themes. This week, you have the chance to express your individuality through vibrant designs that celebrate different occasions. Whether you’re planning for a festive holiday or embracing the colors of the changing season, these nail art ideas elevate your style while showcasing your personality.

Holiday-Inspired Nails

Along with the subtle beauty of everyday designs, you can bring the fun of the holidays to your fingertips. Embrace colors and motifs that reflect seasonal festivities, from glittery snowflakes for winter to blooming flowers in spring. Your nails can serve as a canvas for celebration, allowing you to share your holiday spirit with the world.

Summer Vibes

With warmer days on the horizon, you can channel that energy into cheerful nail designs that capture the essence of summer. Bright colors, playful patterns, and tropical themes can all be incorporated into your nail art, making it a perfect representation of leisurely days and bright sunshine.

In fact, summer vibes can inspire you to experiment with vibrant shades like coral, turquoise, and sunny yellow. Think tropical prints, palm trees, or even beach scenes for an added flair. You’ll find that mixing these elements can create fun nail art that not only looks great but also puts you in a summer state of mind, no matter the season!

Tips for Maintaining Your Nail Art

Many individuals admire beautiful nail art but often overlook its maintenance. To keep your designs looking fresh and vibrant, consider these tips:

  • Apply a clear top coat every few days to seal in your designs and prevent chipping.
  • Avoid harsh chemicals or prolonged exposure to water to maintain the integrity of your nail art.
  • Wear gloves while doing household chores to protect your nails from damage.
  • Moisturize your cuticles regularly to promote healthy nail growth.

Knowing these tips will help extend the life of your nail art and keep your manicure looking salon-fresh.

Long-lasting Techniques

Any nail art lover knows that time and effort can go to waste if your designs don’t last. To achieve long-lasting results, use high-quality nail polish, and always start with a base coat. Additionally, be sure to allow each layer to dry completely before applying the next one to minimize smudging or peeling.

Nail Care Best Practices

One of the best ways to maintain your nail art is by practicing proper nail care. Keeping your nails healthy and strong is imperative for beautiful designs that last longer. Regularly trim and shape your nails, and be mindful of your dietary choices, which can influence nail strength and growth.

Nail health is often overlooked but is vital for maintaining your artwork. A balanced diet rich in vitamins and minerals can significantly improve the appearance and strength of your nails. Consider supplementing your diet with biotin and staying hydrated. Additionally, consistently moisturizing your hands and cuticles can prevent dryness and brittleness, ensuring your nail art looks its best for as long as possible.

To wrap up

Drawing together various nail art designs over 30 days can be a transformative experience for your self-expression and creativity. As you explore different styles, techniques, and themes, you’ll not only expand your skills but also discover your unique preferences. Embrace the journey of experimenting with colors, patterns, and textures, and enjoy the process of creating beautiful art on your nails. By the end of the month, you’ll likely feel more confident in your abilities and inspired to continue innovating with your nail art.

FAQ

Q: What can I expect from trying 30 days of different nail art designs?

A: By trying 30 days of different nail art designs, you can expect to enhance your creativity, improve your nail art skills, and discover new techniques. Each day presents a unique design, which can help you build a diverse portfolio of styles. This challenge can also add a fun and artistic element to your daily routine, resulting in various looks that showcase your personality and taste.

Q: Do I need a lot of supplies to start this challenge?

A: While having a basic set of nail art supplies can be helpful, you don’t need an overwhelming amount to begin. Start with a few necessary tools such as nail polish in different colors, brushes, dotting tools, and nail stickers or stamps if you wish. As you progress through the challenge, you can gradually add to your collection based on the designs you want to experiment with.

Q: How can I find inspiration for each day’s nail art design?

A: Inspiration can come from various sources, such as social media platforms like Instagram and Pinterest, nail art blogs, or even your surroundings. You can explore seasonal themes, holidays, or color combinations that resonate with your mood. Additionally, consider creating a mood board or saving images of designs you admire to refer back to throughout the challenge.

Q: What should I do if I struggle with a particular design?

A: If you find a specific design challenging, it’s perfectly normal! Take a break and revisit it later, or look for tutorials that can guide you step-by-step. You might also try simplifying the design or modifying it with elements you are comfortable with. The goal is to enjoy the process and allow room for experimentation and creativity without putting too much pressure on yourself.

Q: Can I share my nail art journey with others?

A: Absolutely! Sharing your nail art journey can be incredibly rewarding and may even inspire others to participate. Consider documenting your designs on social media using relevant hashtags, or start a blog or journal to showcase your progress. Engaging with the nail art community online can provide positive feedback, tips, and encouragement as you begin on this creative challenge.

How to Add Rhinestones to Your Nail Designs

Rhinestones can transform your nail designs into eye-catching masterpieces that stand out. By incorporating these sparkling embellishments, you can elevate your manicure and showcase your unique style. In this post, you’ll learn practical tips and techniques to effectively add rhinestones to your nails, ensuring they stay in place and look fabulous. For a step-by-step guide, check out How to Attach Rhinestones to Nails: 13 Steps (with Pictures). Get ready to shine with your stunning nail art!

Key Takeaways:

  • Choose the right size: Select rhinestones that complement the nail design and the size of the nails for a balanced look.
  • Adhesive options: Use a strong nail adhesive or gel to securely attach rhinestones, ensuring they last longer without easily falling off.
  • Placement techniques: Experiment with different placements, like accent nails or patterns, to enhance your overall nail design creativity.

Choosing the Right Rhinestones

For creating stunning nail designs, selecting the right rhinestones is vital. The variety available in terms of colors, sizes, and finishes allows you to personalize your look. Consider the overall aesthetic you want to achieve and how the rhinestones will complement your base colors and patterns. Your choice can elevate a simple design into a dazzling statement piece.

Types of Rhinestones

With different types of rhinestones on the market, you can choose options that best fit your style. Here are some popular types:

  • Glass rhinestones
  • Acrylic rhinestones
  • Crystal rhinestones
  • Flatback rhinestones
  • Self-adhesive rhinestones

This makes it easy to find the perfect option for your nail art project.

TypeCharacteristics
GlassBrilliant shine, durable
AcrylicLightweight, budget-friendly
CrystalHigh-quality, premium shine
FlatbackEasy to apply, versatile
Self-adhesiveNo glue needed, convenient

Sizing Considerations

About choosing the right size of rhinestones, it is important to consider the scale of your nail design. Going for oversized stones can create a bold statement, while smaller options can add subtle elegance. Evaluate how the size aligns with the rest of your nail art to achieve a balanced look.

Rhinestones come in various sizes typically measured in millimeters. For nails, popular sizes range from 1mm to 5mm, depending on the detail you wish to portray. Make sure to assess your nail shape and design style to ensure that the rhinestones you choose enhance your overall look rather than overpower it. Mixing different sizes can also create an eye-catching effect, helping you to achieve the perfect design.

Preparing Your Nails

While getting your nails ready for rhinestone embellishments, it’s necessary to ensure they are clean and well-maintained. Start with removing any previous nail polish and gently push back the cuticles. Trim and file your nails to your desired shape, ensuring they are smooth and even. This preparation not only gives a polished look but also provides a clean canvas for the rhinestones to adhere to, enhancing the overall outcome of your nail design.

Nail Care Basics

By focusing on nail care basics, you lay the foundation for a great rhinestone design. Keep your nails well-hydrated by applying cuticle oil regularly, as this promotes healthy growth and strengthens your nails. Additionally, using a gentle scrub can help remove dead skin around the nails, ensuring a fresh appearance.

Selecting a Base Color

Selecting your base color is an important step in nail design. Choose a shade that complements the rhinestones you plan to use, as this will enhance the overall look of your nails. A neutral color can provide a chic backdrop, while bold shades can make your rhinestones pop.

At the same time, consider your personal style and the occasion when choosing your base color. Lighter shades such as pastels or whites create an elegant look, making them ideal for special events. Conversely, vibrant colors like reds or blues can add a fun and playful touch. Test a few swatches on your nails to ensure you’re happy with your color choice before proceeding with the rhinestones.

Tools and Materials Needed

Unlike other nail art techniques, adding rhinestones requires specific tools and materials to achieve the best results. You will need quality rhinestones in various sizes and shapes, a reliable adhesive, and nail tools like a picker or dotting tool to help place the stones precisely. Additionally, consider having a clean-up brush and a top coat to secure your design and provide a professional finish.

Essential Tools

At the very least, you will need a rhinestone picker tool, which makes it easier to handle small gems, and a dotting tool for precise placement. Nail tweezers can also be helpful to pick up and position your rhinestones accurately without any mess. A clean-up brush is useful for tidying up any excess adhesive around the rhinestones.

Recommended Adhesives

Any strong adhesive that can hold your rhinestones in place is suitable for nail designs. Some popular choices include nail glue, gel top coat, or clear-drying craft glue. Each type offers unique benefits, allowing for flexibility in your designs.

For instance, nail glue provides a strong hold and is specifically formulated for use on nails, ensuring your rhinestones stay in place longer. Gel top coat not only attaches rhinestones but also adds a glossy finish to your designs. Clear-drying craft glue is a great option if you’re looking for something more accessible, but ensure it is safe for use on nails to avoid any damage. Choose the adhesive that best fits your crafting style and the durability you desire.

Techniques for Applying Rhinestones

All nail designs can benefit from the strategic application of rhinestones. Whether you want a simple accent or an intricate pattern, understanding these techniques will help elevate your nail game. Choose the method that suits your style and skill level, and let your creativity shine by embedding these sparkling gems into your manicures.

Simple Placement Methods

Along with traditional nail polish, you can easily incorporate rhinestones into your designs using straightforward placement methods. Start by selecting a nail glue or a gel base coat, apply a tiny dot onto your nail, and carefully place each rhinestone where you want it. Use a toothpick or rhinestone picker for precision, and finish with a top coat to secure your design.

Advanced Design Techniques

Techniques for advanced design allow you to create stunning, eye-catching patterns using rhinestones. You can achieve elaborate artistry by employing tools and methods that require more skill but yield beautiful results. Consider trying out the following techniques:

Advanced Design Techniques

  1. Gradient Placement: Mix sizes and colors for a blended effect.
  2. Negative Space: Create designs that leave parts of the nail unembellished.
  3. Layering: Stack multiple rhinestones for depth.
  4. Geometric Patterns: Arrange stones in precise, angular designs.
  5. 3D Shapes: Combine rhinestones with other embellishments for a multidimensional look.

With these advanced techniques, you can craft unique nail art that captures attention. Combining your skills with creativity opens up a world of possibilities in rhinestone design. You can start by selecting a geometric shape, carefully mapping out your design on paper, and then translating it onto your nails with rhinestones. This strategic approach makes the process manageable and enjoyable.

Steps for Advanced Design Techniques

  1. Sketch your desired design on paper.
  2. Gather rhinestones of various sizes and colors.
  3. Practice the layout with dotting tools before applying glue.
  4. Use a top coat to seal and protect your design.
  5. Experiment with placement for personalized style.

Aftercare for Rhinestone Nails

Not properly caring for your rhinestone nails can lead to premature peeling and loss of your dazzling accents. To extend the life of your design, avoid exposing your nails to excessive water and harsh chemicals. Use gloves when doing dishes or cleaning, and be gentle when you wash your hands. Regularly apply a nourishing cuticle oil to keep your nails and the surrounding skin healthy and hydrated.

Maintaining Your Design

On a daily basis, be mindful of how you interact with surfaces. Avoid scraping your nails against hard objects and opt for a light touch when typing or using your phone. This attention will help maintain the integrity of your rhinestone accents, ensuring that they stay sparkling for longer.

Removing Rhinestones Safely

By taking the right approach, you can safely remove rhinestones without damaging your nails. Begin by softening the adhesive used for the rhinestones. You can do this with a generous application of acetone or a special nail polish remover designed for rhinestone removal.

In fact, be sure to soak a cotton ball in acetone and place it over the rhinestones for a few minutes to allow the glue to loosen. Afterward, gently lift the rhinestones with a wooden stick or cuticle pusher. Avoid pulling or yanking, as this can cause damage to your natural nail. Cleanse your nails afterward and apply a nourishing treatment to restore moisture and health to your nails and cuticles.

Creative Design Ideas

Once again, let your imagination run wild with rhinestone nail designs! Combine various shapes and sizes of rhinestones to create stunning patterns or incorporate them into intricate nail art. You can embellish the tips of your nails or create unique designs using negative space. The key is to blend rhinestones with your chosen colors and styles to achieve an overall cohesive look that truly reflects your personality.

Themed Nail Designs

On your journey to fabulous nail art, consider adopting themed designs that resonate with your personality or current occasions. Whether you’re celebrating a holiday, a special event, or just expressing yourself, using rhinestones as accents can elevate your nail art game. Choose colors and shapes of rhinestones that complement your theme for a polished, chic effect.

Mixing and Matching Rhinestones

One of the most exciting aspects of nail design is the ability to mix and match rhinestones. You can create a playful look by combining different colors, sizes, and shapes. This allows you to express your unique style and creativity while ensuring your nail design stands out.

Further, mixing and matching rhinestones opens up endless possibilities for your nail designs. Experiment with contrasting colors and textures to create dynamic patterns. Pair larger stones with smaller ones for an eye-catching effect, or use similar shades for a more subtle approach. Don’t hesitate to explore various placements, layering rhinestones in a gradient or clustering them together for added drama. Your nails can be a canvas for your artistic flair, letting your creativity shine through with every design you create.

Summing up

Now that you’ve learned the steps to add rhinestones to your nail designs, you can elevate your nail game with stunning embellishments. Whether you choose to apply a few strategically placed stones or create intricate patterns, the key is to ensure they are securely fixed with the right adhesive. Practice will make perfect, and soon you’ll find yourself experimenting with different sizes and colors to match your personal style. Enjoy the creativity and make your nails truly stand out!

FAQ

Q: What types of rhinestones are best for nail designs?

A: When identifying rhinestones for nail designs, consider the type of adhesive you will be using. Flat-back rhinestones are ideal as they sit well on the nail surface. Crystal or glass rhinestones provide a more glamorous look, while acrylic rhinestones are lighter and can be easier to work with. Additionally, ensure to choose a size that complements the design – smaller sizes for intricate patterns and larger stones as focal points.

Q: How do I properly apply rhinestones to my nails?

A: To apply rhinestones, first, create your desired nail design and allow the base coat to dry completely. Use a dotting tool or a toothpick dipped in nail glue to pick up the rhinestone. Place it gently onto the nail where you want it to stick. Make sure to press down slightly to secure a stronger bond. Once you’ve applied all rhinestones, seal the design with a top coat to protect them and enhance their shine.

Q: Can I use regular nail polish with rhinestones?

A: Yes, you can use regular nail polish with rhinestones. However, for better adhesion and a long-lasting effect, it’s recommended to use a nail glue designed specifically for embellishments. After painting your nails with regular polish, allow it to dry before adding rhinestones to ensure they adhere well. Once you’ve finished your design, apply a top coat to protect both the polish and the rhinestones.

Q: How do I remove rhinestones from my nails without damaging the polish?

A: To safely remove rhinestones, soak a cotton ball in acetone nail polish remover and press it against your nail for a few seconds to loosen the adhesive. Gently peel the rhinestone off using a pair of tweezers or your fingers. If residue is left, you can use a small amount of remover on a cotton swab to clean it up. Be gentle to avoid damaging the underlying nail polish.

Q: Are rhinestones safe to use on natural nails?

A: Yes, rhinestones are safe to use on natural nails if applied correctly. It’s important to apply them using a safe adhesive and avoid excessive pressure when attaching them. Always ensure that you follow up with a top coat to seal the rhinestones and protect your natural nails. If you experience any adverse reactions or discomfort, remove them immediately and consult with a nail professional.

Skip to content