beauty

Round Nails or Stiletto Finding Your Ideal Look

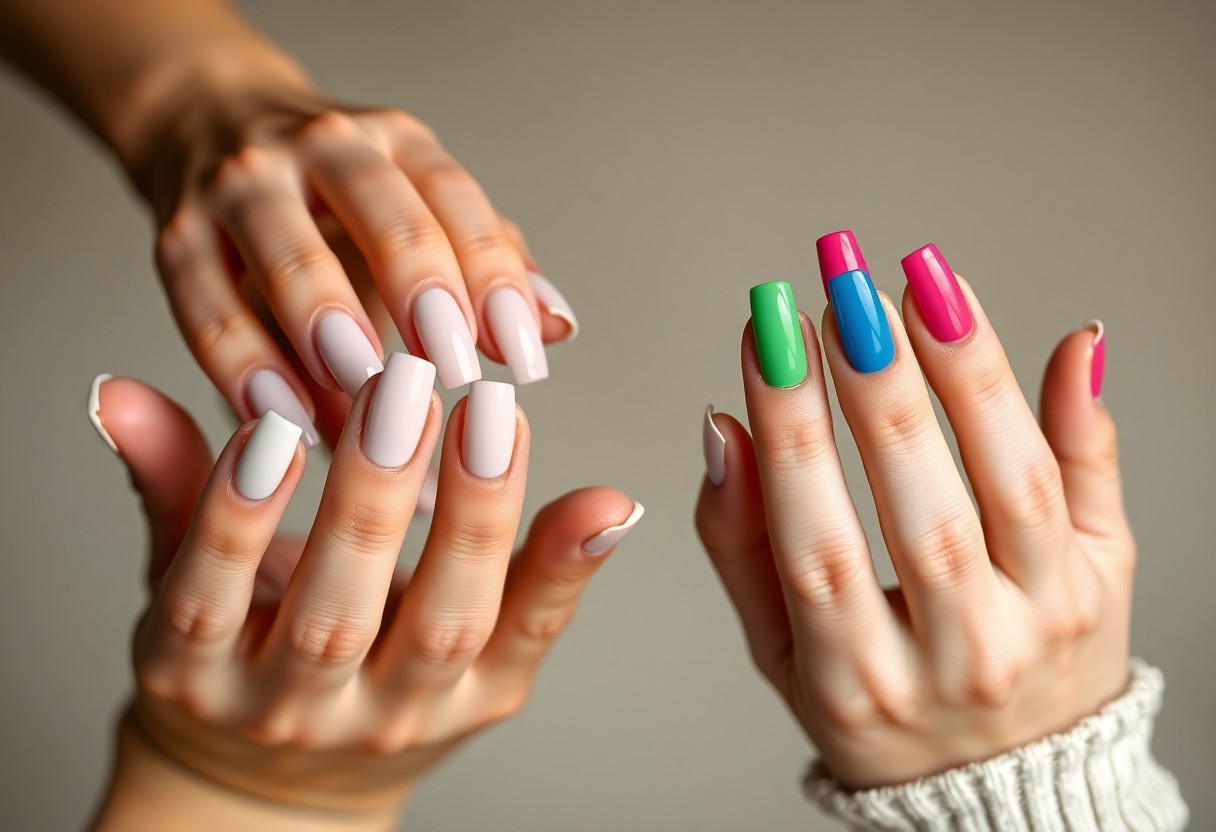
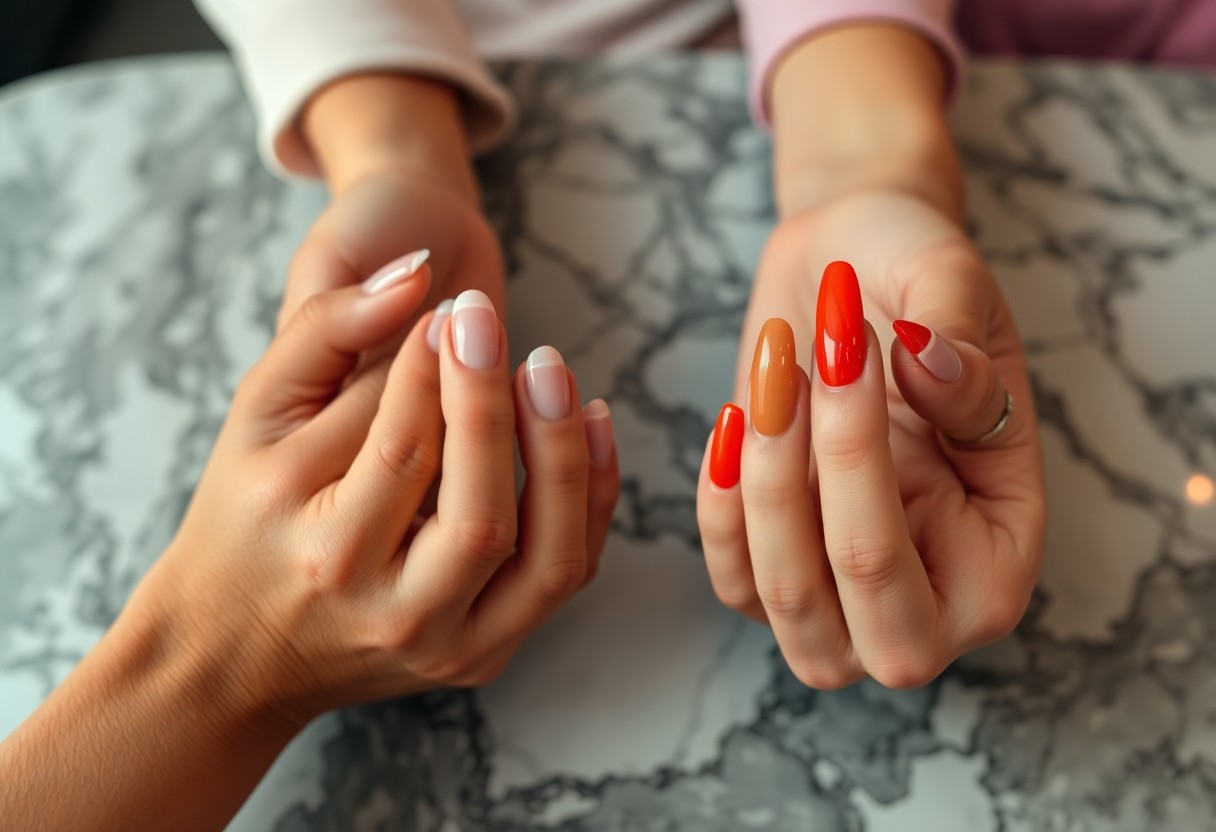
You face an important decision when it comes to nail shapes—whether to choose round nails or stiletto nails. Each option offers distinct aesthetics and can reflect different aspects of your personality and style. Round nails provide a classic, understated vibe, perfect for everyday wear, while stiletto nails exude boldness and modern flair, making a striking statement. In this blog post, we will explore the benefits and considerations of both nail shapes, helping you determine which one aligns best with your unique look and lifestyle.

Key Takeaways:

  • Round Nails offer a classic and versatile look that suits a variety of styles and occasions.
  • Stiletto Nails provide a bold and edgy aesthetic, perfect for making a statement and showcasing creativity.
  • Your ideal look may depend on personal style, lifestyle, and finger shape, so it’s important to choose a nail shape that complements you.

Understanding Nail Shapes

While choosing your nail shape, it’s important to consider how it complements your personal style and lifestyle. Different nail shapes can convey unique aesthetics and enhance your overall appearance. By understanding the characteristics of various nail shapes, you can make a more informed decision for your next manicure, ensuring that your nails reflect your personality and individual flair.

Round Nails: Characteristics and Benefits

About round nails, they are characterized by their soft, gentle curves, mimicking the natural shape of your fingertips. This classic form is not only versatile but also low-maintenance, making it a popular choice for those who prefer a polished look without the fuss. Round nails are great for everyday wear as they tend to resist breakage, offering durability alongside their elegant appearance.

Stiletto Nails: Advantages and Unique Features

Features of stiletto nails include their striking, elongated shape that sharpens to a point at the tip. This edgy design instantly adds drama to your look, drawing attention and showcasing your boldness. Stiletto nails provide a range of creative opportunities for nail art and customization, allowing for intricate designs that stand out. They can elevate your style and give you the confidence to express your individuality.

Indeed, stiletto nails are particularly favored for their ability to make a statement. The sharp, pointed tips create an impression of elegance and sophistication, while also offering versatility in design. Whether you prefer a classic solid color or elaborate nail art, stiletto nails serve as a fantastic canvas for your creative expression. They are ideal for those unafraid to embrace daring styles and who want their nails to reflect a bold personality.

Factors to Consider When Choosing Nail Shapes

Some important factors to consider when selecting your ideal nail shape include:

  • Your personal style and aesthetic
  • Your lifestyle and maintenance requirements
  • The shape of your natural nails
  • Special occasions or events
  • Current nail trends

This will help you make an informed decision that aligns with your preferences and needs.

Personal Style and Aesthetic

Around your personal style and aesthetic, nail shapes can play a significant role in expressing who you are. Whether you lean towards edgy, classic, or whimsical styles, the shape of your nails can complement your look. For instance, stiletto nails often convey a bold and dramatic flair, while round nails present a softer, more understated vibe. Consider the colors, designs, and occasions that best fit your individuality as you make your choice.

Lifestyle and Maintenance Requirements

Between your lifestyle and nail maintenance, it’s imperative to choose a nail shape that suits your daily activities. If you lead a busy life or perform tasks that require precision, shorter nail shapes like round or oval may work better. In contrast, if you prefer something eye-catching and don’t mind extra upkeep, stiletto or almond shapes might be the right choice for you.

And, while considering maintenance, think about how often you can commit to visits for fills or repairs. More dramatic shapes often require regular attention, whereas simpler shapes can be less demanding and more adaptable for an active lifestyle. Balancing aesthetics with your daily responsibilities will ensure that you enjoy your nails without added stress.

Popular Nail Art Ideas for Round Nails

Despite the variety of nail shapes available, round nails offer a classic and versatile canvas for expressing your style. Whether you opt for intricate designs or simple elegance, there’s something for everyone. If you’re unsure about the best nail shape for you, check out How to Choose the Best Nail Shape for You to help guide your decision.

Color Trends and Designs

Color plays a pivotal role in nail art, and round nails allow for an array of vibrant shades and unique combinations. You can experiment with seasonal palettes, pastels, or bold hues to match your mood or outfit, ensuring that your nails become a stunning focal point.

Creative Techniques and Finishes

On the other hand, creative techniques can elevate your round nails to a new level of artistry. From ombre effects to marble designs, incorporating different finishes and textures adds depth and intrigue to your nail look.

This versatility enables you to explore endless possibilities, such as matte finishes for a chic touch or glossy topcoats for a polished effect. You can also play with layering techniques, decals, or nail art decals to truly personalize your round nails. Being adventurous in your approach will set your style apart while making your nails a standout feature.

Stunning Stiletto Nail Designs

Unlike traditional nail shapes, stiletto nails exude an air of bold sophistication, making them a popular choice for those who wish to express their unique style. The tapered point creates a dramatic effect, allowing you to showcase your personality through various designs. From intricate artwork to simple, chic minimalism, stiletto nails provide ample canvas for creativity, ensuring that your nails truly stand out in any crowd.

Seasonal Inspiration

After the seasons change, so can your nail designs! Each time of year presents an opportunity to refresh your stiletto look with colors and patterns that reflect the essence of the season. Whether it’s warm tones for autumn, festive designs for the holidays, or bright florals for spring, don’t hesitate to draw inspiration from nature and seasonal trends to ensure your stiletto nails remain in vogue.

Glamorous Enhancements

Stiletto nails are perfect for adding glamorous enhancements that elevate your overall look. Consider incorporating embellishments like rhinestones, glitter, or metallic foils to create eye-catching designs that capture attention. Beyond basic polish, these decorations can transform your nails into a stunning display, making them the perfect finishing touch for any outfit.

Glamorous enhancements are not just limited to the nail art itself. You can also explore options like matte finishes, ombre effects, or even nail stamping for added flair. Mix and match different textures and colors to personalize your stiletto nails, ensuring that they reflect your individual taste. As you experiment with various styles and embellishments, you’ll find that glamorous enhancements can transform your nails into a statement accessory, making every glance at your hands a delightful experience.

Tips for Maintaining Your Chosen Nail Shape

Now that you’ve chosen your ideal nail shape, it’s imperative to keep them looking pristine. Follow these simple tips to maintain the health and appearance of your nails:

  • Regularly trim and file your nails as needed to maintain shape.
  • Use a nourishing cuticle oil to keep your cuticles hydrated.
  • Avoid using your nails as tools to prevent chips and breaks.
  • Wear gloves when doing household chores to protect your nails.
  • Keep your nails clean and polished for a polished look.

This will help ensure that your nails remain stunning and well-kept.

Care and Upkeep for Round Nails

Among the most popular shapes, round nails require specific care to maintain their gentle curves. Regular filing is imperative to keep their shape, as they can easily become jagged or uneven. Make sure to use a fine-grit file and buff your nails weekly to give them a smooth finish. Additionally, moisturizing your hands and cuticles daily will prevent dryness and breakage. Regular touch-ups with a clear polish can also help in maintaining their overall appearance and shine.

Preserving Stiletto Nail Integrity

With stiletto nails, keeping their sharp points intact takes a little extra diligence. Frequent filing is imperative, but it’s vital to use caution and the correct techniques to avoid unnecessary damage. Cut and file the sides to maintain that dramatic shape while paying attention to the points. Be mindful of your activities—avoid situations that might result in snagging or breaking your nails. Regular application of strengthening treatments can also help keep them healthy and prevent chips or breaks.

Considering the unique nature of stiletto nails, it’s beneficial to combine regular maintenance with a protective approach. Refrain from utilizing your fingertips for tasks that could compromise your nail shape. Embracing a gentle touch and keeping them hydrated with oils and conditioners will also support their structural integrity. Following these guidelines can ensure your stiletto nails remain an eye-catching statement while lasting longer between salon visits.

Transitioning Between Nail Shapes

Not all nail shapes are created equal, and changing from one to another can breathe new life into your manicures. Transitioning between shapes like round to stiletto requires some consideration of your nail health and personal style. Whether you’re feeling adventurous or simply looking for a change, be sure to evaluate your preferences and how they align with the demands of various nail shapes. It’s all about finding the balance that works best for you.

When and How to Switch Styles

Across the seasons, your style preferences may evolve, prompting you to switch your nail shape. Timing is crucial; perhaps you want shorter nails for summer or longer ones for festive occasions. Opt for a gradual transition by visiting a skilled nail technician who can help reshape without damaging your natural nails. This ensures that the transformation feels seamless and works harmoniously with your personal flair.

Adapting Nail Care Routines

Nail care routines must be adjusted as you switch shapes to keep your nails healthy and looking great. Each nail shape requires specific attention; for instance, stiletto nails may need more filing and trimming due to their pointed edges, while round nails might benefit from less maintenance. Tailoring your regimen will not only preserve the integrity of your nails but also enhance your overall aesthetic.

Switch your focus based on the shape you choose for your nails. For stiletto shapes, prioritize strengthening treatments to guard against breakage, while round nails often thrive with more basic upkeep and hydration. Weekly exfoliation and moisturizing can keep cuticles healthy across any shape, but be attentive to the individual needs of your style choice. Adjusting your products and techniques allows you to maintain beautiful nails, regardless of their shape.

Final Words

As a reminder, choosing between round nails or stiletto shapes ultimately depends on your personal style and lifestyle. Round nails offer practicality and elegance, making them perfect for everyday wear, while stiletto nails add a bold, artistic flair to your look. Consider how each shape complements your hands and fits into your routine. Experiment to find what resonates with you, ensuring that your choice enhances not just your appearance, but also your confidence. Ultimately, your nails should reflect your unique personality and bring you joy.

FAQ

Q: What are round nails and what is their appeal?

A: Round nails are shaped with a smooth, rounded tip that follows the natural shape of the fingertip. Their appeal lies in their versatility and classic aesthetic. This shape is ideal for those who prefer a low-maintenance look while still keeping their nails neatly trimmed and presentable. Round nails are also less prone to snagging compared to sharp shapes, making them a popular choice for everyday wear.

Q: What are stiletto nails and why are they considered trendy?

A: Stiletto nails are characterized by their long, pointed tips that create a dramatic and eye-catching appearance. They are considered trendy due to their bold statements and ability to showcase intricate nail art. Stiletto nails often allow for greater creativity in design, as their elongated shape provides more surface area for decorations like gems, designs, and colors. They are popular among fashion-forward individuals looking to make a striking impression.

Q: How do I choose between round nails and stiletto nails?

A: Choosing between round nails and stiletto nails largely depends on your personal style, lifestyle, and comfort. If you prefer a more classic, practical look with ease of maintenance, round nails might be the better choice. On the other hand, if you enjoy standing out and expressing yourself through bold nail art, stiletto nails could be ideal. Consider how each shape fits into your daily activities, as stiletto nails may require more caution due to their sharp points.

Q: Can I achieve different lengths with round and stiletto nails?

A: Yes, both round and stiletto nails can be achieved in various lengths. Round nails can be short to medium in length, making them suitable for those who want something subtle yet polished. Stiletto nails, typically longer, can range from medium to extra-long, allowing for even more dramatic looks. Your desired length should align with your comfort, style, and how much maintenance you are willing to perform.

Q: What maintenance do round and stiletto nails require?

A: The maintenance required for both shapes varies. Round nails typically require regular filing to maintain their shape and prevent any snagging. They may need a fill every few weeks, depending on growth. Stiletto nails, however, require more frequent maintenance due to their length and sharper tips. Regular fills, careful upkeep to avoid breakage, and possibly more frequent trips to a salon might be necessary, especially if you opt for intricate designs that need touch-ups. Additionally, using a good quality top coat can help protect the shape and finish of both nail styles.

Why You Should Never Skip the Top Coat

Nails can transform your look, but to achieve a polished, long-lasting manicure, you should never skip the top coat. This necessary step not only enhances your nail polish’s shine and vibrancy but also provides a protective barrier against chips, cracks, and fading. By incorporating a top coat into your nail care routine, you’re ensuring that your hard work lasts longer, keeping your manicure looking fresh and flawless. Investing a few extra minutes for this step can save you time and frustration, allowing you to enjoy beautiful nails for days to come.

Key Takeaways:

  • Protection: A top coat acts as a protective barrier, shielding your nail polish from chips, scratches, and dents.
  • Shine: Using a top coat enhances the shine and overall finish of your manicure, giving it a polished, high-gloss look.
  • Longevity: Applying a top coat can significantly extend the life of your nail polish, allowing you to enjoy your manicure for a longer time without touch-ups.

The Importance of Top Coat

For anyone who loves nail care, applying a top coat is an imperative step that should never be overlooked. It not only seals your manicure but also extends its longevity, ensuring a flawless finish that lasts longer. Without a top coat, you risk dulling the vibrant colors and diminishing the overall appearance of your nails. Make this step a non-negotiable part of your nail routine to achieve that salon-quality outcome at home.

Protection Against Chipping

Above all, a top coat provides a barrier that significantly reduces the risk of chipping. When you apply your polish, it’s vulnerable to nicks and dents from daily activities. The top coat acts like a shield, keeping your nails intact and looking fresh longer. By investing in this extra layer, you’re safeguarding your hard work and maintaining the pristine look of your manicure.

Enhanced Shine and Finish

The application of a top coat elevates your manicure with a brilliant shine that catches the light beautifully. This glossy finish not only makes your nails look healthier but also enhances the color payoff of your nail polish. At times, without a top coat, colors can appear flat or uneven, diminishing your effort. By opting for a high-quality top coat, you allow your nails to shine to their fullest potential, transforming a simple polish into a stunning statement while also providing extra protection from wear and tear.

The Benefits of Using a Top Coat

The benefits of using a top coat in your nail care routine are numerous. Not only does it enhance your nail’s shine, but it also serves as a protective shield, keeping your color vibrant and fresh for longer. A quality top coat creates a seal that helps mitigate chips, scratches, and other damage, ensuring your manicure looks its best. Incorporating a top coat is a simple yet effective step that elevates your nail game significantly.

Longevity of Nail Color

Against the commonly held belief that nail polish alone is sufficient, applying a top coat dramatically enhances the longevity of your nail color. Without it, your manicures are likely to succumb to chips and fading within days. A top coat acts like armor, extending the life of your polish so you can enjoy that flawless finish for much longer.

Prevention of Staining

Above all, a top coat plays a vital role in preventing staining of your natural nails. Dark or pigmented polishes can leave unsightly marks on your nail bed, making your nails look dull and unhealthy.

At times, you may notice that your favorite vibrant nail colors leave visible stains on your nails even after removal. This is where a good top coat comes into play. By applying it underneath your colored polish, you create a barrier that prevents the pigments from penetrating your nails. As a result, your natural nails remain clean and free from discoloration, allowing you to switch up your nail looks without the worry of long-term damage.

Different Types of Top Coats

Now that you understand the importance of a top coat, let’s explore the different types available to enhance your manicure:

Standard Top CoatProvides a glossy finish and durability.
Fast-Drying Top CoatDries your polish quickly to save time.
Matte Top CoatGives your nails a non-shiny, sophisticated look.
UV Top CoatCures under UV light for long-lasting effects.
Peel-Off Top CoatMakes removing your polish effortless.

After learning about these options, you might be tempted to join the conversation about skipping top coats. Check out this discussion on Reddit about skipping top coats for more insights.

Fast-Drying Options

On a busy schedule? Fast-drying top coats are your best friend. They minimize waiting time, allowing you to get back to your daily activities sooner without sacrificing your nail polish’s longevity. These formulations typically contain special ingredients that speed up the drying process, so you can enjoy beautiful nails without the usual hassle.

Matte vs. Glossy Finishes

One of the exciting decisions you’ll face is choosing between matte and glossy top coats. Both finishes can dramatically change the look of your nails and can be selected based on your personal style and occasion.

Coats serve as your finishing touch, whether you prefer a sleek, shiny surface or a more subdued, matte appearance. Glossy finishes will reflect light, giving your nails a vibrant look, while matte finishes offer a modern and edgy vibe. Consider trying both to see which one resonates with your personal aesthetic or suits different occasions.

Application Tips for the Perfect Top Coat

Unlike applying nail polish, applying a top coat requires precision for a flawless finish. Follow these tips to master the technique:

  • Ensure your base color is completely dry before application.
  • Use long, even strokes to apply the top coat.
  • Cap the edges of your nails to prevent chipping.
  • Apply a thin layer initially, allowing it to self-level.

Perceiving the difference a top coat makes is immediate, enhancing your manicure’s longevity and shine.

How to Apply Evenly

To achieve an even application, always start from the center of your nail and move outward. This technique ensures that the product spreads evenly without pooling at the edges, which can lead to an uneven finish. Make sure to use a clean brush and avoid overloading it with top coat to maintain controlled application.

Timing Between Coats

For optimal results, timing between layers is important. Allow your base color to fully dry before applying the top coat. If you’re layering multiple coats of top coat, waiting a minute or two between coats can prevent smudges and ensure that each layer adheres properly, promoting a beautiful, long-lasting shine.

Understanding the timing is key to a perfect finish. If you apply your top coat too soon, it can disrupt the underlying polish, leading to streaks and an uneven texture. By allowing adequate drying time, you ensure that each layer bonds effectively, giving you a smooth and flawless finish that enhances the durability of your manicure.

Common Myths About Top Coats

All too often, misconceptions about top coats can lead you to underestimate their importance. Some believe that a top coat is simply an unnecessary add-on, but in reality, it plays a vital role in enhancing the longevity, shine, and protection of your manicure. By debunking these myths, you can ensure your nails look their best while being safeguarded against chipping and wear.

Skipping Top Coat Saves Time

Saves you precious minutes, but the illusion of efficiency might cost you more in the long run. Skipping the top coat often leads to chips and dullness that require much more time to fix than applying that extra layer. Investing those extra moments can save you hassle later, allowing you to enjoy a polished look for longer.

Top Coat is Only for Nail Polish

After all, you might believe top coats are exclusively for your nail polish, but this isn’t the case. Top coats can be beneficial for various nail treatments, including gel and acrylics. By applying a top coat over these enhancements, you enhance their durability while improving the overall appearance of your nails.

In fact, using a top coat on gel and acrylic nails not only provides a protective layer but also adds a glossy finish that elevates the look of your nails. Moreover, it helps prevent discoloration and fading, ensuring that your investment in nail enhancements lasts longer. So whether using traditional polish or getting stylish tips with gel or acrylics, a top coat is imperative for maintenance and appeal.

Frequently Asked Questions

Keep your nails looking fabulous by understanding the importance of a top coat. If you’re wondering, Why Do I Need To Use A Top Coat?, it’s crucial for extending your manicure’s lifespan while adding shine and protection.

Can You Use Top Coat Alone?

An effective top coat can indeed be used on its own, giving your nails a glossy finish without color. This approach can enhance the natural color of your nails while still providing some protection against chips and scratches.

How Often Should You Reapply?

Any time you notice your nails losing their shine or if they begin to chip, it’s a good idea to apply your top coat again. Regular reapplication can significantly extend the life of your manicure.

With daily activities and exposure to elements, your manicure may start to wear down faster than you’d like. You should aim to reapply your top coat every few days to keep it looking fresh and glossy. Regular maintenance helps to seal in your color and keep your nails healthy and vibrant.

Conclusion

On the whole, you should never skip the top coat in your nail care routine, as it serves as a protective barrier, enhances the longevity of your manicure, and elevates the overall appearance of your nails. By always applying a top coat, you ensure that your polish remains vibrant and chip-free for longer, saving you both time and effort in touch-ups. Prioritizing this final layer not only extends the life of your nail art but also gives your nails that polished, professional finish you desire.

FAQ

Q: What is the purpose of a top coat in nail care?

A: A top coat serves several vital functions in nail care. Primarily, it adds a protective layer over your nail polish, helping to shield it from chips, scratches, and fading. This additional layer enhances the longevity of the polish, ensuring your manicure looks fresh for a longer period. Additionally, top coats can also add shine or a matte finish, depending on the type you choose, giving your nails a polished and professional appearance.

Q: How does skipping the top coat affect the longevity of my manicure?

A: Skipping the top coat significantly shortens the lifespan of your manicure. Without this protective layer, your nail polish is more susceptible to wear and tear from everyday activities. Chips and scratches are more likely to occur, and the color may fade faster due to exposure to elements like water, sunlight, and harsh chemicals. Ultimately, a manicure without a top coat can start to look dull and worn much sooner than one that includes this vital step.

Q: Can I use a top coat with any type of nail polish?

A: Yes, most top coats are designed to be compatible with a wide variety of nail polishes, including regular, gel, and even specialty formulas. However, it’s always a good idea to check the labels or manufacturers’ recommendations to ensure compatibility. Using the right top coat can help achieve the desired finish and longevity, whether you choose a glossy, matte, or quick-dry option.

Q: Are there different types of top coats, and how do I choose the right one?

A: There are several types of top coats available, each serving different purposes. Some are formulated for quick drying, while others may provide extra shine or a matte finish. There are also specialized top coats designed to enhance nail art or provide extra protection for gel manicures. When choosing a top coat, consider your desired finish, your nail type, and any specific needs you might have, such as a quick-drying option if you’re often in a hurry.

Q: Does using a top coat require special application techniques?

A: While applying a top coat is generally straightforward, there are a few techniques that can enhance its effectiveness. To get the best results, start with a clean, dry nail surface. Apply the top coat slowly and evenly, starting from the base of the nail and moving to the tip, sealing the edges to prevent chipping. Allow it to dry fully for maximum durability. For added shine, consider applying a second coat of topcoat after the first one has dried.

How to Recreate Celebrity Nail Looks at Home

Most people admire the stunning nail designs sported by their favorite celebrities but feel that achieving those looks at home is daunting. You don’t need to be a professional nail artist to master these trendy styles; all you need is the right tools, techniques, and a bit of creativity. This guide will help you break down popular celebrity nail looks and provide step-by-step instructions to recreate them effortlessly. Get ready to bring a touch of Hollywood glamour to your fingertips without stepping foot in a salon!

Key Takeaways:

  • Research your favorite celebrity nail designs by browsing social media platforms like Instagram and Pinterest, as many celebrities share their manicure looks online.
  • Gather tools, such as high-quality nail polish, nail art brushes, dotting tools, and decals to achieve the desired look, ensuring you invest in the right materials for a salon-quality finish.
  • Practice your application technique by experimenting with different styles and designs at home, which will help you build confidence and improve your skills over time.

Essential Tools and Products

A variety of tools and products can help you recreate stunning celebrity nail looks in the comfort of your home. Start with a solid foundation by investing in quality nail polishes, crucial grooming tools, and nail art supplies. With the right items on hand, you’ll be able to achieve salon-worthy designs that elevate your manicure game and make you feel fabulous.

Nail Care Basics

Among the first steps in achieving a celebrity-inspired manicure is proper nail care. Ensure your nails are clean and trimmed, and consider using a nourishing cuticle oil to keep your cuticles healthy. Regularly exfoliating and moisturizing your hands will enhance the overall appearance of your nails, giving them that flawless look that celebs often flaunt.

Must-Have Nail Art Supplies

By stocking your beauty arsenal with crucial nail art supplies, you can easily create intricate designs that wow. These may include nail brushes, dotting tools, striping tape, and nail decals. With a well-curated collection, you’ll be equipped to experiment and elevate your nail art skills while recreating looks inspired by your favorite stars.

At the heart of nail art creativity is the right set of must-have supplies. Nail brushes allow you to create detailed designs, while dotting tools help you achieve perfect polka dots and intricate patterns. Striping tape can be invaluable for precise lines, and nail decals provide an easy way to add flair without the need for advanced techniques. With these tools at your disposal, you’ll feel empowered to bring celebrity nail looks to life in your very own home manicure routine.

Popular Celebrity Nail Looks

Clearly, celebrity nail looks often set trends that many aspire to replicate. From stylish patterns to eye-catching colors, these designs inspire creativity and personal expression in your nail care routine. Whether you’re aiming for glam or something more understated, there’s a multitude of iconic styles that you can easily recreate at home. With the right products and techniques, you can bring a touch of celebrity flair to your fingertips.

Iconic Styles to Emulate

Nail art has reached new heights with celebrities showcasing stunning designs that capture attention. From the timeless elegance of a classic red manicure to the bold sophistication of geometric patterns, you can draw inspiration from the styles worn by stars like Zendaya and Kylie Jenner. Emulate these iconic looks by selecting a signature color and implementing unique accents that reflect your personality, combining a touch of celebrity glam with your own twist.

Seasonal Trends from the Stars

Below, the seasonal nail trends set by celebrities can help you choose your next manicure idea, keeping your nails fashionable all year round. From vibrant summer hues to warm autumn shades, each season brings fresh opportunities to express yourself through nail art. Paying attention to what your favorite stars are wearing can guide you in selecting colors and designs that perfectly match the season’s vibe.

Even more exciting, many celebrities collaborate with nail brands to release seasonal collections that showcase trendy colors and exclusive designs. By following these trends, you can elevate your nail game and stay in sync with what’s hot. Whether it’s pastel shades for spring or dark, moody tones for fall, incorporating elements from your favorite celebrity trends allows you to keep your nails on point while expressing your unique style.

Step-by-Step Guides for DIY

Not all celebrity nail looks are out of reach! With the right techniques, you can recreate these stunning designs at home. Here’s a simplified breakdown to guide you through each style:

Nail LookSteps to Recreate
Ombre Effect1. Apply a base coat. 2. Use a makeup sponge and two polish colors. 3. Dab onto nails. 4. Seal with topcoat.
Marble Nails1. Apply a base coat. 2. Drop polish colors in water. 3. Swirl with a toothpick. 4. Dip your nail. 5. Topcoat.

Technique for Each Look

At each step, focus on achieving even coverage and precision. For the ombre effect, use a light hand when applying polish with the sponge for a seamless blend. In the marble technique, be quick while swirling in the water—practice makes perfect!

Tips for Flawless Application

By paying attention to details, you can elevate your nail game. Here are some crucial tips for flawless application:

  • Always start with a clean nail surface.
  • Use a base coat to protect your nails.
  • Layer polishes gradually for a smoother finish.

This can make a noticeable difference in the longevity of your manicure.

And to further enhance your skills, keep in mind these pointers:

  • Invest in quality tools for precision.
  • Allow each layer to dry completely.
  • Practice on a disposable nail wheel for technique.

This will help boost your confidence and refine your application skills.

Color Theory and Nail Health

Keep in mind that understanding color theory can elevate your nail game while ensuring the health of your nails. The right shades can complement your skin tone and enhance your overall appearance. Additionally, choosing high-quality, non-toxic polishes can prevent nail damage, allowing you to flaunt your favorite celebrity-inspired looks without compromising the integrity of your nails.

Choosing the Right Shades

Among the plethora of shades available, it’s crucial to find those that not only reflect current trends but also harmonize with your complexion. Warmer skin tones often look stunning with earthy tones and yellows, whereas cooler skin tones might shine in jewel tones and metallics. Take time to experiment and find hues that make your nails pop and feel uniquely yours.

Nail Care for Longevity

Behind every stunning nail look is a commitment to proper nail care and maintenance. This includes regular moisturizing, hydration, and the occasional break from polish to prevent brittleness. Implementing a routine that includes cuticle oil and nail strengtheners can also significantly enhance the durability of your nail art.

Hence, prioritizing your nail care routine is key to achieving longevity in both your nail health and your stunning celebrity-inspired designs. Incorporate practices like avoiding overly aggressive filing and using gloves during household chores to minimize damage. By giving your nails the attention they deserve, you can ensure that they’re not just a canvas for beautiful colors but remain strong and healthy for all your nail art needs.

Common Mistakes to Avoid

For a flawless nail recreation, steer clear of common mistakes that can sabotage your efforts. Poor preparation, skipping base coats, and rushing through the process can lead to unsatisfactory results. Check out this guide on CELEBRITY NAIL STRIP LOOK TO RECREATE AT HOME for helpful tips and tricks to get it right.

Application Errors

Across the nail art community, application errors are often the biggest hurdle. You may apply products too thickly, forget to properly prep your nails, or overlook the importance of curing time for gel nails. These blunders can lead to chips, peeling, and uneven finishes, making it difficult to achieve that celebrity look.

Maintenance Gone Wrong

Mistakes in nail maintenance can severely impact the longevity of your at-home manicure. Neglecting regular upkeep—such as moisturizing your cuticles and avoiding harsh chemicals—can cause your nails to weaken and your polish to chip. Ensuring you have consistent care routines not only enhances the appearance of your nails but also keeps them healthy.

Further, your nail health directly influences how long your nail art will last. Monitor your nails for signs of breakage or wear, as these can ruin the overall look. Engaging in regular habit, such as applying cuticle oil and choosing gentle cleansers, will help maintain your nails and keep your designs looking fresh. With proper care, you can enjoy your recreated celebrity nail looks for longer.

Customizing Looks to Fit Your Style

After you’ve found inspiration from your favorite celebrity nail looks, it’s time to make those designs your own. Tailor the colors and shapes to reflect your style, whether that means opting for bolder hues or a more minimalist approach. Consider your lifestyle and how much maintenance you’re willing to commit to, allowing you to create a unique nail design that not only looks great but also fits your personality and daily routine.

Personalizing Celebrity Designs

On your journey to customizing celebrity nail designs, take a moment to analyze the elements you love most. Whether it’s the color palette, nail shape, or embellishments, use these features as a base. Feel free to swap out colors or add your favorite patterns—after all, it’s your nails that should shine!

Experimenting with Nail Art

Beside customizing celebrity designs, you can explore nail art as a fun and creative way to express yourself. Consider incorporating different techniques, such as ombré, marbling, or even simple dot patterns, to enhance your nail look. 

Even if you’re new to nail art, practicing on a few practice nails can help you build confidence in your skills. Look online for tutorials or step-by-step guides that match your selected design. Don’t shy away from mixing and matching techniques; blending styles can lead to stunning results. Use different tools like dotting tools or brushes to create unique textures and effects. Let your imagination run wild, and you’ll soon discover that your nails can become a canvas for your creativity.

Final Words

Hence, you can effortlessly recreate stunning celebrity nail looks at home with the right tools, techniques, and inspiration. Explore various styles, gather the necessary materials, and don’t hesitate to experiment with colors and designs that resonate with your personal style. For some fresh ideas, check out this resource for 10 Celebrity Nail Looks You Can Recreate at Home featuring trendy spring nails. Enjoy the creative process, and let your nails be a canvas for your unique expression!

FAQ

Q: What tools and materials do I need to recreate celebrity nail looks at home?

A: To recreate celebrity nail looks, you will need a few important tools and materials. Start with a good quality nail file, cuticle pusher, and buffer to prep your nails. Invest in a base coat and a top coat for longevity and shine. You will also need nail polish in the colors of your choice, nail art brushes, dotting tools, and potentially nail stickers or gems for embellishments. A UV lamp is necessary if you are using gel polish. Having a clean workspace and some cotton swabs or pads with nail polish remover will also help tidy up any mistakes.

Q: How can I find the right nail design inspired by a celebrity?

A: To find the right nail design inspired by a celebrity, browse social media platforms like Instagram and Pinterest where many celebrities showcase their nail art. You can also check beauty magazines or follow nail art blogs that feature celebrity designs. Once you find a look you love, save a photo as a reference. Pay attention to the color palette and the techniques used, such as ombre, negative space, or intricate nail art, so you can replicate it effectively.

Q: Are there any specific techniques for replicating intricate nail designs?

A: Yes, replicating intricate nail designs requires some specific techniques. For detailed designs, start with a solid base coat. Use nail art brushes for fine details and line work, as these will give you more control. Dotting tools are excellent for creating dots and small patterns. If you are trying a stamp design, a nail stamping kit can provide various patterns and images effortlessly. Practice on a piece of paper or a nail wheel before applying it to your nails to build confidence in your technique.

Q: How do I ensure my nail designs last longer?

A: To ensure your nail designs last longer, start with a clean nail surface free from oils or old polish. Apply a high-quality base coat to protect your nails. Use two thin layers of color polish rather than one thick layer, as this helps prevent chipping. After applying your design, seal it with a top coat to enhance shine and durability. Lastly, try to avoid exposure to harsh chemicals or excessive water, as this can weaken the polish and cause it to chip.

Q: What troubleshooting tips can I follow if my nail art doesn’t turn out as expected?

A: If your nail art doesn’t turn out as expected, there are several troubleshooting tips you can follow. Firstly, if your polish is streaky, ensure you are using thin layers and allowing each layer to dry completely before adding another. If your designs smear or smudge, consider using quick-drying top coats. If you make a mistake, a small brush dipped in nail polish remover can clean up the edges for a more polished look. Finally, don’t get discouraged; some designs take practice, so give yourself the grace to experiment and improve over time!

How to Choose Between Soft Gel and Hard Gel Nails

Many individuals find themselves wondering which type of gel nails is right for them: soft gel or hard gel. Each option has unique benefits and limitations that can affect your decision based on your lifestyle, nail health, and personal preferences. In this guide, you will learn about the key differences between these two types of gel nails, helping you make an informed choice that best suits your needs and enhances your nail care routine.

Key Takeaways:

  • Durability: Hard gel nails provide a stronger and more durable finish, making them suitable for individuals with weaker natural nails.
  • Flexibility: Soft gel nails offer more flexibility and a lighter feel on the natural nails, which can be more comfortable for everyday wear.
  • Removal process: Soft gel nails are easier to remove compared to hard gel, which requires filing and soaking, making maintenance simpler for some users.

Understanding Nail Gels

While exploring the world of nail enhancements, it’s necessary to understand the different types of gel available. Nail gels are versatile products used for both enhancing nails and extending their length, made to cater to various preferences and styles. Knowing the qualities and benefits of soft gel and hard gel nails will help you make an informed decision that aligns with your lifestyle and aesthetic goals.

What are Soft Gel Nails?

Across the nail enhancement landscape, soft gel nails stand out for their flexibility and ease of application. These gels offer a lightweight feel, allowing for a natural appearance while providing a bit of strength. Soft gel nails are often used for extensions or as a base for nail art.

What are Hard Gel Nails?

Along the spectrum of nail enhancements, hard gel nails are known for their durability and strength. These gels cure to form a firm structure that can withstand more pressure, making them ideal for those seeking long-lasting wear and resistance against chipping.

Nail hard gel is composed of a thicker formula that provides extra support to your natural nails. Once cured under a UV or LED lamp, it creates a robust layer that can be shaped and filed just like your own nails. Ideal for intricate nail designs or lengthening, hard gel nails offer a polished finish that can last for weeks, ensuring your manicure stays intact during daily activities. You can enjoy high shine and unmatched resilience, making them a favorite among nail enthusiasts.

Benefits of Soft Gel Nails

Now that you understand the options available, it’s vital to recognize the numerous benefits of soft gel nails. One of the key advantages is their lightweight nature, which makes them less likely to cause discomfort or damage to your natural nails. They can be easily shaped and styled, providing a more natural look while still offering durability and shine. Overall, soft gel nails present a fantastic alternative for those seeking both beauty and functionality in their nail care routine.

Flexibility and Comfort

One of the standout features of soft gel nails is their flexibility. This allows them to adapt to the natural movements of your nails, reducing the risk of breakage compared to hard gel options. You will often find that soft gels feel more comfortable, almost like a second skin, helping you maintain your daily activities without any hindrance.

Ease of Removal

After enjoying your stunning soft gel nails, one of the best benefits is the ease of removal. This process can be significantly quicker and less damaging compared to hard gel nails, making your overall maintenance routine simpler.

At the end of your nail’s life cycle, soft gel nails can be soaked off effortlessly using acetone or a gentle removal solution. This minimizes the chances of damaging your natural nails, allowing them to remain healthy and strong. Many professionals recommend this method, ensuring that you have a positive experience when changing your nail look. With soft gel nails, you won’t have to worry about the time-consuming or harsh removal processes often associated with other nail enhancements.

Benefits of Hard Gel Nails

Many nail enthusiasts prefer hard gel nails for their impressive longevity and professional finish. These enhancements offer a polished appearance while providing a versatile base for intricate nail art. Additionally, hard gel nails are less prone to chipping and breaking compared to other options, allowing you to enjoy beautifully manicured nails for an extended period. With minimal maintenance needed, hard gel nails can be a practical choice for those who lead busy lives.

Durability and Strength

Below the surface, hard gel nails provide exceptional durability and strength. Unlike traditional polish or soft gels, hard gels are formulated to withstand the rigors of daily wear and tear. This sturdy structure protects your natural nails from damage, making it an ideal choice for individuals with active lifestyles or those who often find their nails chipping or breaking.

Ideal for Nail Extensions

Hard gel nails are particularly well-suited for nail extensions. Their robust formula allows you to create longer and more dramatic nail shapes without compromising strength. Unlike softer alternatives, hard gels provide the support needed for extended talons, enabling you to achieve your desired length and style.

Extensions made with hard gel give you the flexibility to experiment with various shapes and lengths while ensuring your natural nails remain protected underneath. As hard gel adheres seamlessly and dries to a strong finish, you can trust that your nail extensions will maintain their form and beauty, enhancing your overall look without sacrificing durability.

Factors to Consider When Choosing

For the best experience with your nails, it’s important to weigh several factors before deciding between soft gel and hard gel nails. Consider the following:

  • Your natural nail strength
  • Desired longevity of the manicure
  • Preference for flexibility versus durability
  • Maintenance routine

This will help you find a suitable option tailored to your unique needs.

Nail Health and Condition

An assessment of your nail health is necessary in making the right choice. If your nails are weak or prone to breakage, hard gel may offer added protection. Conversely, if your nails are healthy, soft gel can provide a lighter touch that allows for more natural nail growth and flexibility.

Lifestyle and Daily Activities

Besides considering your nail health, your lifestyle plays a significant role in your choice between soft and hard gel nails.

It’s important to think about how your daily activities may impact your manicure. If you work with your hands a lot or engage in high-impact activities, hard gel nails may provide the strength and resilience you need. However, if your lifestyle is more laid-back with minimal wear and tear, soft gel nails could be a better fit, offering a lighter feel and a more natural appearance while still maintaining some durability.

Application Techniques for Each Gel

After you’ve decided on the type of gel nails, it’s important to understand the application techniques for each. You can find detailed information on Soft Gel vs. Hard Gel: What’s the Difference? A Comparison of … to help you further.

Soft Gel Application Process

Against the hard gel application technique, soft gel applications are typically more straightforward and user-friendly. The process involves applying a base coat, curing under an LED or UV lamp, layering the soft gel, followed by another curing session, and finally finishing with a top coat for shine. This method is less time-consuming and perfect for beginners.

Hard Gel Application Process

The hard gel application process is a bit more intricate and requires specific steps to achieve durable results. You start with a strong base coat, which is imperative for adherence, followed by creating the desired nail shape using hard gel. Each layer must be cured separately, ensuring every application is solid. The final step is adding a top coat for a glossy finish and checking for any imperfections.

Each layer of hard gel plays a vital role in ensuring the strength and longevity of your nails. You must carefully sculpt the nails, filing them down to achieve the exact shape you desire. It’s important to let each layer cure thoroughly, as this will impact the overall durability. With practice, you’ll find that this method allows for an impressive, salon-quality finish that can last for weeks.

Common Myths and Misconceptions

Keep in mind that misinformation regarding nail enhancements can lead to poor choices. Many believe that soft gel nails are less durable than hard gels, while others think hard gels are too heavy and unnatural. Such myths may misguide your decision-making process. It’s crucial to differentiate fact from fiction to find the right option for your nail needs.

Soft Gel vs. Hard Gel Myths

Common misconceptions about soft and hard gels can cloud your judgment. For instance, people often assume that soft gels lack strength or that hard gels automatically lead to more damage. Knowing the real attributes of each type can help you choose the nails that fit your lifestyle and preferences.

Clarifying Misunderstandings

Against the common belief, soft gels can be just as durable as hard gels due to their flexibility and lightweight design. Additionally, hard gels do not necessarily cause harm when applied correctly, making them suitable for various nail shapes. It’s important to assess your individual needs before making a choice.

Considering the differences in application and wear between soft and hard gels is vital. Soft gels offer a lighter feel and are easier to remove, making them ideal for temporary wear or for users who prefer a more natural look. On the other hand, hard gels provide a stronger structure that suits those looking for long-lasting nails. By understanding these nuances, you can confidently debunk myths and select the nail type that best aligns with your style and routine.

Summing up

Following this guide, you can confidently choose between soft gel and hard gel nails based on your preferences and lifestyle. Consider factors like durability, flexibility, and your desired nail look to make an informed decision that suits your needs. If you’re curious about the details surrounding these types of gels, check out the conversation about Hard gel vs. soft gel…let’s discuss what those words mean. Your choices can enhance your nail experience, providing you with beautiful results.

Q: What are the main differences between soft gel and hard gel nails?

A: Soft gel nails are typically more flexible and lightweight. They are often used to create a natural look and can be soaked off easily. Hard gel nails, on the other hand, are more durable and provide additional strength, making them suitable for those looking for longer-lasting results. Hard gel requires filing for removal and is ideal for creating extensions as it can withstand more stress and impact.

Q: How do I know which type of gel nail is best for my lifestyle?

A: Consider your daily activities and nail habits when choosing between soft and hard gel nails. If you lead an active lifestyle or frequently use your hands, hard gel may be a better option due to its strength and durability. However, if you prefer a lightweight, natural finish and opt for regular nail changes, soft gel could be more suitable as it allows for easier removal and maintenance.

Q: Can I switch from soft gel to hard gel nails, or vice versa?

A: Yes, you can switch between soft gel and hard gel nails, but it’s important to have them properly applied and removed by a professional nail technician. Transitioning may require some adjustments to the application method and aftercare. Consulting with your technician can help you determine the best approach based on your nail health and preferences.

Skip to content