It’s easier than you think to elevate your nails with stunning geometric designs that you can create right at home. With a few simple tools and techniques, you can transform your manicure into a work of art that showcases your personal style. In this blog post, you’ll learn how to master various geometric patterns, choose the right color combinations, and apply your designs with precision, making nail art an enjoyable and creative experience that you can proudly show off. Let’s explore the step-by-step guide to achieving those chic geometric looks you adore.
Key Takeaways:
- Tools: Equip yourself with quality tools like striping tape, dotting tools, and nail brushes to achieve precise geometric designs.
- Color Combination: Choose a well-coordinated color palette that enhances your geometric patterns, creating contrast and visual interest.
- Practice Techniques: Familiarize yourself with basic nail art techniques, such as freehand drawing and using stencils, to improve your geometric creations.
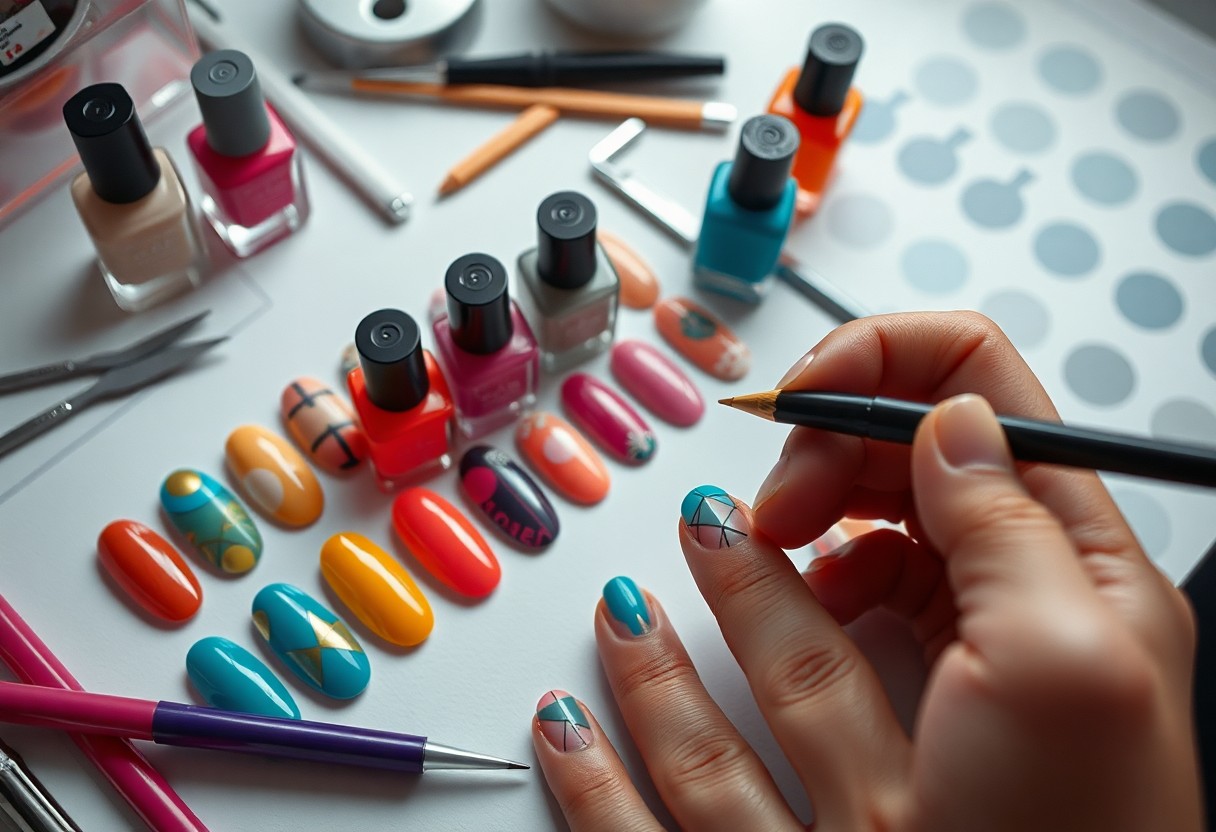
Tools and Materials Needed
While creating stunning geometric nail art at home, you’ll need a few vital tools and materials. Gather items like nail polish, nail tape, a brush for detailing, and a dotting tool to help achieve those intricate designs. For a comprehensive guide and tips on techniques, check out this Tutorial: Edgy Geometric Nail Art and elevate your nail game.
Essential Nail Art Supplies
Besides the basic nail polish colors, having a base coat, top coat, and nail dryer will enhance the longevity and finish of your designs. You should also invest in high-quality nail tape for straight-line designs and a stable surface for applying your art.
Optional Accessories for Precision
Essential tools like fine detail brushes and striping brushes can significantly improve the quality of your geometric nail art. These precision accessories allow you to create sharper lines and more intricate patterns.
This added precision can make all the difference when you want to elevate your nail art to the next level. A fine detail brush is perfect for small designs or touch-ups, while striping brushes help create those delicate lines that define geometric patterns. Utilizing these tools can help you achieve a salon-quality finish from the comfort of your home.
Preparing Your Nails
If you want to ensure a flawless foundation for your geometric nail art, preparing your nails is vital. Start by gently removing any old polish and trimming your nails to your desired length. Buff the surface to create a smooth canvas, and wash your hands thoroughly to eliminate any residue. Finish by pushing back your cuticles and applying a moisturizing hand cream to keep your skin looking healthy.
Nail Care and Maintenance
At the heart of stunning nail art is proper nail care and maintenance. Regularly moisturizing your hands and nails will help maintain their health and prevent them from becoming brittle or breaking. Invest in a high-quality cuticle oil to nourish the area around your nails, and incorporate a buffing routine to promote shine and smoothness.
Choosing the Right Base Coat
Careful selection of a base coat is vital for your nail art. A good base coat not only protects your natural nails from staining but also creates an optimal surface for the colors to adhere properly.
In addition to protection, a quality base coat can enhance the longevity of your geometric nail art. Look for one that is specifically designed to prevent chipping and peeling, as this will help your design last longer. Many base coats also have additional benefits, such as nourishing ingredients or strengthening properties, which can help maintain the integrity of your nails over time. Choose a base coat that suits your nail type for the best results.
Basic Geometric Patterns
After you familiarize yourself with the vitals of geometric nail art, it’s time to explore basic patterns. Popular designs include strips, triangles, and grids that are easy to master yet look stunning. For a detailed guide, check out Easy Geometric Nail Art- Tutorial – Allure Delight. These patterns serve as a foundation for more intricate designs and will help build your confidence in nail art.
Simple Lines and Shapes
Above all, simple lines and shapes are a great starting point for your nail art journey. Using striping tape or a fine brush, you can create clean lines and basic shapes that form the backbone of more complex designs. Experiment with different colors to enhance the visual interest of your manicure.
Combining Shapes for Unique Designs
Unique designs emerge when you combine various shapes and patterns. You can play with different sizes and orientations of triangles, squares, and circles to create depth and dimensionality. Mixing color schemes and finishes, such as matte and glossy, can further enhance the uniqueness of your nail art.
Simple combinations of shapes can lead to eye-catching designs that elevates your nail art game. Start with two or three basic shapes and play around with their arrangement. For instance, layering triangles over circles can create a dynamic look, while alternating colors can add vibrancy. Don’t hesitate to explore different combinations, as this process is where your creativity can truly shine!
Advanced Techniques
For those looking to elevate their geometric nail art, incorporating advanced techniques can make all the difference. Explore these methods:
|
Using Tape for Clean Lines
Between colors or designs, using tape can help you achieve clean and crisp lines that elevate the overall look of your nails. Choose a fine tape, apply it carefully, and paint over it for impressive results.
Stamping and Stencils
Using stamping plates and stencils allows you to recreate intricate designs easily and quickly. These tools can be a game changer when you’re aiming for geometric precision.
A stamping kit usually includes a plate with various designs, a stamper, and a scraper. To use, simply apply polish to the design, scrape off the excess, and press it onto your nail. Stencils can be utilized to create unique shapes and styles, ensuring your geometric art stands out. Mastering these techniques will provide you with endless possibilities for creativity in your nail art.
Color Selection and Combination
Many factors contribute to achieving stunning geometric nail art, and color selection is one of the most vital. Choosing the right colors not only enhances the overall look but also sets the mood of your design. Consider using a mix of bold hues and soft pastels for a balanced effect, or go for an all-monochrome palette for a sleek, modern feel.
Choosing a Color Palette
An effective color palette can create a stunning backdrop for your geometric designs. To select your palette, think about your personal style and the season. Use color theory to choose complementary colors that amplify each other, ensuring a visually appealing outcome.
Tips for a Harmonious Design
Tips for achieving a harmonious design include focusing on balance and contrast. You can achieve this by following these suggestions:
- Choose three to five colors for a cohesive look.
- Utilize shades and tones of your chosen colors to add depth.
- Mix matte and glossy finishes for varied texture.
Thou can enhance your artistic expression through color harmony!
For instance, you may want to experiment with varying tones of the same color for a gradient effect. This approach showcases depth while remaining visually calming. Additionally, consider these strategies:
- Incorporate a neutral base to anchor bold colors.
- Use color blocking to create definite sections in your design.
- Test your palette on a nail wheel before applying to avoid surprises.
Thou can elevate your nail art with careful color choices!
Application and Finishing Touches
Despite the intricate designs you may plan, proper application and finishing touches are crucial for a professional-looking geometric nail art. Start by ensuring your nails are clean and dry, then use striping tape or stencils to outline your desired shapes. Carefully fill in each section with polish, allowing adequate drying time between layers to prevent smudging. Once satisfied with the design, add your finishing touches for an eye-catching effect.
Applying Nail Polish Effectively
With a steady hand, apply the base color to ensure an even canvas for your geometric designs. Use a quality brush; a thin one can help you maneuver in tight spaces, while a wider brush covers larger areas quickly. It’s best to apply multiple thin coats rather than one thick layer, as this helps prevent bubbles and ensures a smooth, flawless finish.
Top Coats and Drying Techniques
The right top coat can elevate your nail art by adding shine and protection. After your design has dried fully, apply a layer of quick-dry top coat to lock in your masterpiece and prevent chipping. You can also speed up the drying process using cold air from a fan or placing your hands in a bowl of ice water for a few minutes. Ensure the top coat is applied evenly for that polished professional look.
To maximize the longevity of your nail art, choose a high-quality top coat that suits your style, whether you’re looking for a glossy or matte finish. Pay attention to drying techniques as well; letting your nails air dry for a bit, followed by using rapid-dry sprays, can help significantly. This way, you not only enhance the look of your geometric design but also ensure it remains intact and vibrant for days to come.

Conclusion
Conclusively, creating geometric nail art at home is an enjoyable and rewarding process that allows you to express your unique style. By gathering the right tools, choosing your favorite colors, and practicing simple techniques such as tape or dotting, you can achieve stunning designs that turn your nails into a canvas. With patience and creativity, you’ll soon master this art form, transforming your manicure into a bold statement that showcases your personality and flair.
Q: What supplies do I need to create geometric nail art at home?
A: To create geometric nail art at home, you will need the following supplies: a base coat and top coat to protect your nails, nail polish in various colors for your design, striping tape or nail art tape to create precise lines, a dotting tool or a fine brush for intricate designs, and a cleanup brush or cotton swabs soaked in nail polish remover for any mistakes. Additionally, a palette or small dishes to mix colors or pour polish can be helpful for more complex designs.
Q: How can I achieve straight lines for my geometric nail art?
A: Achieving straight lines is vital for geometric nail art. You can use striping tape to help create precise lines. First, apply a base color and let it dry completely. Then, place the striping tape in the desired pattern on your nails, ensuring it adheres well. Paint over the tape with a contrasting color, and once it’s dry, carefully remove the tape to reveal clean lines. If you prefer freehand designs, use a fine brush to paint the lines slowly and steadily, allowing each section to dry before adding the next.
Q: What techniques can I use to add depth to my geometric nail art?
A: To add depth to your geometric nail art, try using techniques such as layering and shading. Start with a base coat, then apply one or two base colors for your geometric shapes. After that, you can create a 3D effect by using lighter or darker shades of the same color to add dimension. For example, use a lighter polish to highlight certain areas and a darker shade to create shadows. You can also incorporate glitter or metallic polishes to enhance the design further. Applying a matte top coat over certain areas while keeping others glossy can create an interesting contrast and more depth in your artwork.