Over the years, coffin nails have become a popular choice for those looking to express their style while maintaining elegance. If you want to master this chic look, it’s necessary to understand the techniques and tools you’ll need for shaping your nails to perfection. In this guide, you’ll discover step-by-step instructions that will help you achieve the ideal coffin shape, tailored to the unique structure of your nails. Get ready to impress with flawless, on-trend coffin nails that highlight your personality and flair!
Key Takeaways:
- File Angles: Use a straight-edge file at a 45-degree angle to create the sharp edges characteristic of coffin nails.
- Length and Shape: Ensure the nail length is long enough for the coffin shape, tapering it gradually towards the tip.
- Buffing Techniques: Smooth the surface after shaping to achieve a flawless finish, enhancing the overall look of the nails.
Understanding Coffin Nails
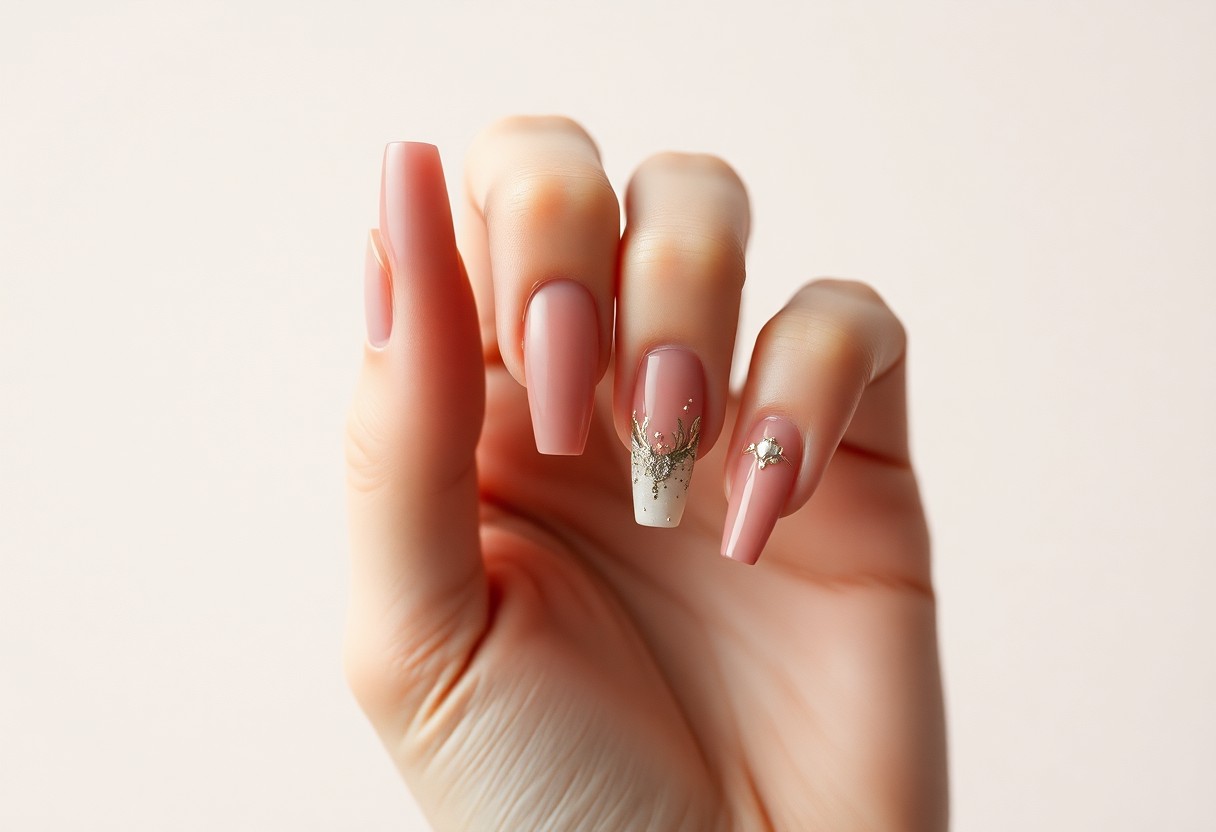
To achieve stunning nails, it’s important to understand coffin nails, a stylish and modern shape that blends elegance with a bold look. This nail style features a straight edge and a tapered tip, resembling a coffin or a modern box. Characterized by its length and dramatic silhouette, coffin nails can be customized in various lengths and finishes, allowing you to showcase your personality and creativity.
Definition and Characteristics
Before stepping into how to achieve the perfect coffin nail shape, it’s important to explore its definition and characteristics. Coffin nails are typically long and feature square tips, creating a unique and sophisticated appearance. This shape is perfect for those who want a chic yet edgy look, allowing for creative nail art and designs that add individuality to your style.
Popularity and Trends
Around the world, coffin nails have gained immense popularity among fashion enthusiasts and influencers, making them a trendy choice for manicures. Their versatility allows them to be styled in many ways, from elegant to bold, catering to various preferences and occasions. Many people choose coffin nails to express their unique personality and elevate their overall look.
Characteristics of coffin nails have made them a favored trend in the beauty community. The shape not only flatters various hand sizes but also offers a chic canvas for nail art, designs, and intricate embellishments. Celebrities and social media influencers often showcase coffin-shaped nails, inspiring others to embrace this trendy look. As a result, you can find countless variations in colors and styles, making coffin nails suitable for both casual and formal settings.
Preparing Your Nails for Shaping
You will want to start by ensuring your nails are clean and free from any polish or product buildup. Gently push back your cuticles and trim any excess skin around the nail bed, as this will allow for a smooth application and perfect shaping. Take the time to check for any breaks or splits in your nails and address these accordingly. A clean canvas is important when transitioning to the striking coffin nail shape!
Nail Health and Maintenance
Health is paramount for achieving and maintaining beautiful coffin nails. Regularly moisturize your cuticles and nails to prevent dryness and brittleness. Incorporate a balanced diet rich in vitamins and minerals, such as biotin, which promotes nail strength. Establishing a routine for nail care can help you avoid problems and ensure they remain healthy and resilient as you shape them into the perfect coffin style.
Tools and Products Needed
By having the right tools and products at your disposal, you can streamline the process of achieving perfect coffin nails. Essential items include a quality nail file, cuticle remover, nail clippers, a buffer, and a top coat for a shiny finish. You may also consider using a base coat and nail strengthener for added protection.
A well-equipped nail kit can make all the difference when shaping coffin nails. Opt for a fine-grit nail file for precise shaping and smoothing, while a buffer helps achieve a polished finish. Don’t overlook the importance of cuticle oil to nourish your cuticles after shaping, as well as a high-quality top coat to seal in your stunning new coffin nail shape. Having these tools and products ready will elevate your nail care routine and deliver stunning results.
Step-by-Step Guide to Achieving the Coffin Shape
Now you can master the coffin nail shape with this easy-to-follow guide. This detailed table breaks down the process into simple steps, ensuring you achieve perfect results.
| Steps | Instructions |
|---|---|
| 1. Start with Length | Choose your desired length for the nails; longer nails work best for coffin shape. |
| 2. Shape the Tips | Begin filing from the side towards the center, creating a tapered look. |
| 3. Achieve the Coffin Shape | File the tip straight across to form the ‘coffin’ end. |
| 4. Smooth the Edges | Use a buffer to smooth all surfaces for a polished finish. |
Filing Techniques
Guide yourself through effective filing techniques. Use a fine-grit file to minimize chipping while refining the shape. Ensure that you file in one direction rather than back and forth to maintain the integrity of your nails. This method promotes smooth edges and reduces breakage, leading to a flawless result.
Shaping with Precision
About fine-tuning your coffin shape, it’s crucial to focus on symmetry and balance. Start by slightly angling your file towards the center of the nail as you shape the edges. Check both hands frequently to ensure consistency, adjusting your technique as needed to maintain an even look.
Another vital aspect of shaping with precision is the use of a straight-edge file at the tip. This allows you to create a distinct and sharp end characteristic of coffin nails. Take your time and ensure that you are attentive to detail during this process, as it will greatly enhance the overall appearance of your nails.
Common Mistakes to Avoid
Unlike other nail shapes, achieving the perfect coffin nail requires precision and awareness of common pitfalls. Many people underestimate the importance of symmetry and end up with uneven edges. Additionally, using improper tools or techniques can lead to damage and an unsatisfactory finish. By being aware of these mistakes, you can ensure your coffin nails look stunning and professional.
Over-Filing
Common mistakes in filing often arise from over-filing your nails, which can weaken their structure and lead to breakage. Aim for a balanced approach, gently shaping the edges without taking too much length or thinning the nail plate.
Neglecting Nail Care
With coffin nails, it’s easy to focus solely on the shape and design while overlooking the health of your nails. Regular maintenance is crucial for longevity and appearance.
Plus, incorporating a dedicated nail care routine is vital for achieving perfect coffin nails. Use a good base coat to protect your natural nails and keep them moisturized with cuticle oil. Avoid excessive exposure to harsh chemicals and always wear gloves during household chores. By nourishing your nails and maintaining their health, you’ll ensure your coffin shape remains intact and vibrant for longer.
Finishing Touches
For achieving the perfect coffin nail shape, the final details can make all the difference. Once you have perfected the length and shape, it’s vital to refine your nails for a polished look. This includes buffing the surface to smooth any imperfections and applying a quality top coat that adds shine while protecting your design. A well-executed finishing touch not only enhances the appearance but also prolongs the life of your manicure.
Polishing and Top Coats
After shaping your coffin nails, focus on polishing. Begin with a base coat to prevent staining and enhance adhesion, followed by two layers of your chosen polish color. Finish off with a top coat to seal in your design and create a glossy finish. This layer helps to prevent chips and keeps your nails looking freshly manicured, ensuring they remain stunning for weeks.
Nail Art Ideas
For those looking to add a personal touch to their coffin nails, nail art offers endless possibilities. Whether you prefer simple designs or intricate patterns, your coffin shape provides a fantastic canvas. Experiment with nail stickers, delicate lines, or even ombre effects to showcase your style. You can also try incorporating gemstones or glitter for added flair, allowing your individuality to shine through.
The versatility of coffin nails means you can adopt various nail art ideas to suit any occasion. Consider seasonal themes for holidays, or choose colors and designs that reflect your mood. Don’t shy away from experimenting with mixed textures, such as matte and glossy finishes or combining different art techniques. Your nails are a canvas to express your creativity, so feel free to let your imagination run wild!
Maintenance and Longevity
Despite the stunning look of coffin nails, maintaining their shape and shine is necessary for longevity. Regular upkeep will prevent any chips or breakage, allowing you to enjoy your nails for longer. Be diligent about scheduling fills every two to three weeks, and keep a nail file and buffer handy at home for quick touch-ups. Additionally, using a high-quality topcoat will help preserve the finish and protect your nails from daily wear and tear.
Touch-Up Techniques
Among the best touch-up techniques are using a fine-grit buffer to smooth out any rough edges and reapplying topcoat weekly. You can also use a nail glue for any minor chips; this quick fix keeps your nails looking pristine while you wait for your next appointment. Don’t hesitate to file any uneven areas gently to maintain the coffin shape; it can significantly enhance the overall appearance of your nails.
Keeping Up with Growth
With regular nail growth, the gap between your cuticle and the acrylic or gel application will become noticeable. To keep your coffin nails looking fresh, it’s necessary to close this gap as soon as it becomes evident.
Maintenance of your coffin nails involves timely fills and addressing growth gaps promptly. As your natural nails grow, the acrylic extensions can look less appealing if left unattended. During your fill appointments, your nail technician will typically reshape and refinish your nails, ensuring they maintain that perfect coffin silhouette. In between visits, gentle filing and regular application of cuticle oil can help keep your nails healthy and encourage even growth, making it easier to maintain their beauty over time.
To wrap up
With these considerations, you can confidently achieve the perfect coffin nail shape that enhances your personal style. Focus on the desired length, ensure your prep work is thorough, and utilize the right filing techniques to create that flattering tapered look. By choosing the right tools and practicing your skills, you’ll be on your way to showcasing beautifully sculpted nails that complement any outfit. Whether you opt for DIY or a salon visit, your nails will make a statement with this trendy shape.
FAQ
Q: What are coffin nails and how do they differ from other nail shapes?
A: Coffin nails, also known as ballerina nails, feature a tapered shape that extends towards the top, where they are squared off. This style is distinct from others like oval or almond nails that have more rounded tips, and from square nails that have straight tips without the tapering.
Q: What tools do I need to shape my nails into a coffin shape?
A: To achieve the perfect coffin nails, you will need a few crucial tools: a nail file (preferably a fine-grit one), nail clippers, a buffer, and possibly dual forms or nail tips if you’re applying acrylics or gels. A good quality base and top coat will also enhance the finished look.
Q: How do I start shaping my nails into the coffin style?
A: Begin by trimming your nails to a desired length with nail clippers. Next, use the nail file to create the tapered shape by filing the sides of the nails at an angle, leaving the top straight. Consistently check both sides to ensure evenness. Finally, buff the edges to smooth and refine the shape.
Q: Can coffin nails be done on natural nails, or do I need enhancements?
A: Coffin nails can be shaped on both natural nails and enhancements such as acrylics or gels. If you’re working with natural nails, keep in mind that they do need to be strong enough to support the shape. Otherwise, adding extensions is a great way to achieve the look without risk of breakage.
Q: How can I maintain the coffin shape of my nails after achieving it?
A: To maintain the coffin shape, regularly file your nails as they grow out, ensuring to keep the sides tapered and the tips square. Using a top coat can provide extra strength and prevent chipping. It’s also important to keep your nails moisturized to prevent breakage, which can affect the shape.